
%27%20fill%3D%27%23E95420%27%3E%3Cpath%20d%3D%27m15.839%205.293-1.447-2.8a.136.136%200%200%200-.051-.055.144.144%200%200%200-.074-.02h-5.8a.143.143%200%200%200-.091.03.13.13%200%200%200-.034.17.138.138%200%200%200%20.072.06l7.251%202.8a.144.144%200%200%200%20.17-.054.13.13%200%200%200%20.007-.13l-.003-.001ZM11.839%204.945.073.223A.073.073%200%200%200%20.026.221a.07.07%200%200%200-.038.027.065.065%200%200%200%20.007.086l7.962%208.182a.069.069%200%200%200%20.049.022.072.072%200%200%200%20.047-.019l3.805-3.461a.066.066%200%200%200%20.02-.061.065.065%200%200%200-.014-.03.07.07%200%200%200-.028-.02l.003-.002ZM5.382%207.183a.071.071%200%200%200-.062-.022.07.07%200%200%200-.03.011.067.067%200%200%200-.023.025l-4.13%207.696a.065.065%200%200%200-.005.046.068.068%200%200%200%20.027.038.072.072%200%200%200%20.09-.006L7.13%209.18a.066.066%200%200%200%200-.087l-1.75-1.91Z%27%2F%3E%3C%2Fg%3E%3Cdefs%3E%3CclipPath%20id%3D%27a%27%3E%3Cpath%20fill%3D%27%23fff%27%20d%3D%27M0%200h15.83v15.21H0z%27%2F%3E%3C%2FclipPath%3E%3C%2Fdefs%3E%3C%2Fsvg%3E)

%27%20fill%3D%27%23E95420%27%3E%3Cpath%20d%3D%27M1.936%202.592c.668%200%201.21-.515%201.21-1.151S2.604.29%201.936.29C1.267.29.726.805.726%201.44c0%20.637.541%201.152%201.21%201.152ZM14.56.576H3.404a1.587%201.587%200%200%201%20.024%201.69l-.026.04h11.156a.56.56%200%200%200%20.386-.15.518.518%200%200%200%20.16-.369v-.692a.502.502%200%200%200-.16-.369.543.543%200%200%200-.386-.15ZM1.936%206.701c.668%200%201.21-.515%201.21-1.15%200-.637-.542-1.152-1.21-1.152-.669%200-1.21.515-1.21%201.151s.541%201.151%201.21%201.151ZM14.56%204.685H3.404a1.612%201.612%200%200%201%20.242%201.083c-.03.215-.105.421-.219.608l-.026.04h11.157a.56.56%200%200%200%20.386-.15.518.518%200%200%200%20.16-.37v-.692a.5.5%200%200%200-.16-.369.542.542%200%200%200-.386-.15ZM1.936%2010.81c.668%200%201.21-.515%201.21-1.15%200-.637-.542-1.152-1.21-1.152-.669%200-1.21.515-1.21%201.151s.541%201.151%201.21%201.151ZM14.56%208.795H3.404a1.611%201.611%200%200%201%20.243%201.082%201.581%201.581%200%200%201-.245.648h11.156a.559.559%200%200%200%20.386-.15.517.517%200%200%200%20.16-.37v-.692a.502.502%200%200%200-.16-.368.543.543%200%200%200-.386-.15ZM1.936%2014.92c.668%200%201.21-.515%201.21-1.15%200-.637-.542-1.152-1.21-1.152-.669%200-1.21.515-1.21%201.151s.541%201.151%201.21%201.151ZM14.56%2012.904H3.404a1.611%201.611%200%200%201%20.242%201.082%201.58%201.58%200%200%201-.219.608l-.026.04h11.157a.562.562%200%200%200%20.386-.15.517.517%200%200%200%20.16-.37v-.692a.5.5%200%200%200-.16-.369.543.543%200%200%200-.386-.15Z%27%2F%3E%3C%2Fg%3E%3Cdefs%3E%3CclipPath%20id%3D%27a%27%3E%3Cpath%20fill%3D%27%23fff%27%20d%3D%27M0%200h15.83v15.21H0z%27%2F%3E%3C%2FclipPath%3E%3C%2Fdefs%3E%3C%2Fsvg%3E)
%27%20fill%3D%27%23E95420%27%3E%3Cpath%20d%3D%27M9.618.272c-.634%200-1.243.243-1.691.674-.448.43-.7%201.015-.701%201.624v4.221a1.9%201.9%200%200%201%201.362%200v-4.22a.955.955%200%200%201%20.291-.72%201.067%201.067%200%200%201%201.479%200%20.955.955%200%200%201%20.29.719v.962h1.363V2.57c0-.61-.253-1.194-.702-1.625A2.445%202.445%200%200%200%209.618.272ZM9.017%208.433c0%20.21-.065.417-.187.593a1.102%201.102%200%200%201-.499.393c-.203.08-.426.102-.642.06a1.125%201.125%200%200%201-.568-.292%201.055%201.055%200%200%201-.304-.547%201.028%201.028%200%200%201%20.064-.616c.084-.195.226-.362.41-.479a1.143%201.143%200%200%201%201.401.133c.103.1.185.217.24.347.057.129.085.268.085.408ZM2.773%205.855c-.634.001-1.242.244-1.69.674C.633%206.96.381%207.545.38%208.154v4.082a1.901%201.901%200%200%201%201.363%200V8.154a.955.955%200%200%201%20.29-.719%201.067%201.067%200%200%201%201.479%200%20.955.955%200%200%201%20.29.719v.962h1.363v-.962c0-.61-.253-1.194-.702-1.625a2.444%202.444%200%200%200-1.69-.674ZM2.166%2013.878c0%20.21-.065.415-.186.59-.121.174-.294.31-.496.39-.202.08-.424.102-.638.06a1.119%201.119%200%200%201-.565-.29%201.049%201.049%200%200%201-.302-.543c-.043-.206-.02-.42.063-.614.084-.194.225-.36.407-.476a1.136%201.136%200%200%201%201.394.133%201.024%201.024%200%200%201%20.323.75Z%27%2F%3E%3Cpath%20d%3D%27M14.752%204.76a1.789%201.789%200%200%201-.681-.126v2.411a.972.972%200%200%201-.312.682c-.193.179-.45.28-.718.28-.268%200-.526-.101-.718-.28a.972.972%200%200%201-.312-.682V4.32h-1.363v2.726c0%20.61.252%201.195.7%201.626a2.443%202.443%200%200%200%201.692.673c.635%200%201.244-.242%201.692-.673.449-.431.7-1.016.7-1.626v-2.41a1.9%201.9%200%200%201-.68.125ZM15.858%202.822c.037.225%200%20.455-.107.658a1.1%201.1%200%200%201-.49.472%201.161%201.161%200%200%201-1.302-.198%201.04%201.04%200%200%201-.206-1.251%201.1%201.1%200%200%201%20.492-.47%201.161%201.161%200%200%201%201.299.199c.166.16.276.366.314.59ZM7.907%2010.2c-.233%200-.465-.042-.681-.126V12.6a.97.97%200%200%201-.302.7%201.05%201.05%200%200%201-.728.29%201.05%201.05%200%200%201-.728-.29.97.97%200%200%201-.302-.7V9.845H3.804V12.6c0%20.61.252%201.194.7%201.625a2.443%202.443%200%200%200%201.692.674c.634%200%201.243-.243%201.692-.674.448-.43.7-1.015.7-1.625v-2.526a1.887%201.887%200%200%201-.68.127Z%27%2F%3E%3C%2Fg%3E%3Cdefs%3E%3CclipPath%20id%3D%27a%27%3E%3Cpath%20fill%3D%27%23fff%27%20d%3D%27M0%200h15.83v15.21H0z%27%2F%3E%3C%2FclipPath%3E%3C%2Fdefs%3E%3C%2Fsvg%3E)

Install Ubuntu Core with Raspberry Pi Imager
Ubuntu Core runs on a large range of hardware, and pre-built images are available for amd64 and Raspberry Pi reference platforms.
Installation on a reference platform is easy and a great way to quickly get started with Ubuntu Core, or to explore Ubuntu Core’s features and evaluate its potential.
Below, we cover how to install a pre-built image of the latest version of Ubuntu Core on a Raspberry Pi 3, 4 or 5. It requires no previous Ubuntu Core experience.
At the end of this tutorial, you’ll be able to connect to your Raspberry Pi, install and configure applications, safe in the knowledge that Ubuntu Core will automatically keep your device updated and secure.
- Requirements
- 1. Write the image to a microSD card
- 2. Boot Ubuntu Core for the first time
- 3. Configure a network connection
- 4. Add Ubuntu SSO details
- 5. Connect to the device
Installation is very similar across each supported Ubuntu Core device. See Supported platforms for a list of which images are available for which platforms.
Requirements
This tutorial is suitable for anyone with an interest in Ubuntu Core - no prior knowledge necessary, but you will need a few things first:
- A Raspberry Pi model 3, 4 or 5.
- A macOs, Windows or Linux computer with a microSD card reader.
- 4GB+ microSD card (this will be erased, so make sure it’s backed up).
- Connected screen and keyboard for installation.
- An Ubuntu SSO account with associated SSH keys.
A pre-built Ubuntu Core image does not use a username and password to login to the system. It instead uses SSH and your public SSH key, which is uploaded to your Ubuntu One account. This is handled by the console-conf snap bundled in pre-built test images. SSH is otherwise not a requirement for Ubuntu Core images. See Connect to Ubuntu Core with SSH for further details.
Alongside enough storage to hold the Ubuntu Core image, you will need a screen and keyboard connected to the Raspberry Pi. These are needed to navigate a few installation prompts, but neither are needed after setup has been completed.
After Ubuntu Core is up and running, if you want to access your device remotely, you’ll need an SSH client for your operating system. Linux and macOS both have clients built-in, whereas Windows users can use Ubuntu on WSL.
Both SSH and the network configuration become optional when building a custom image.
1. Write the image to a microSD card
We’re going to use the Raspberry Pi Foundation’s Raspberry Pi Imager to write the Ubuntu Core image to the microSD card. Raspberry Pi Imager both downloads and safely installs an image to your microSD card.
Download and install Raspberry Pi Imager from one of the following locations:
- Official download page: https://www.raspberrypi.org/software
- Snap package for Linux users: https://snapcraft.io/rpi-imager
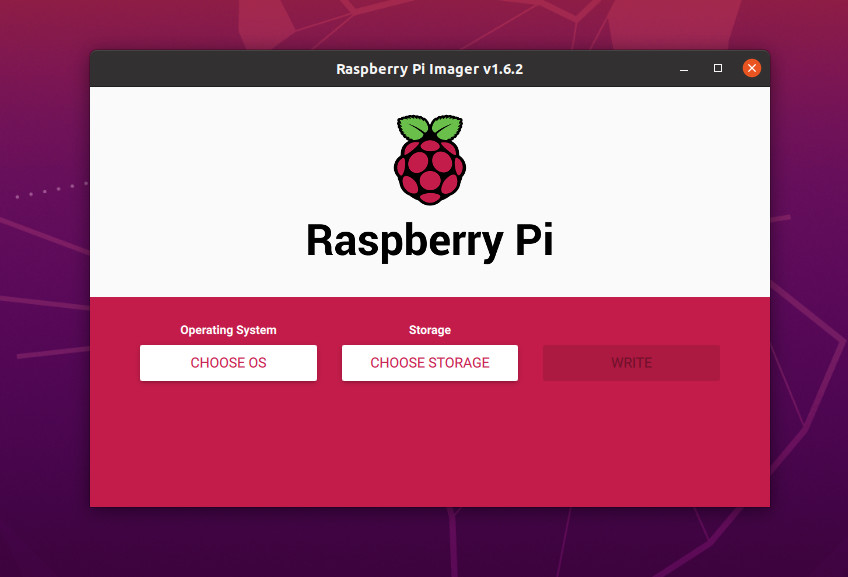
After it’s installed and running, you will see its main window showing buttons for the three step download and write process:
-
Select Choose OS and a pop-up list appears. Scroll down and select Other general-purpose OS followed by Ubuntu. Now scroll to the bottom of the Ubuntu list and select Ubuntu Core 24 (64-bit).
You can alternatively download the image manually (ubuntu-core-24-arm64+raspi.img.xz) and instead choose Use custom from bottom of the Choose OS menu. In the file requester that appears, select the image you just downloaded. The xz file can be selected without being decompressed first.
-
Select Choose Storage and insert your microSD if you haven’t already. Now select the device from the list.
-
Finally, select Write. A warning will state that all data on your selected device will be erased, so it’s worth double checking your selection was correct. Select Yes if you’re sure. You may then be asked for your password before the download, write and verification processes begin.
When the process has finished, Raspberry Pi Imager will proclaim “Write Successful” and you can remove the card from the reader. It’s now ready to be inserted into your Raspberry Pi.
3. Boot Ubuntu Core for the first time
You can now insert the microSD card into your powered-off Raspberry Pi and power-on the device.
From this point, it can take around five minutes for the system to instantiate itself. You will see typical Linux output on the screen, periods where there’s just a flashing cursor, and messages like Installing the system, please wait for a reboot. When this process has finished, you will see the following:
Press enter to configure.
Press Enter and you will see a prompt that reads:
Ubuntu Core
Configure the network and setup an administrator account on this all-snap
Ubuntu Core system.
Press Enter again and you will be taken to the network setup page:
3. Configure a network connection
Network access is a requirement for Ubuntu Core, at least initially, and you have a choice about whether to use a wired connection (Ethernet) or Wi-Fi, if your Raspberry Pi supports it.
Wi-Fi
There is currently a Linux kernel bug that outputs the above failure messages to the screen. These messages can be safely ignored. The bug causing the errors will be fixed in a future release.
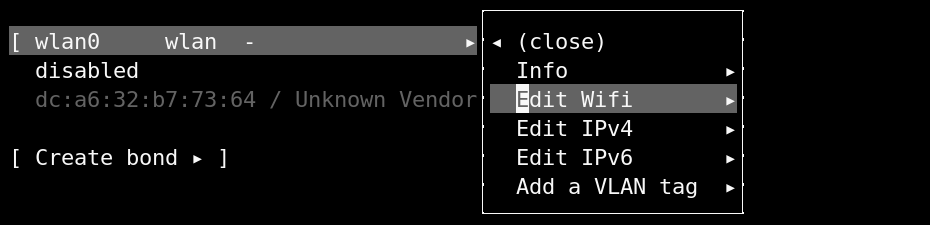
This is the most common option. If you have a device with Wi-Fi capabilities, such as a Raspberry Pi 3 or 4, it will appear as a separate network device called wlan0 beneath any Ethernet devices.

To configure Wi-Fi, press the cursor up key until wlan0 is selected and press Enter. You will see a small menu and you need to select Edit Wifi.
After selecting Edit Wifi, you will see the network interface configuration panel for Wi-Fi. If you know the name of the Wi-Fi network you wish to connect to, it can be entered directly, or cursor down to Choose a visible network and select a network from a list of those that have been detected.
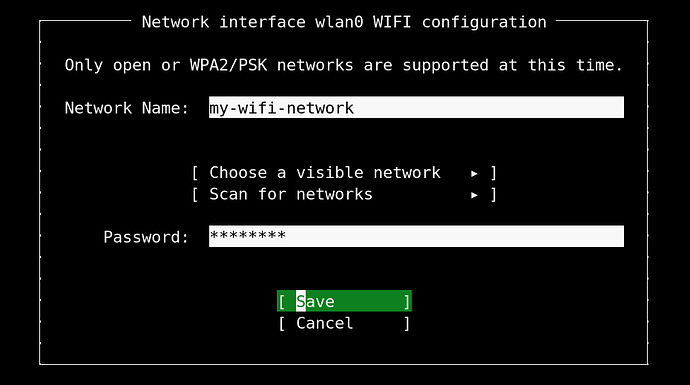
Finally, enter the Wi-Fi password and select Save to complete the configuration. You will be returned to the previous menu and your device will attempt to connect to the network. If successful, you will see its IP address to the right of DHCPv4.

For advanced network configuration, such as setting a static IP address, select the wlan0 device again, and choose edit IPv4 from the menu.
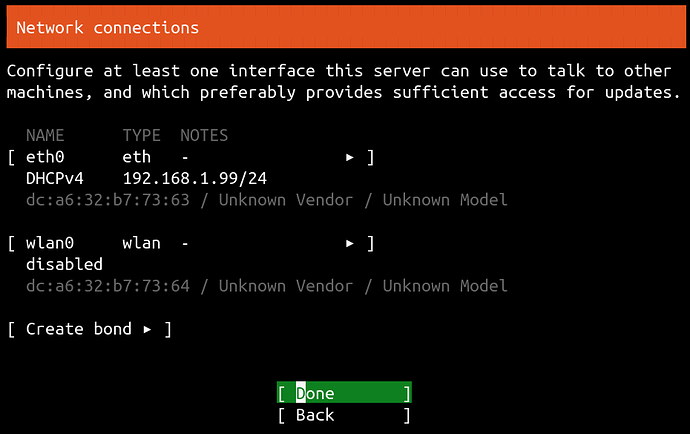
When you’ve finished configuring your network settings, select Done and press enter on the Network connections page to move on to the final step.
Ethernet
If an Ethernet cable is connected to your device, a network connection will attempt to be automatically negotiated and, if this is successful, you will see an IP address for the device after the DHCPv4 entry in the Network connections page. In this case, you don’t need to do anything further:

To configure an Ethernet connection manually, select the eth0 device and select Edit IPv4 from the small menu that appears. By default, the network device will be configured to use Automatic (DHCP), which is why the connection attempts to automatically configure itself. Press Enter to reveal two further options, Manual and Disabled:
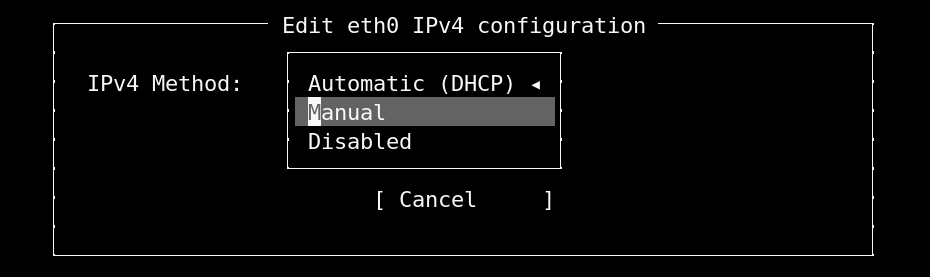
Selecting Manual will allow you to configure your Ethernet connection manually by entering values for your subnet mask value (using CIDR xx.xx.xx.xx/yy notation), the static IP address of your device, the network gateway, and the name servers you wish to use:
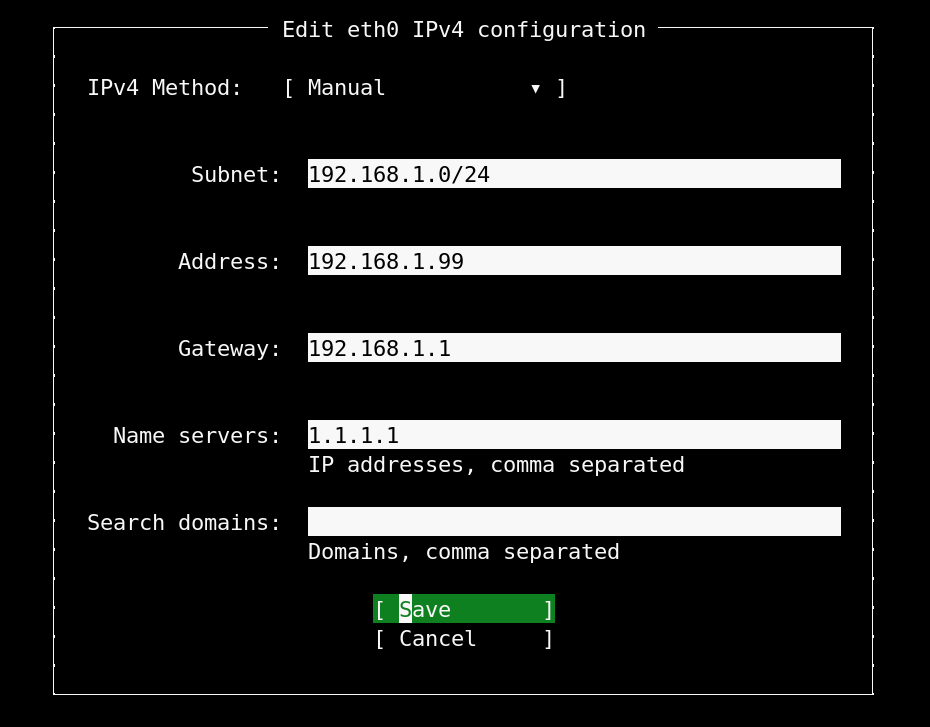
Select Save to apply those changes and for the connection to be attempted. You can now proceed to the next step by pressing Done.
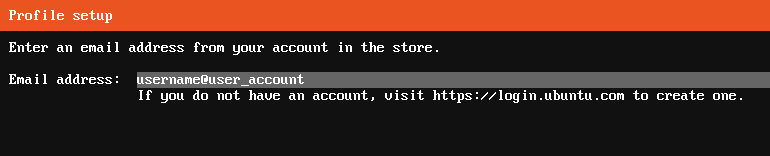
4. Add Ubuntu SSO details
This is the final step before completing the Ubuntu Core setup and you simply need to enter the email address linked to your Ubuntu SSH account.
As mentioned earlier, your account is used to link its registered SSH keys to the new device deployment and allow you to connect without any further device configuration.
With your username registered across the network, you will see a message similar to the following:
This device is registered to <ubuntu-sso-email-address>

Remote access was authenticated with SSO user <username>.
Public SSH keys were added to the device for remote access.

<ubuntu-sso-email-address> can connect remotely to this device via SSH:

ssh <username>@<ip-address>
Everything is now configured and you’re ready to connect to the device.
5. Connect to the device
If a display is connected, the network addresses and associated account username will be shown.
You can now connect to your Ubuntu Core machine with the ssh command and your username followed by the IP address of your device:
ssh <username>@<device ip address>
For example:
$ ssh user@10.0.2.15
The authenticity of host '192.168.1.68 (192.168.1.68)' can't be established.
ED25259 key fingerprint is SHA256:VD5KH7hM5RxQ15mM70zyJvgmg.
This key is not known by any other names
Are you sure you want to continue connecting (yes/no/[fingerprint])? yes
Warning: Permanently added '192.168.1.68' (ED25259) to the list of known hosts.
[...]
This Ubuntu Core machine is a tiny, transactional edition of Ubuntu,
designed for appliances, firmware and fixed-function VMs.
As shown above, the first time you connect to a new device you will be asked to accept its authenticity. You can check the ECDSA key fingerprint against the finger print shown on the screen after a first reboot. ECDSA is the second one listed.
Congratulations! You have successfully downloaded, installed, and connected to a pre-built Ubuntu Core image on your Raspberry Pi.
See First steps with Ubuntu Core for an introduction to using your new Ubuntu Core installation or learn how to build your Ubuntu Core image.