
Automate the deployment of Kubernetes in existing AWS infrastructure

Samuel Cozannet
on 8 February 2017
Tags: Amazon Web Services , AWS , Charmed Kubernetes , docker , Juju , kubernetes
When I talk about Ubuntu and Kubernetes, and how we deploy the latter at Canonical using Juju, the main question I get is: Can you deploy in an existing infrastructure?
Often, existing infrastructure means the VPC and/or subnets that I have been allocated to do my work on AWS.
What is better than a little hands on to explain how Juju can interact with your infrastructure, and leverage a predefined network environment?
The rest of this post assumes that:
- You have access to an AWS account that can provision VMs and create network infrastructure
- You are familiar with Kubernetes in general
- You are familiar with AWS infrastructure
- You have notions of CloudFormation
- You understand Juju concepts, and have the client installed on your work machine
About this last point, as a reminder, if you have not yet installed Juju, do it by entering the following commands on an Ubuntu 16.04 machine or VM
sudo apt-add-repository ppa:juju/stable
sudo apt-add-repository ppa:conjure-up/next
sudo apt update && apt upgrade -yqq
sudo apt install -yqq juju conjure-up
for other OSes, lookup the official docs
Then to connect to the AWS cloud with your credentials, read this page
Now that you are ready, this is what we are going to do:
- Deploy a network environment made of a VPC, public subnets and private subnet via CloudFormation. This will be our “existing infrastructure”
- Bootstrap a Juju Controller in that VPC
- Setup Juju to understand the network layout
- Deploy Kubernetes in that environment, with PKI node and etcd nodes in the private subnets, and Master and Worker nodes in the public subnets
- We’ll open a few ports for our worker nodes, deploy a sample application and expose it via an ingress in k8s.
Deploying the Network stack with CloudFormation
The target is to deploy a multi AZ cluster to achieve a proper level of HA between our worker nodes and the control plane.
The design below shows
- 2x public subnets, in 2 different AZs
- 2x private subnets, also in 2 different AZs
- 1 public gateway, that will be used to connect the public subnets to Internet
- 1x private NAT gateway, to allow connectivity from the private subnets to Internet

This Cloudformation template defines all these. We deploy it using the GUI of AWS, going to CloudFormation and creating a new stack as shown on the images below.
Juju will require the following setup:
- VPC should be in “available” state and contain one or more subnets.
- An Internet Gateway (IGW) should be attached to the VPC.
- The main route table of the VPC should have both a default route to the attached IGW and a local route matching the VPC CIDR block.
- At least one of the VPC subnets should have MapPublicIPOnLaunch attribute enabled (i.e. at least one subnet needs to be ‘public’).
- All subnets should be implicitly associated to the VPC main route table, rather than explicitly to per-subnet route tables.
First let us select the JSON file

Add a few information
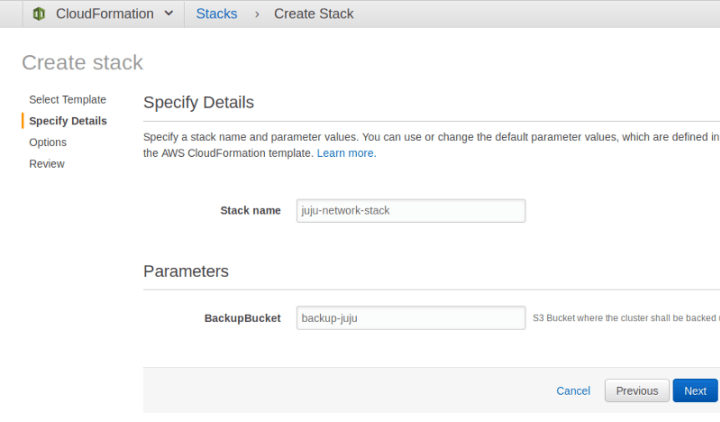
Add a few options
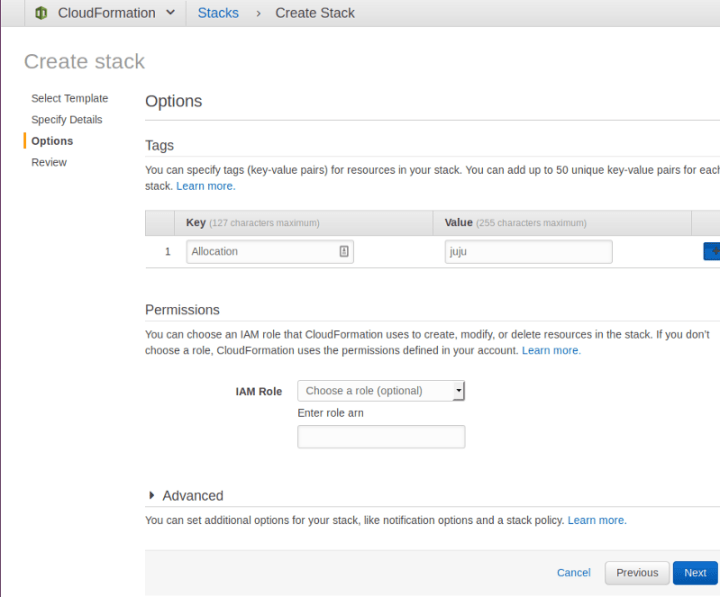
and voilàààà! Now we have a nice setup with private and public subnets in a given VPC.
Now let us bring up Kubernetes in our new setup
Bootstrapping Juju
Bootstrap a Juju Controller with:
juju bootstrap aws/us-west-2 k8s-us-west-2 \
 --config vpc-id=vpc-fa6dfa9d --config vpc-id-force=true \
 --to "subnet=subnet-bb1ab2dc" \
 --bootstrap-constraints "root-disk=128G mem=8G" \
 --credential canonical \
 --bootstrap-series xenial
Which will output something like:
WARNING! The specified vpc-id does not satisfy the minimum Juju requirements,
but will be used anyway because vpc-id-force=true is also specified.
Using VPC "vpc-fa6dfa9d" in region "us-west-2"
Creating Juju controller "k8s-us-west-2" on aws/us-west-2
Looking for packaged Juju agent version 2.1-beta5 for amd64
Launching controller instance(s) on aws/us-west-2...
 - i-001a9dce9beb162fd (arch=amd64 mem=8G cores=2)
Fetching Juju GUI 2.2.7
Waiting for address
Attempting to connect to 52.34.249.95:22
Attempting to connect to 10.0.1.254:22
Logging to /var/log/cloud-init-output.log on the bootstrap machine
Running apt-get update
Running apt-get upgrade
Installing curl, cpu-checker, bridge-utils, cloud-utils, tmux
Fetching Juju agent version 2.1-beta5 for amd64
Installing Juju machine agent
Starting Juju machine agent (service jujud-machine-0)
Bootstrap agent now started
Contacting Juju controller at 10.0.1.254 to verify accessibility...
Bootstrap complete, "k8s-us-west-2" controller now available.
Controller machines are in the "controller" model.
Initial model "default" added.
At this point, Juju doesn’t know about the mapping of private and public subnets, we need to teach it what it is. Create 2 spaces with identifiable and meaningful names:
juju add-space public
added space "public" with no subnets
juju add-space private
added space "private" with no subnets
Now identify the subnets that are private from those that are public. Use the MapPublicIpOnLaunch property of the subnet as a discriminating factor
# Resolves private subnets:
aws ec2 describe-subnets \
 --filter Name=vpc-id,Values=vpc-56416e32 \
 | jq --raw-output \
 '.[][] | select(.MapPublicIpOnLaunch == false) | .SubnetId'
subnet-ba1ab2dd
subnet-f44486bd
And
# Resolves private subnets:
aws ec2 describe-subnets \
 --filter Name=vpc-id,Values=vpc-56416e32 \
 | jq --raw-output \
 '.[][] | select(.MapPublicIpOnLaunch == false) | .SubnetId'
subnet-ba1ab2dd
subnet-f44486bd
Add the subnets to their respective space
juju add-subnet subnet-ba1ab2dd private
added subnet with ProviderId “subnet-ba1ab2dd” in space “private”
juju add-subnet subnet-f44486bd private
added subnet with ProviderId “subnet-f44486bd” in space “private”
juju add-subnet subnet-bb1ab2dc public
added subnet with ProviderId “subnet-bb1ab2dc” in space “public”
juju add-subnet subnet-f24486bb public
added subnet with ProviderId “subnet-f24486bb” in space “public”
Now Juju knows the mapping of your design in AWS. You are now ready to deploy Kubernetes.
Deploying Kubernetes
Quick summary of the design targets
- etcd, PKI must be in a private subnet
- Master will be in a public subnet to expose the API. In a more production environment, you may want to deploy it in the private space, and add a public ELB to expose 6443.
- Workers must be in a public subnet. Again, in a more production environment, you will want to put it in a private space, and expose a public ELB.
- etcd must be HA so 3+ units, can fit on t2.small but for resilience m3.medium is better suited (t2.small tend to get shot in the head pretty often by AWS).
- Workers must be scaled so 3 units as well, can use m4.large instances for a standard combination of CPU/RAM/Network, have a minimum of 64GB root disk to welcome many Docker images
- We will operate a Single Master for this simple deployment but need to scale later, hence adding a load balancer (Juju allows to do that later).
Ready? In juju 2.0.x, you have to deploy manually so network spaces constraints are taken into account
First, deploy your support applications with:
juju deploy --constraints "instance-type=m3.medium spaces=private" cs:~containers/etcd-23
juju deploy --constraints "instance-type=m3.medium spaces=private" cs:~containers/easyrsa-6
Now enforce your constraints and scale out etcd
juju set-constraints etcd "instance-type=m3.medium spaces=private"
juju add-unit -n2 etcd
Now, deploy the Kubernetes Core applications, enforce constraints and scale out:
juju deploy --constraints "cpu-cores=2 mem=8G root-disk=32G spaces=public" cs:~containers/kubernetes-master-11
juju deploy --constraints "instance-type=m4.xlarge spaces=public" cs:~containers/kubernetes-worker-13
juju deploy cs:~containers/flannel-10
juju set-constraints kubernetes-worker "instance-type=m4.xlarge spaces=public"
juju add-unit -n2 kubernetes-worker
Create the relations between the components:
juju add-relation kubernetes-master:cluster-dns kubernetes-worker:kube-dns
juju add-relation kubernetes-master:certificates easyrsa:client
juju add-relation etcd:certificates easyrsa:client
juju add-relation kubernetes-master:etcd etcd:db
juju add-relation kubernetes-worker:certificates easyrsa:client
juju add-relation flannel:etcd etcd:db
juju add-relation flannel:cni kubernetes-master:cni
juju add-relation flannel:cni kubernetes-worker:cni
juju add-relation kubernetes-worker:kube-api-endpoint kubernetes-master:kube-api-endpoint
and expose the master, to connect to the API, and the workers, to get access to the workloads:
juju expose kubernetes-master
juju expose kubernetes-worker
You can track the deployment with
watch -c juju status --colorand get a dynamic view on:
Model    Controller     Cloud/Region   Version
default  k8s-us-west-2  aws/us-west-2  2.1-beta5
App                Version  Status  Scale  Charm              Store       Rev  OS      Notes
easyrsa            3.0.1    active      1  easyrsa            jujucharms    6  ubuntu
etcd               2.2.5    active      3  etcd               jujucharms   23  ubuntu
flannel            0.7.0    active      4  flannel            jujucharms   10  ubuntu
kubernetes-master  1.5.2    active      1  kubernetes-master  jujucharms   11  ubuntu  exposed
kubernetes-worker  1.5.2    active      3  kubernetes-worker  jujucharms   13  ubuntu
Unit                  Workload  Agent  Machine  Public address  Ports           Message
easyrsa/0*            active    idle   2        10.0.251.198                    Certificate Authority connected.
etcd/0*               active    idle   1        10.0.252.237    2379/tcp        Healthy with 3 known peers.
etcd/1                active    idle   6        10.0.251.143    2379/tcp        Healthy with 3 known peers.
etcd/2                active    idle   7        10.0.251.31     2379/tcp        Healthy with 3 known peers.
kubernetes-master/0*  active    idle   0        35.164.145.16   6443/tcp        Kubernetes master running.
  flannel/0*          active    idle            35.164.145.16                   Flannel subnet 10.1.37.1/24
kubernetes-worker/0*  active    idle   3        52.27.16.150    80/tcp,443/tcp  Kubernetes worker running.
  flannel/3           active    idle            52.27.16.150                    Flannel subnet 10.1.11.1/24
kubernetes-worker/1   active    idle   4        52.10.62.234    80/tcp,443/tcp  Kubernetes worker running.
  flannel/1           active    idle            52.10.62.234                    Flannel subnet 10.1.43.1/24
kubernetes-worker/2   active    idle   5        52.27.1.171     80/tcp,443/tcp  Kubernetes worker running.
  flannel/2           active    idle            52.27.1.171                     Flannel subnet 10.1.68.1/24
Machine  State    DNS            Inst id              Series  AZ
0        started  35.164.145.16  i-0a3fdb3ce9590cb7e  xenial  us-west-2a
1        started  10.0.252.237   i-0dcbd977bee04563b  xenial  us-west-2b
2        started  10.0.251.198   i-04cedb17e22064212  xenial  us-west-2a
3        started  52.27.16.150   i-0f44e7e27f776aebf  xenial  us-west-2b
4        started  52.10.62.234   i-02ff8041a61550802  xenial  us-west-2a
5        started  52.27.1.171    i-0a4505185421bbdaf  xenial  us-west-2a
6        started  10.0.251.143   i-05a855d5c0c6f847d  xenial  us-west-2a
7        started  10.0.251.31    i-03f1aafe15d163a34  xenial  us-west-2a
Relation      Provides           Consumes           Type
certificates  easyrsa            etcd               regular
certificates  easyrsa            kubernetes-master  regular
certificates  easyrsa            kubernetes-worker  regular
cluster       etcd               etcd               peer
etcd          etcd               flannel            regular
etcd          etcd               kubernetes-master  regular
cni           flannel            kubernetes-master  regular
cni           flannel            kubernetes-worker  regular
cni           kubernetes-master  flannel            subordinate
kube-dns      kubernetes-master  kubernetes-worker  regular
cni           kubernetes-worker  flannel            subordinate
Here we can see how our nodes are spread across private and public subnets.
- All etcd and easyrsa have private IP addresses displayed like 10.0.X.Y where X is randomly distributed between 251 and 252 and Y is DHCP from AWS;
- All Master and Worker units have public IP addresses in 35.xx (first AZ) or 52.yy (second AZ).
As you can scale network spaces and subnets by your own, you can also label nodes in specific areas, in order to run specific workloads on them.
Getting control of the cluster
First download kubectl & the kubeconfig file from the master
mkdir ~/.kube
juju scp kubernetes-master/0:/home/ubuntu/kubectl ./
juju scp kubernetes-master/0:/home/ubuntu/config ./.kube/
chmod +x kubectl && mv kubectl /usr/local/bin/
Test that the connection is ok with:
kubectl get nodes --show-labels
NAME STATUS AGE LABELS
ip-10-0-1-54 Ready 18m beta.kubernetes.io/arch=amd64,beta.kubernetes.io/os=linux,kubernetes.io/hostname=ip-10-0-1-54
ip-10-0-1-95 Ready 18m beta.kubernetes.io/arch=amd64,beta.kubernetes.io/os=linux,kubernetes.io/hostname=ip-10-0-1-95
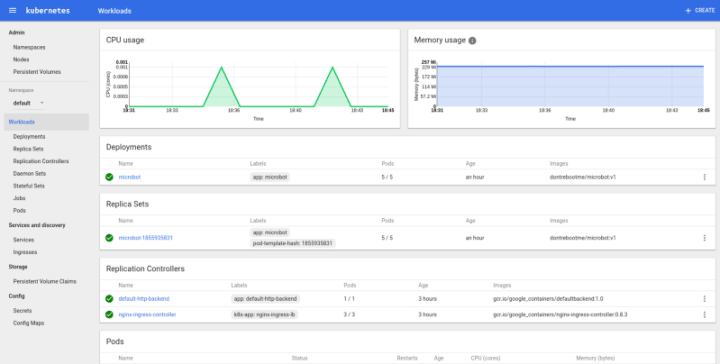
ip-10-0-2-43 Ready 18m beta.kubernetes.io/arch=amd64,beta.kubernetes.io/os=linux,kubernetes.io/hostname=ip-10-0-2-43Deploy the demo application (microbots)
juju run-action kubernetes-worker/0 microbot replicas=5
Action queued with id: 1a76d3f7-f82c-48ee-84f4-c4f77f3a453d
check the output
juju show-action-output 1a76d3f7-f82c-48ee-84f4-c4f77f3a453d
results:
  address: microbot.52.27.16.150.xip.io
status: completed
timing:
  completed: 2017-02-06 15:51:54 +0000 UTC
  enqueued: 2017-02-06 15:51:52 +0000 UTC
  started: 2017-02-06 15:51:53 +0000 UTC
Now you can go to the DNS endpoint, refresh the app and see how the the application is deployed.
Conclusion
Using the Canonical Distribution of Kubernetes and AWS CloudFormation, we simulated the deployment of a Kubernetes cluster in an existing environment, instead of a Juju-generated network set up.
There are many other ways to leverage the automated deployment post completion. For example, Juju will allocate tags to instances that match the current controller, model and units. You can therefore reuse that information in other CloudFormation templates to create ELBs and map them to units or groups of units.
Of course, this doesn’t only apply to Kubernetes, and you can use the same mechanism for all the other workloads Juju can deploy, such as Big Data solutions. Same tool, different purposes…

What’s the risk of unsolved vulnerabilities in Docker images?
Having a trusted source for your dependencies is critical for a secure software supply chain. How confident are you in your container security? See how Ubuntu and Canonical can help.
Newsletter signup
Related posts
The hitchhiker’s guide to infrastructure modernization
One of my favourite authors, Douglas Adams, once said that “we are stuck with technology when what we really want is just stuff that works.” Whilst Adams is...
Harnessing the potential of 5G with Kubernetes: a cloud-native telco transformation perspective
Telecommunications networks are undergoing a cloud-native revolution. 5G promises ultra-fast connectivity and real-time services, but achieving those benefits...
Canonical releases FIPS-enabled Kubernetes
Today at KubeCon North America, Canonical, the publisher of Ubuntu, released support to enable FIPS mode in its Kubernetes distribution, providing everything...