
%27%20fill%3D%27%23E95420%27%3E%3Cpath%20d%3D%27m15.839%205.293-1.447-2.8a.136.136%200%200%200-.051-.055.144.144%200%200%200-.074-.02h-5.8a.143.143%200%200%200-.091.03.13.13%200%200%200-.034.17.138.138%200%200%200%20.072.06l7.251%202.8a.144.144%200%200%200%20.17-.054.13.13%200%200%200%20.007-.13l-.003-.001ZM11.839%204.945.073.223A.073.073%200%200%200%20.026.221a.07.07%200%200%200-.038.027.065.065%200%200%200%20.007.086l7.962%208.182a.069.069%200%200%200%20.049.022.072.072%200%200%200%20.047-.019l3.805-3.461a.066.066%200%200%200%20.02-.061.065.065%200%200%200-.014-.03.07.07%200%200%200-.028-.02l.003-.002ZM5.382%207.183a.071.071%200%200%200-.062-.022.07.07%200%200%200-.03.011.067.067%200%200%200-.023.025l-4.13%207.696a.065.065%200%200%200-.005.046.068.068%200%200%200%20.027.038.072.072%200%200%200%20.09-.006L7.13%209.18a.066.066%200%200%200%200-.087l-1.75-1.91Z%27%2F%3E%3C%2Fg%3E%3Cdefs%3E%3CclipPath%20id%3D%27a%27%3E%3Cpath%20fill%3D%27%23fff%27%20d%3D%27M0%200h15.83v15.21H0z%27%2F%3E%3C%2FclipPath%3E%3C%2Fdefs%3E%3C%2Fsvg%3E)

%27%20fill%3D%27%23E95420%27%3E%3Cpath%20d%3D%27M1.936%202.592c.668%200%201.21-.515%201.21-1.151S2.604.29%201.936.29C1.267.29.726.805.726%201.44c0%20.637.541%201.152%201.21%201.152ZM14.56.576H3.404a1.587%201.587%200%200%201%20.024%201.69l-.026.04h11.156a.56.56%200%200%200%20.386-.15.518.518%200%200%200%20.16-.369v-.692a.502.502%200%200%200-.16-.369.543.543%200%200%200-.386-.15ZM1.936%206.701c.668%200%201.21-.515%201.21-1.15%200-.637-.542-1.152-1.21-1.152-.669%200-1.21.515-1.21%201.151s.541%201.151%201.21%201.151ZM14.56%204.685H3.404a1.612%201.612%200%200%201%20.242%201.083c-.03.215-.105.421-.219.608l-.026.04h11.157a.56.56%200%200%200%20.386-.15.518.518%200%200%200%20.16-.37v-.692a.5.5%200%200%200-.16-.369.542.542%200%200%200-.386-.15ZM1.936%2010.81c.668%200%201.21-.515%201.21-1.15%200-.637-.542-1.152-1.21-1.152-.669%200-1.21.515-1.21%201.151s.541%201.151%201.21%201.151ZM14.56%208.795H3.404a1.611%201.611%200%200%201%20.243%201.082%201.581%201.581%200%200%201-.245.648h11.156a.559.559%200%200%200%20.386-.15.517.517%200%200%200%20.16-.37v-.692a.502.502%200%200%200-.16-.368.543.543%200%200%200-.386-.15ZM1.936%2014.92c.668%200%201.21-.515%201.21-1.15%200-.637-.542-1.152-1.21-1.152-.669%200-1.21.515-1.21%201.151s.541%201.151%201.21%201.151ZM14.56%2012.904H3.404a1.611%201.611%200%200%201%20.242%201.082%201.58%201.58%200%200%201-.219.608l-.026.04h11.157a.562.562%200%200%200%20.386-.15.517.517%200%200%200%20.16-.37v-.692a.5.5%200%200%200-.16-.369.543.543%200%200%200-.386-.15Z%27%2F%3E%3C%2Fg%3E%3Cdefs%3E%3CclipPath%20id%3D%27a%27%3E%3Cpath%20fill%3D%27%23fff%27%20d%3D%27M0%200h15.83v15.21H0z%27%2F%3E%3C%2FclipPath%3E%3C%2Fdefs%3E%3C%2Fsvg%3E)
%27%20fill%3D%27%23E95420%27%3E%3Cpath%20d%3D%27M9.618.272c-.634%200-1.243.243-1.691.674-.448.43-.7%201.015-.701%201.624v4.221a1.9%201.9%200%200%201%201.362%200v-4.22a.955.955%200%200%201%20.291-.72%201.067%201.067%200%200%201%201.479%200%20.955.955%200%200%201%20.29.719v.962h1.363V2.57c0-.61-.253-1.194-.702-1.625A2.445%202.445%200%200%200%209.618.272ZM9.017%208.433c0%20.21-.065.417-.187.593a1.102%201.102%200%200%201-.499.393c-.203.08-.426.102-.642.06a1.125%201.125%200%200%201-.568-.292%201.055%201.055%200%200%201-.304-.547%201.028%201.028%200%200%201%20.064-.616c.084-.195.226-.362.41-.479a1.143%201.143%200%200%201%201.401.133c.103.1.185.217.24.347.057.129.085.268.085.408ZM2.773%205.855c-.634.001-1.242.244-1.69.674C.633%206.96.381%207.545.38%208.154v4.082a1.901%201.901%200%200%201%201.363%200V8.154a.955.955%200%200%201%20.29-.719%201.067%201.067%200%200%201%201.479%200%20.955.955%200%200%201%20.29.719v.962h1.363v-.962c0-.61-.253-1.194-.702-1.625a2.444%202.444%200%200%200-1.69-.674ZM2.166%2013.878c0%20.21-.065.415-.186.59-.121.174-.294.31-.496.39-.202.08-.424.102-.638.06a1.119%201.119%200%200%201-.565-.29%201.049%201.049%200%200%201-.302-.543c-.043-.206-.02-.42.063-.614.084-.194.225-.36.407-.476a1.136%201.136%200%200%201%201.394.133%201.024%201.024%200%200%201%20.323.75Z%27%2F%3E%3Cpath%20d%3D%27M14.752%204.76a1.789%201.789%200%200%201-.681-.126v2.411a.972.972%200%200%201-.312.682c-.193.179-.45.28-.718.28-.268%200-.526-.101-.718-.28a.972.972%200%200%201-.312-.682V4.32h-1.363v2.726c0%20.61.252%201.195.7%201.626a2.443%202.443%200%200%200%201.692.673c.635%200%201.244-.242%201.692-.673.449-.431.7-1.016.7-1.626v-2.41a1.9%201.9%200%200%201-.68.125ZM15.858%202.822c.037.225%200%20.455-.107.658a1.1%201.1%200%200%201-.49.472%201.161%201.161%200%200%201-1.302-.198%201.04%201.04%200%200%201-.206-1.251%201.1%201.1%200%200%201%20.492-.47%201.161%201.161%200%200%201%201.299.199c.166.16.276.366.314.59ZM7.907%2010.2c-.233%200-.465-.042-.681-.126V12.6a.97.97%200%200%201-.302.7%201.05%201.05%200%200%201-.728.29%201.05%201.05%200%200%201-.728-.29.97.97%200%200%201-.302-.7V9.845H3.804V12.6c0%20.61.252%201.194.7%201.625a2.443%202.443%200%200%200%201.692.674c.634%200%201.243-.243%201.692-.674.448-.43.7-1.015.7-1.625v-2.526a1.887%201.887%200%200%201-.68.127Z%27%2F%3E%3C%2Fg%3E%3Cdefs%3E%3CclipPath%20id%3D%27a%27%3E%3Cpath%20fill%3D%27%23fff%27%20d%3D%27M0%200h15.83v15.21H0z%27%2F%3E%3C%2FclipPath%3E%3C%2Fdefs%3E%3C%2Fsvg%3E)

How to colourise black & white pictures with OpenVINO™ on Ubuntu containers (Part 2)

Valentin Viennot
on 9 December 2021
Tags: containers , docker , Intel , machine learning , OpenVINO
This blog is the last part of a series – don’t miss parts one and zero. We’re on a mission to demonstrate OpenVINO™ on Ubuntu containers; from the consistently outstanding developer experience to the added trust to your software supply chain. In this blog, I’ll guide you on your way to building and deploying an AI colouriser app on MicroK8s. The demo will give you a better feel of the Ubuntu in containers experience and how it makes developers’ lives easier, especially in complex environments like AI/ML.

The story so far: I misplanned my Christmas shopping and had to find a last-minute present for my grandparents (still hoping they’re not reading). Fortunately, I came across this blog. It gave me the best Christmas present idea ever: a handcrafted photo book of their childhood pictures, colourised using deep learning. Easy peasy, you think (sarcastically). But seriously, thanks to OpenVINO™ and Ubuntu containers, it is much easier than it sounds! You’ll see.
Demo architecture
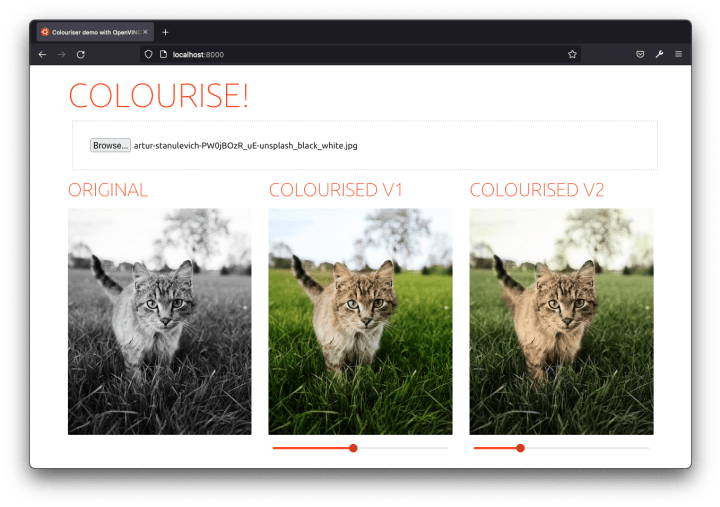
“As a user, I can drag and drop black and white pictures to the browser so that it displays their ready-to-download colourised version.” – said the PM (me).
For that – replied the onetime software engineer (still me) – we only need:
- A fancy yet lightweight frontend component.
- OpenVINO™ Model Server to serve the neural network colourisation predictions.
- A very light backend component.
Whilst we could target the Model Server directly with the frontend (it exposes a REST API), we need to apply transformations to the submitted image. The colourisation models, in fact, each expect a specific input.
Finally, we’ll deploy these three services with Kubernetes because… well… because it’s groovy. And if you think otherwise (everyone is allowed to have a flaw or two), you’ll find a fully functional docker-compose.yaml in the source code repository.
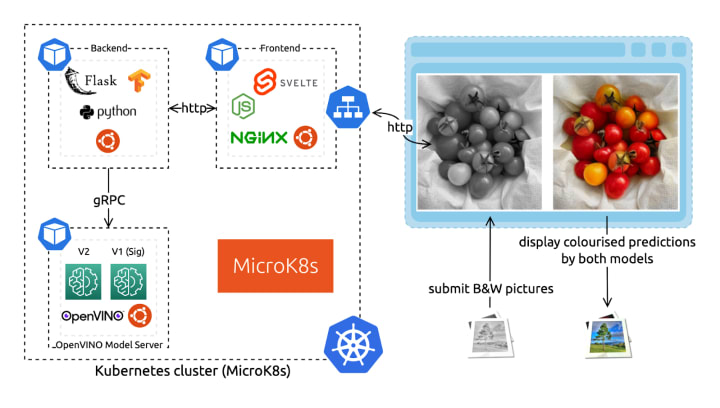
If anything I wrote before doesn’t make sense to you, make sure to read part one of the demo blog series. In the upcoming sections, we will first look at each component and then show how to deploy them with Kubernetes using MicroK8s. Don’t worry; the full source code is freely available, and I’ll link you to the relevant parts.
Neural network – OpenVINO Model Server
The colourisation neural network is published under the BSD 2-clause License, accessible from the Open Model Zoo. It is pre-trained, so we don’t need to understand it in order to use it. However, let’s look closer to understand what input it expects. I also strongly encourage you to read the original work from Richard Zhang, Phillip Isola, and Alexei A. Efros. They made the approach super accessible and understandable on this website and in the original paper.
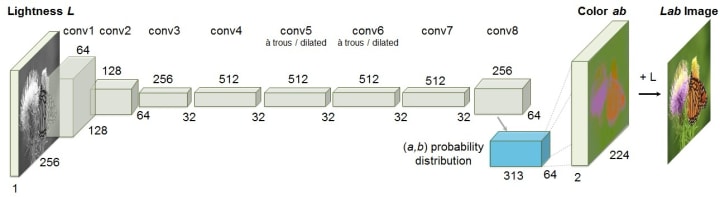
As you can see on the network architecture diagram, the neural network uses an unusual colour space: LAB. There are many 3-dimensional spaces to code colours: RGB, HSL, HSV, etc. The LAB format is relevant here as it fully isolates the colour information from the lightness information. Therefore, a grayscale image can be coded with only the L (for Lightness) axis. We will send only the L axis to the neural network’s input. It will generate predictions for the colours coded on the two remaining axes: A and B.
From the architecture diagram, we can also see that the model expects a 256×256 pixels input size. For these reasons, we cannot just send our RGB-coded grayscale picture in its original size to the network. We need to first transform it.
We compare the results of two different model versions for the demo. Let them be called ‘V1’ (Siggraph) and ‘V2’. The models are served with the same instance of the OpenVINO™ Model Server as two different models. (We could also have done it with two different versions of the same model – read more in the documentation.)
Finally, to build the Docker image, we use the first stage from the Ubuntu-based development kit to download and convert the model. We then rebase on the more lightweight Model Server image.
# Dockerfile
FROM openvino/ubuntu20_dev:latest AS omz
# download and convert the model
…
FROM openvino/model_server:latest
# copy the model files and configure the Model Server
…
Backend – Ubuntu-based Flask app (Python)
For the backend microservice that interfaces between the user-facing frontend and the Model Server hosting the neural network, we chose to use Python. There are many valuable libraries to manipulate data, including images, specifically for machine learning applications. To provide web serving capabilities, Flask is an easy choice.
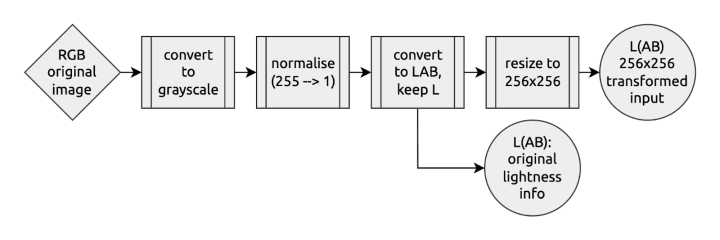
The backend takes an HTTP POST request with the to-be-colourised picture. It synchronously returns the colourised result using the neural network predictions. In between – as we’ve just seen – it needs to convert the input to match the model architecture and to prepare the output to show a displayable result.
Here’s how the transformation pipeline looks like on the input:
And the output looks something like that:

To containerise our Python Flask application, we use the first stage with all the development dependencies to prepare our execution environment. We copy it onto a fresh Ubuntu base image to run it, configuring the model server’s gRPC connection (as detailed in the previous blog).
Frontend – Ubuntu-based NGINX container and Svelte app
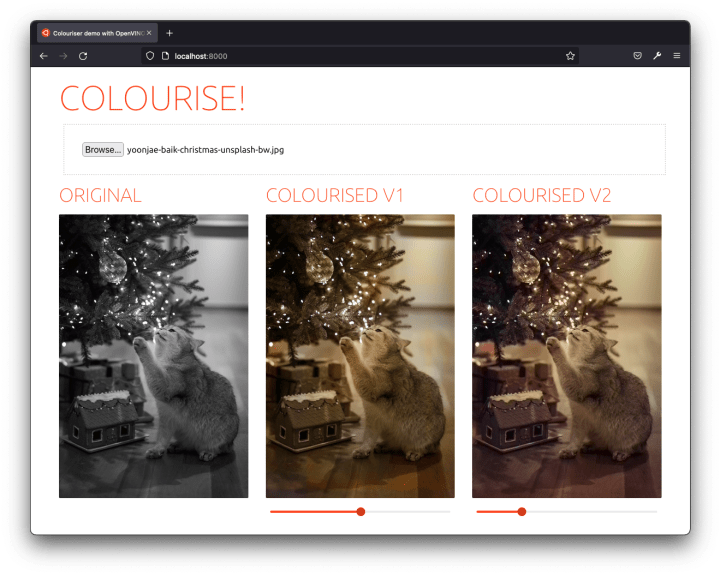
Finally, I put together a fancy UI for you to try the solution out. It’s an effortless single-page application with a file input field. It can display side-by-side the results from the two different colourisation models.
I used Svelte to build the demo as a dynamic frontend. Below each colourisation result, there’s even a saturation slider (using a CSS transformation) so that you can emphasise the predicted colours and better compare the before and after.
To ship this frontend application, we again use a Docker image. We first build the application using the Node base image. We then rebase it on top of the preconfigured NGINX LTS image maintained by Canonical. A reverse proxy on the frontend side serves as a passthrough to the backend on the /API endpoint to simplify the deployment configuration. We do that directly in an NGINX.conf configuration file copied to the NGINX templates directory. The container image is preconfigured to use these template files with environment variables.
Deployment with Kubernetes
I hope you had the time to scan some black and white pictures, because things are about to get serious(ly colourised).
We’ll assume you already have a running Kubernetes installation from the next section. If not, I encourage you to run the following steps or go through this MicroK8s tutorial.
# https://microk8s.io/docs
sudo snap install microk8s --classic

# Add current user ($USER) to the microk8s group
sudo usermod -a -G microk8s $USER && sudo chown -f -R $USER ~/.kube
newgrp microk8s

# Enable the DNS, Storage, and Registry addons required later
microk8s enable dns storage registry

# Wait for the cluster to be in a Ready state
microk8s status --wait-ready

# Create an alias to enable the `kubectl` command
sudo snap alias microk8s.kubectl kubectl
Build the components’ Docker images
Every component comes with a Dockerfile to build itself in a standard environment and ship its deployment dependencies (read What are containers for more information). They all create an Ubuntu-based Docker image for a consistent developer experience.
Before deploying our colouriser app with Kubernetes, we need to build and push the components’ images. They need to be hosted in a registry accessible from our Kubernetes cluster. We will use the built-in local registry with MicroK8s. Depending on your network bandwidth, building and pushing the images will take a few minutes or more.
sudo snap install docker
cd ~ && git clone https://github.com/valentincanonical/colouriser-demo.git

# Backend
docker build backend -t localhost:32000/backend:latest
docker push localhost:32000/backend:latest

# Model Server
docker build modelserver -t localhost:32000/modelserver:latest
docker push localhost:32000/modelserver:latest

# Frontend
docker build frontend -t localhost:32000/frontend:latest
docker push localhost:32000/frontend:latest
Apply the Kubernetes configuration files
All the components are now ready for deployment. The Kubernetes configuration files are available as deployments and services YAML descriptors in the ./K8s folder of the demo repository. We can apply them all at once, in once command:
kubectl apply -f ./k8sGive it a few minutes. You can watch the app being deployed with watch kubectl status. Of all the services, the frontend one has a specific NodePort configuration to make it publicly accessible by targeting the Node IP address.
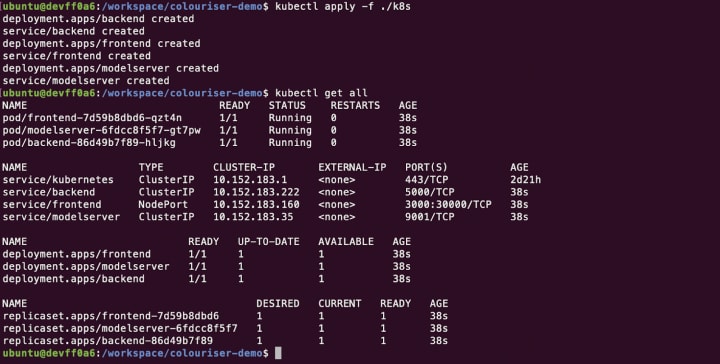
Once ready, you can access the demo app at http://localhost:30000/ (or replace localhost with a cluster node IP address if you’re using a remote cluster). Pick an image from your computer, and get it colourised!
All in all, the project was pretty easy considering the task we accomplished. Thanks to Ubuntu containers, building each component’s image with multi-stage builds was a consistent and straightforward experience. And thanks to OpenVINO™ and the Open Model Zoo, serving a pre-trained model with excellent inference performance was a simple task accessible to all developers.
That’s a wrap!
You didn’t even have to share your pics over the Internet to get it done. You are now ready to add some spice for Christmas Eve family dinner: “- do you remember your cute blue anorak?, – I’m pretty sure it was red, – no, no, too bad the photos were black and white, – oh wait, I have something for you.” Pretty nice, eh?
Thanks for reading this series; I hope you enjoyed it. Feel free to reach out on socials. I’ll leave you with the last colourisation example, right in the holidays’ theme.
Wishing you all the best holidays, see you in 2022!
- Canonical x Intel Webinar: Secure AI deployments at the edge
- Learn more about Canonical’s maintained Ubuntu-based OCI images
- Read last-year holidays season’s blog about running EKS locally
What’s the risk of unsolved vulnerabilities in Docker images?
Recent surveys found that many popular containers had known vulnerabilities. Container images provenance is critical for a secure software supply chain in production. Benefit from Canonical’s security expertise with the LTS Docker images portfolio, a curated set of application images, free of vulnerabilities, with a 24/7 commitment.