
Our Kubernetes deployment pipeline

Maximilian Ehlers
on 21 December 2018
Tags: Design , Development , web
A few weeks ago I joined the web and design team here at Canonical, in the Base Squad, which is our backend team.
One of the things that we are responsible for is deploying the code to our different staging and production environments.
With multiple features being developed simultaneously, bugs being fixed, and some parts refactored on 27 websites and many projects it quickly becomes a complex problem to solve manually.
In this post I want to lay out the way we use Charmed Kubernetes to automate much of our deployment process, using https://snapcraft.io as an example.
The cluster configuration
Before we delve into the flow of deploying changes to our Kubernetes cluster, we first need an idea of how the cluster is configured. Our cluster is a standard installation of our own Charmed Kubernetes, managed for us by our infrastructure team.
We use Git to manage all the Kubernetes configuration files for our infrastructure and all its changes.
This repository includes the config for almost all the public services that we manage. Feel free to take a look.
So for example the snapcraft.io config has a deployment configuration with name: snapcraft-io attached to its metadata.
Besides all the other configuration that is going on in this file, this is the most important detail to understand how the next steps work.
From code to staging
Now let’s uncover our workflow for deploying code changes onto a Staging environment.
We have a policy in our team, that the master branch of our repositories is kept in a releasable state. This means that any of our developers are free to deploy any of our sites at any time.
Let’s say that we are through our Code Review and now want to bring the project to life in the staging environment.
The first thing to do is to head over to our Jenkins Server and start our pipeline.


As a developer these are only two clicks, while what is actually happening on the server is the following:
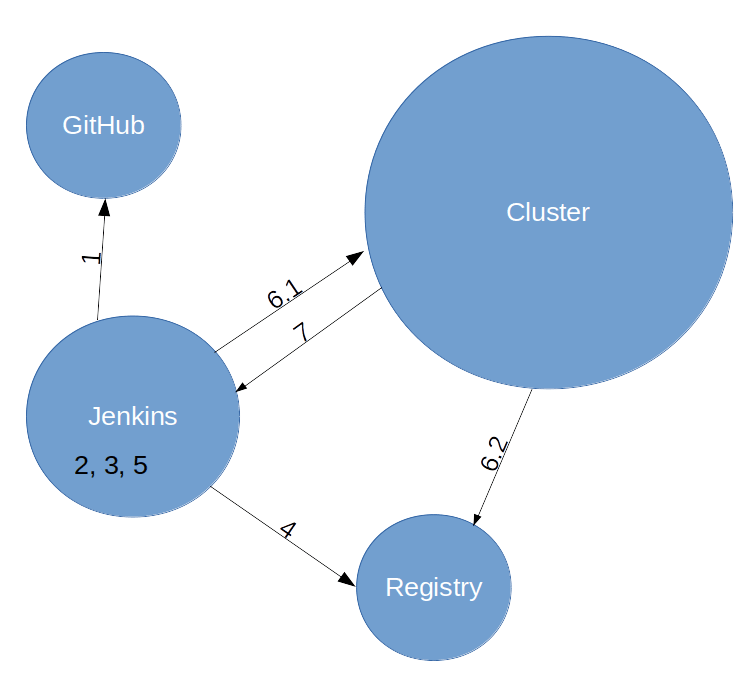
- Pull the code from the GitHub master branch
- Build the files for the website
- Build a fresh docker container that contains the application and its dependencies
- Push the container into our container registry
- Remove the locally built container as cleanup
- Deploy to cluster
- Trigger the deployment into the Kubernetes cluster (here we use the metadata mentioned above!)
- Kubernetes pulls the correct image from the registry
- Wait for the Pods to be updated with the new version
All changes are now deployed at https://staging.snapcraft.io.
Once these steps are complete the application can be accessed by all our stakeholders to get some of that important feedback as quickly as we can.
If changes need to be made, we go back to work on the codebase.
An additional thing we add to our pipeline is a link to the production deploy task. This way we can just open that in a new browser tab when we are happy and continue with the next step.
From staging into production
The task to get our application into Staging has already done most of the heavy lifting for us, building the container and pushing it into our registry.
The encapsulation inside the image makes sure that the application will run the same way in the production environment as is does in the staging one, so Kubernetes can simply pull the same image from our registry.
With these prerequisites, the Jenkins pipeline for a production deploy is rather simple.
All we need to provide to it is the ID of the image that we previously deployed to staging.
Again a top down outline of what is happening:
- Trigger the deployment of the previously built image into our Production cluster (this comes from the registry)
- Wait for the deployment to be rolled out on all Pods
- Tag the deployed image as “latest” in the registry
The first two steps would be enough for a rollout to production already, which is then live at https://snapcraft.io.
Step 3 is only included to help us find the current live image that is running the site.
Conclusion
Depending on your experience this might have been quite a lot of new information, or you might say, too easy!
What I hope you can take away from this, is the relative straightforwardness of our Kubernetes workflow.
Ignoring the tag updating, we can deploy into our production environment in 8 steps, that translate to 2 Jenkins Tasks, which we can complete with ~3 clicks.
Of course we are always striving to keep on improving things. At the moment we are investigating tools such as Helm and ksonnet to see if they can help us simplify our workflow further.
If you would like to find out even more about how we work here in the Canonical Webteam head over to our practices website.
Talk to us today
Interested in running Ubuntu in your organisation?
Newsletter signup
Related posts
Improving our web page creation workflow: how structured content is slashing design and development time
Co-authored with Julie Muzina A year ago, during our Madrid Engineering Sprint, we challenged ourselves to dramatically reduce, or even eliminate, the need...
Open design: the opportunity design students didn’t know they were missing
What if you could work on real-world projects, shape cutting-edge technology, collaborate with developers across the world, make a meaningful impact with your...
Generating accessible color palettes for design systems … inspired by APCA!
This is the first of two blog posts about how we created the color palette for a new design system at Canonical. In this post I share my journey into...