How to deploy one or more Kubernetes clusters to a single box
Canonical
on 13 November 2017
This article originally appeared at Rye Terrell’s blog
In a recent collaboration between the Linux Foundation and Canonical, we designed an architecture for the CKA exam. In order to keep the exam as affordable as possible, we needed to optimize our resource utilization — ideally, by running multiple Kubernetes clusters on a single VM. This is how we did it.
Kubernetes has developed a dedicated following because it allows us to build efficient, robust architectures in a declarative way. Efficient because they are built on top of container technology, and robust because they are distributed.
While the distributed nature of the applications we build on top of Kubernetes allow them to be more robust in terms of availability, that same architecture has the potential to, ironically, reduce application robustness in terms of ease-of-testing. Consider the following generic architecture:

Generic multi-cluster deployment of Kubernetes on top of VMs
Testing an application built on top of such a deployment has at least two major challenges. One is simply the cost of the resources needed for a test deployment. You may need many VMs to model your application sufficiently. If you want to parallelize your testing, you’re going to be paying that cost for each deployment.
Another challenge is the time required to bring up the deployment — we need to wait for VMs to be instanced, available, provisioned, and networked. Any time that can be saved there can be devoted to more testing.
We need to go deeper.

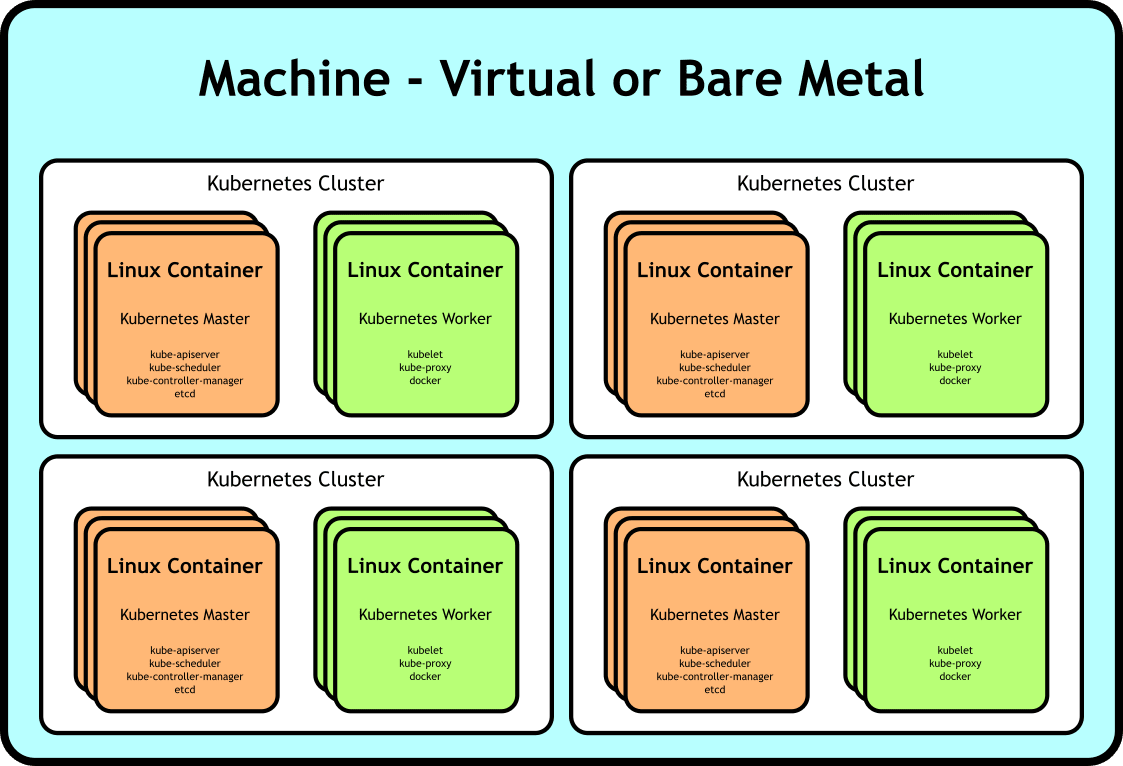
We made our applications more efficient by leveraging container technology against our processes. What if we could do the same thing, but leverage it instead against our machines? What if we could make our deployment look like this:

Generic multi-cluster deployment of Kubernetes on top of Linux containers
…a single box with multiple containers acting as the nodes of our clusters. With this architecture, we save on resources because, while we may require a larger machine to serve as the host, we’re not wasting resources on many more underutilized smaller boxes. Additionally, we save significant time not waiting for the containers to be instanced and become available — they’re nearly as instant as docker containers. And perhaps most exciting, we can save this deployment as a virtual machine image to both reduce the provisioning time costs tremendously and make our deployment reproducible.
We can rebuild him. We have the technology.

While the container technologies utilized by Kubernetes wrap processes, we need something that will containerize an entire system. Linux containers are well suited to this — from their documentation:
The goal of LXC is to create an environment as close as possible to a standard Linux installation but without the need for a separate kernel.
Perfect. Let’s try it out.
$ lxc launch ubuntu:16.04 hello-kubernetes

Creating hello-kubernetes
Starting hello-kubernetes

$ lxc exec hello-kubernetes /bin/bash

root@hello-kubernetes:~# lsb_release -a

No LSB modules are available.
Distributor ID: Ubuntu
Description: Ubuntu 16.04.3 LTS
Release: 16.04
Codename: xenial

root@hello-kubernetes:~# systemctl list-units

UNIT LOAD ACTIVE SUB DESCRIPTION
dev-sda1.device loaded activating tentative
dev-sda1.device -.mount loaded active mounted /
dev-.lxd\x2dmounts.mount loaded active mounted
/dev/.lxd-mounts dev-full.mount loaded active mounted
/dev/full dev-fuse.mount loaded active mounted /dev/fuse
...
Boom. Complete containerized system.
It’s alive!

Now that we know how to create a containerized system on our host, building out a Kubernetes cluster looks like normal. You can use whatever tool you like for this, but I’ll be using conjure-up with CDK here because it already knows how to create linux containers and deploy kubernetes to them.
Let’s get started. First, we’ll tell conjure-up we want to deploy Kubernetes:
$ conjure-up canonical-kubernetes
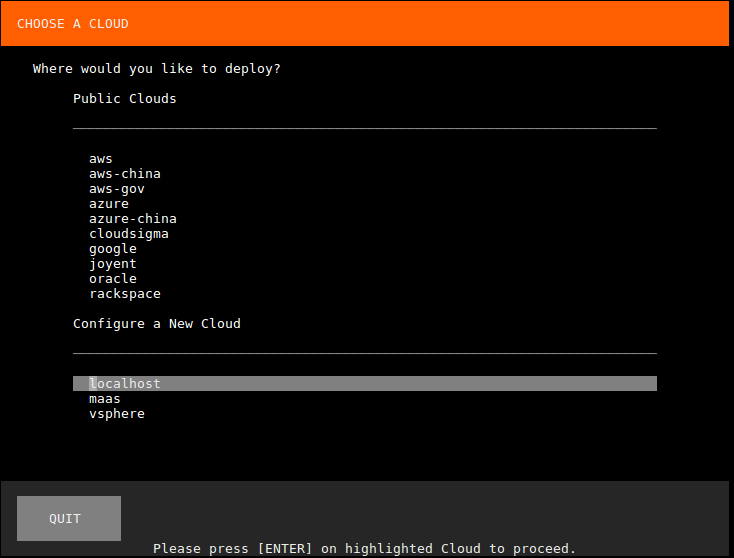
This will bring up a wizard in the terminal, which will first ask where we want to deploy to. We’ll select localhost:

Next click on “Deploy all 6 Remaining Applications”:

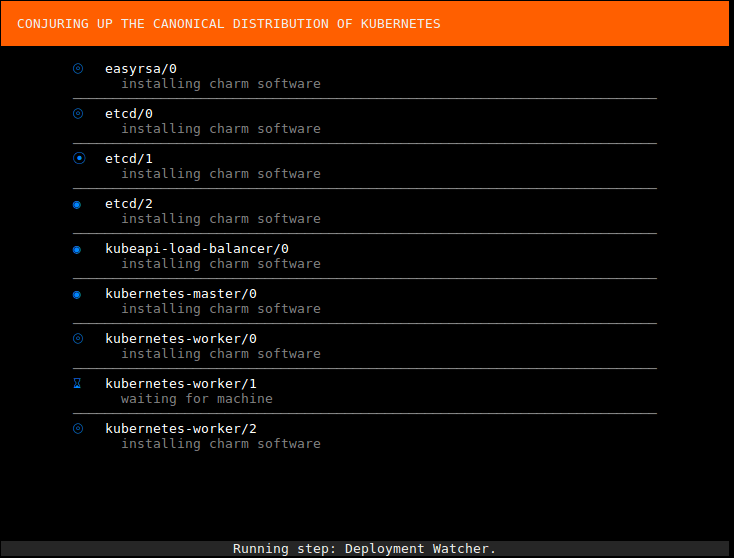
Then wait a bit as the cluster is brought up:

Conjure-up will grab kubefed and kubectl for you. Click Run:

That’s it, there’s now a Kubernetes cluster running on top of Linux containers on your VM:
$ kubectl cluster-info
Kubernetes master is running at http://localhost:8080
Heapster is running at http://localhost:8080/api/v1/namespaces/kube-system/services/heapster/proxy
KubeDNS is running at http://localhost:8080/api/v1/namespaces/kube-system/services/kube-dns/proxy
kubernetes-dashboard is running at http://localhost:8080/api/v1/namespaces/kube-system/services/kubernetes-dashboard/proxy
Grafana is running at http://localhost:8080/api/v1/namespaces/kube-system/services/monitoring-grafana/proxy
InfluxDB is running at http://localhost:8080/api/v1/namespaces/kube-system/services/monitoring-influxdb/proxy
Let’s make another one.

There’s no reason we can’t deploy multiple Kubernetes clusters, either. I’ll continue to use conjure-up here because it makes it easy, but feel free to use the tool of your choice. Let’s run conjure-up in headless mode this time:
$ conjure-up canonical-kubernetes localhost conjure-up-localhost-642 cluster2
[info] Summoning canonical-kubernetes to localhost
[info] Creating Juju model.
[info] Juju model created.
[info] Running step: pre-deploy.
[info] Deploying kubernetes-master...
[info] Deploying flannel...
[info] Deploying kubernetes-worker...
[info] Deploying easyrsa...
[info] Deploying kubeapi-load-balancer...
[info] Deploying etcd...
[info] Exposing kubeapi-load-balancer.
[info] etcd: deployed, installing.
[info] kubeapi-load-balancer: deployed, installing.
[info] easyrsa: deployed, installing.
[info] flannel: deployed, installing.
[info] kubernetes-master: deployed, installing.
[info] Setting relation easyrsa:client <-> etcd:certificates
[info] Exposing kubernetes-worker.
[info] kubernetes-worker: deployed, installing.
[info] Setting relation flannel:cni <-> kubernetes-worker:cni
[info] Setting relation easyrsa:client <-> kubeapi-load-balancer:certificates
[info] Setting relation kubeapi-load-balancer:apiserver <-> kubernetes-master:kube-api-endpoint
[info] Setting relation kubeapi-load-balancer:website <-> kubernetes-worker:kube-api-endpoint
[info] Setting relation flannel:cni <-> kubernetes-master:cni
[info] Setting relation etcd:db <-> flannel:etcd
[info] Setting relation easyrsa:client <-> kubernetes-master:certificates
[info] Setting relation kubernetes-master:kube-control <-> kubernetes-worker:kube-control
[info] Setting relation kubeapi-load-balancer:loadbalancer <-> kubernetes-master:loadbalancer
[info] Setting relation easyrsa:client <-> kubernetes-worker:certificates
[info] Setting relation etcd:db <-> kubernetes-master:etcd
[info] Waiting for deployment to settle.
[info] Running step: 00_deploy-done.
[info] Model settled.
[info] Running post-deployment steps
[info] Running step: step-01_get-kubectl.
[info] Running step: step-02_cluster-info.
[info] Running step: step-03_enable-cni.
[info] Installation of your big software is now complete.
[warning] Shutting down
And here’s our second cluster:
$ kubectl cluster-info
Kubernetes master is running at http://localhost:8080 Heapster is running at http://localhost:8080/api/v1/namespaces/kube-system/services/heapster/proxy KubeDNS is running at http://localhost:8080/api/v1/namespaces/kube-system/services/kube-dns/proxy kubernetes-dashboard is running at http://localhost:8080/api/v1/namespaces/kube-system/services/kubernetes-dashboard/proxy Grafana is running at http://localhost:8080/api/v1/namespaces/kube-system/services/monitoring-grafana/proxy InfluxDB is running at http://localhost:8080/api/v1/namespaces/kube-system/services/monitoring-influxdb/proxy
Let’s make it reproducible.

Now that we have a reasonably sophisticated deployment, let’s see about reproducing it quickly. First we’ll create an AMI of our instance:
$ aws ec2 create-image --instance-id i-02c547825d34d345e --name cluster-in-a-box
ami-5f9eb33a
And then kick off an instance of it and ssh in:
$ aws ec2 run-instances --count 1 --image-id ami-5f9eb33a --instance-type t2.xlarge --key-name mykey
Let’s check on our clusters. First the original cluster:
$ kubectl cluster-info
Kubernetes master is running at http://localhost:8080
Heapster is running at http://localhost:8080/api/v1/namespaces/kube-system/services/heapster/proxy
KubeDNS is running at http://localhost:8080/api/v1/namespaces/kube-system/services/kube-dns/proxy
kubernetes-dashboard is running at http://localhost:8080/api/v1/namespaces/kube-system/services/kubernetes-dashboard/proxy
Grafana is running at http://localhost:8080/api/v1/namespaces/kube-system/services/monitoring-grafana/proxy
InfluxDB is running at http://localhost:8080/api/v1/namespaces/kube-system/services/monitoring-influxdb/proxy
And our second cluster:
$ kubectl cluster-info
Kubernetes master is running at http://localhost:8080
Heapster is running at http://localhost:8080/api/v1/namespaces/kube-system/services/heapster/proxy
KubeDNS is running at http://localhost:8080/api/v1/namespaces/kube-system/services/kube-dns/proxy
kubernetes-dashboard is running at http://localhost:8080/api/v1/namespaces/kube-system/services/kubernetes-dashboard/proxy
Grafana is running at http://localhost:8080/api/v1/namespaces/kube-system/services/monitoring-grafana/proxy
InfluxDB is running at http://localhost:8080/api/v1/namespaces/kube-system/services/monitoring-influxdb/proxy
Looks good!
Conclusion
Linux containers allow us to containerize full linux systems. We can utilize this to deploy Kubernetes clusters quickly & cheaply — ideal for testing deployments without unnecessary resource & time overhead.
Can you think of other uses for a Kubernetes cluster-in-a-box? I’d love to hear about it — leave a comment below!
If you found this interesting, Marco Ceppi and I will be giving a talk about it at Kubecon 2017. Hope to see you there!
Talk to us today
Interested in running Ubuntu in your organisation?
Newsletter signup
Related posts
Canonical releases Ubuntu 25.10 Questing Quokka
The latest interim release of Ubuntu comes with compatibility enhancements at the silicon level, accessibility upgrades and a robust security posture that...
Ubuntu worker nodes for OKE now in Limited Availability
Oracle Kubernetes Engine now supports Ubuntu images for worker nodes natively, with no need for custom images 8 October 2025 – Today Canonical, the publisher...
OpenStack cloud – happy 15th anniversary!
Happy birthday, OpenStack! It’s astonishing how fast time flies – fifteen years already. Yet, here we are: OpenStack cloud still stands as a de facto standard...
