
Hardware Setup: Deploying OpenStack on MAAS 1.9+ with Juju
Canonical
on 22 January 2016
This is part 2 of my new “Deploying OpenStack on MAAS 1.9+ with Juju” series, and it follows up on my last week’s post Introduction: Deploying OpenStack on MAAS 1.9+ with Juju. In this post I’m going to explain the steps I used to configure the actual hardware – physical networking and wiring needed before MAAS is configured. I planned to include the MAAS setup in here as well, but the post grew larger than expected, so I’ll explain the MAAS setup in the next post.
Hardware Setup for Deploying OpenStack on MAAS 1.9+ with Juju
The openstack-base bundle requires 4 machines, each with 2 network interface cards (NICs). Since we’re focusing on the networking side of things here, the other requirement (2 separate disks on each machine) is not a priority – it should be trivial to add it though, if needed. To make the deployment slightly closer to a real-world scenario, I’ve decided to also use 2 zones in MAAS, putting a couple of machines in each zone, both of them plugged into a dedicated switch for the zone.
Used Hardware
- 4x Intel NUC Kits (DC53427HYE)
- I already have 2 of those, each with 120GB Crucial M2 M500 SSD drives
- Ordered 2 more from amazon.co.uk, each with larger 256GB Crucial M2 M550 SSD drives.
- There are cheaper options, but these NUCs support Intel vPro/AMT and can be powered on and off remotely by MAAS.
- 4x USB-to-Ethernet adapters
- Each NUC has only one 1Gbps NIC, so these are needed to satisfy the requirement for 2 NICs per machine.
- I’ve used Anker USB 3.0 to RJ45 Gigabit Ethernet Adapters, because they were cheap and support USB 3.0, but others should work as well.
- Used for zone1, has web-based admin panel, and most importantly has hardware support for IEEE 802.1Q VLANs.
- I already had this one and was using it for my local MAAS.
- Used for zone2 and provides mostly the same features as the one above.
- 10x short (1 to 2m long) UTP Cat5e cables (connecting NUCs to switches and switches to each other and to MAAS).
- 1x longer (5m) UTP Cat5e cable (connecting MAAS to the home WiFi router for external connectivity).
- 4x EU 3-prong power cords (e.g. like this one), one for each NUC (since first 2 came from US, last 2 from UK).
- 4x short (1.5m) HDMI cables (optional), for accessing NUC BIOS and diagnosing issues.
If you’re interested, click here for a couple of photos I took of the completed deployment with all those components.
Setting up Wiring and Switches
TL-SG1024DE
As described the last post, I need to configure 8 VLANs for OpenStack in MAAS and the switches, using VIDs 50, 100, 150, 200, 250, 30, and 99, along with the untagged default VLAN used for PXE booting the NUCs from MAAS. I’ll use a subnet with CIDR 10.14.0.0/20 for PXE booting the NUCs, and subnets with ranges 10.
Before wiring up everything, I need to configure both switches, adding the VLANs to them using the web admin panels.

Following the user guide that came up with TL-SG1024DE, I’ve powered on the switch, connected port 1 to my laptop, and statically assigned 192.168.0.2/24 to it, then accessed the admin panel on 192.168.0.1, logging in with the default username and password (admin/admin). Of course, the first thing is to change the password to something more secure, using the menu on the left-side (System > User Account). Next, using System > IP Setting, I changed the IP address (10.14.0.2), subnet mask (255.255.240.0), default gateway (10.14.0.1 – this will be the MAAS server IP), and since MAAS will be managing most of the VLANs, I disabled DHCP on the switch. After changing the IP I needed to reconnect using the new address, but first I changed my laptop’s static IP to 10.14.0.1/24 for the NIC I was using (eth0). Finally, I’ve created all the VLANs and configured the ports like in the screenshot below:

Port 1 will be trunking all VLANs (tagged and untagged), and will be connected to the MAAS server. Ports 4, 6, 8, and 10 will receive tagged traffic for VLANs 50, 100, and 150 (on each NUC’s primary NIC), while ports 3, 5, 7, and 9, receive tagged traffic for VLANs 200, 250, 99, and 30 (on each NUC’s secondary NIC). Finally, port 24 is configured the same way as port 1, and will be connected to the other switch. Well, now you can plug all the UTP cables.
IMPORTANT! Make sure to save the switch configuration once done (Save Config from the menu on the left) otherwise it will be LOST! Also, it’s a good idea to make a backup of it (System Tools > Backup and Restore).
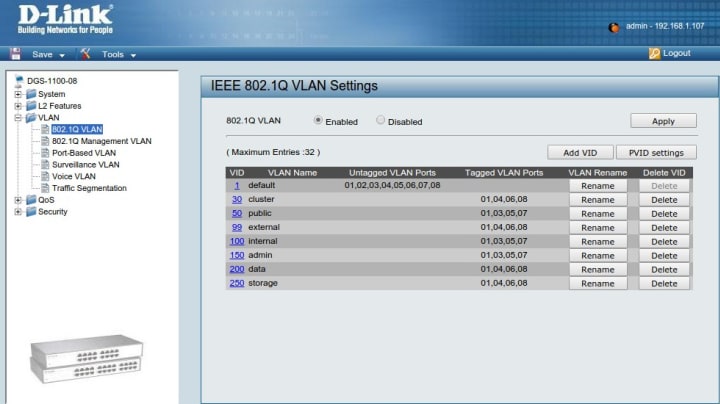
DGS-1100-08
The initial configuration is very similar, with a few differences:
- 10.90.90.90/24 is the default subnet for configuring the switch, and the admin panel is accessible on 10.90.90.90.
- I used 10.90.90.99/24 as IP for my laptop, connected directly to port 1 on the switch.
- No username required, just password (admin again being the default one).

Once again, changing the admin password was the first step, then configuring the IP address, etc. I’ve used IP address 10.14.1.2, same subnet mask and gateway (255.255.240.0, 10.14.0.1), and disabled DHCP. After reconnecting to the new IP from the laptop (the latter now using 10.14.0.1/24 as earlier), I enabled 802.1Q VLAN support and configured all the VLANs and ports to match the first switch (as seen on screenshot below). Finally, I saved the switch configuration (using the Save dropdown menu) , backed it up (using the Tools dropdown menu), and plugged in the cables the same way.
Preparing the NUCs for MAAS
MAAS can power these NUCs on and off remotely, provided AMT is set up correctly. For each NUC the same set of steps are needed to enable AMT. My colleague Dustin Kirkland explained the process in great detail and nice screenshots in his “Everything you need to know about Intel” blog post, so highly recommend following his guide. Some notes for my specific setup:
- I used 10.14.0.11 and 10.14.0.12 as IP addresses for the first two NUCs (which will be in zone1).
- For the other two NUCs (in zone2), I picked 10.14.1.21 and 10.14.1.22 respectively.
- All subnet masks and default gateways for AMT are the same – 255.255.240.0 and 10.14.0.1 respectively.
- I plugged in the USB2Ethernet adapters only after finishing the AMT setup (so all these IPs are set on the primary on-board NIC).
- Each NUC has different AMT password (not necessarily required, but slightly more secure I guess).
- Of course, I made sure AMT is enabled before saving and exiting the BIOS.
- Finally, since MAAS needs let each NUC PXE boot over the network, for each NUC I entered the (regular) BIOS and changed the boot order to Network boot first, then boot from the SSD.
Next Steps: MAAS Setup
Stay tuned! 
Next post will be about setting up MAAS and modelling the OpenStack deployment with spaces, subnets, VLANs, and fabrics – matching the described hardware configuration.
Talk to us today
Interested in running Ubuntu in your organisation?
Newsletter signup
Related posts
From cloud to dashboard: experience the future of infotainment development at CES 2026
This year, we’re excited to show a demo that combines the strengths of both Anbox Cloud and Rightware’s Kanzi, the industry-leading software for creating...
Canonical announces Ubuntu Pro for WSL
Ubuntu Pro for WSL provides turnkey security maintenance and enterprise support for Ubuntu 24.04 LTS WSL instances in Windows. The subscription will also...
Canonical announces general availability of Ubuntu on Qualcomm Dragonwing™ IQ-9075 platform
December 1, 2025 – Canonical, the publisher of Ubuntu, today announced the availability of certified images for the Qualcomm Dragonwing™ IQ-9075 platform....