
Install the AdGuard Ubuntu Appliance
for Raspberry Pi 2
Installation instructions
What you'll need
- A microSD card (4GB minimum, 8GB recommended)
- A Raspberry Pi 2
- A computer with a microSD card drive
- A micro-USB power cable
- A monitor with an HDMI interface
- An HDMI cable
- A USB keyboard
How to install
These steps will flash your AdGuard Ubuntu Appliance to your Raspberry Pi with a Ubuntu machine, and get you logged in.
-
Install the Raspberry Pi Imaging Tool
-
Prepare the microSD card
Warning- Insert the microSD card into your computer
-
Run the imager and click
CHOOSE OS
-
Next, choose
Use Custom. Select the image you downloaded.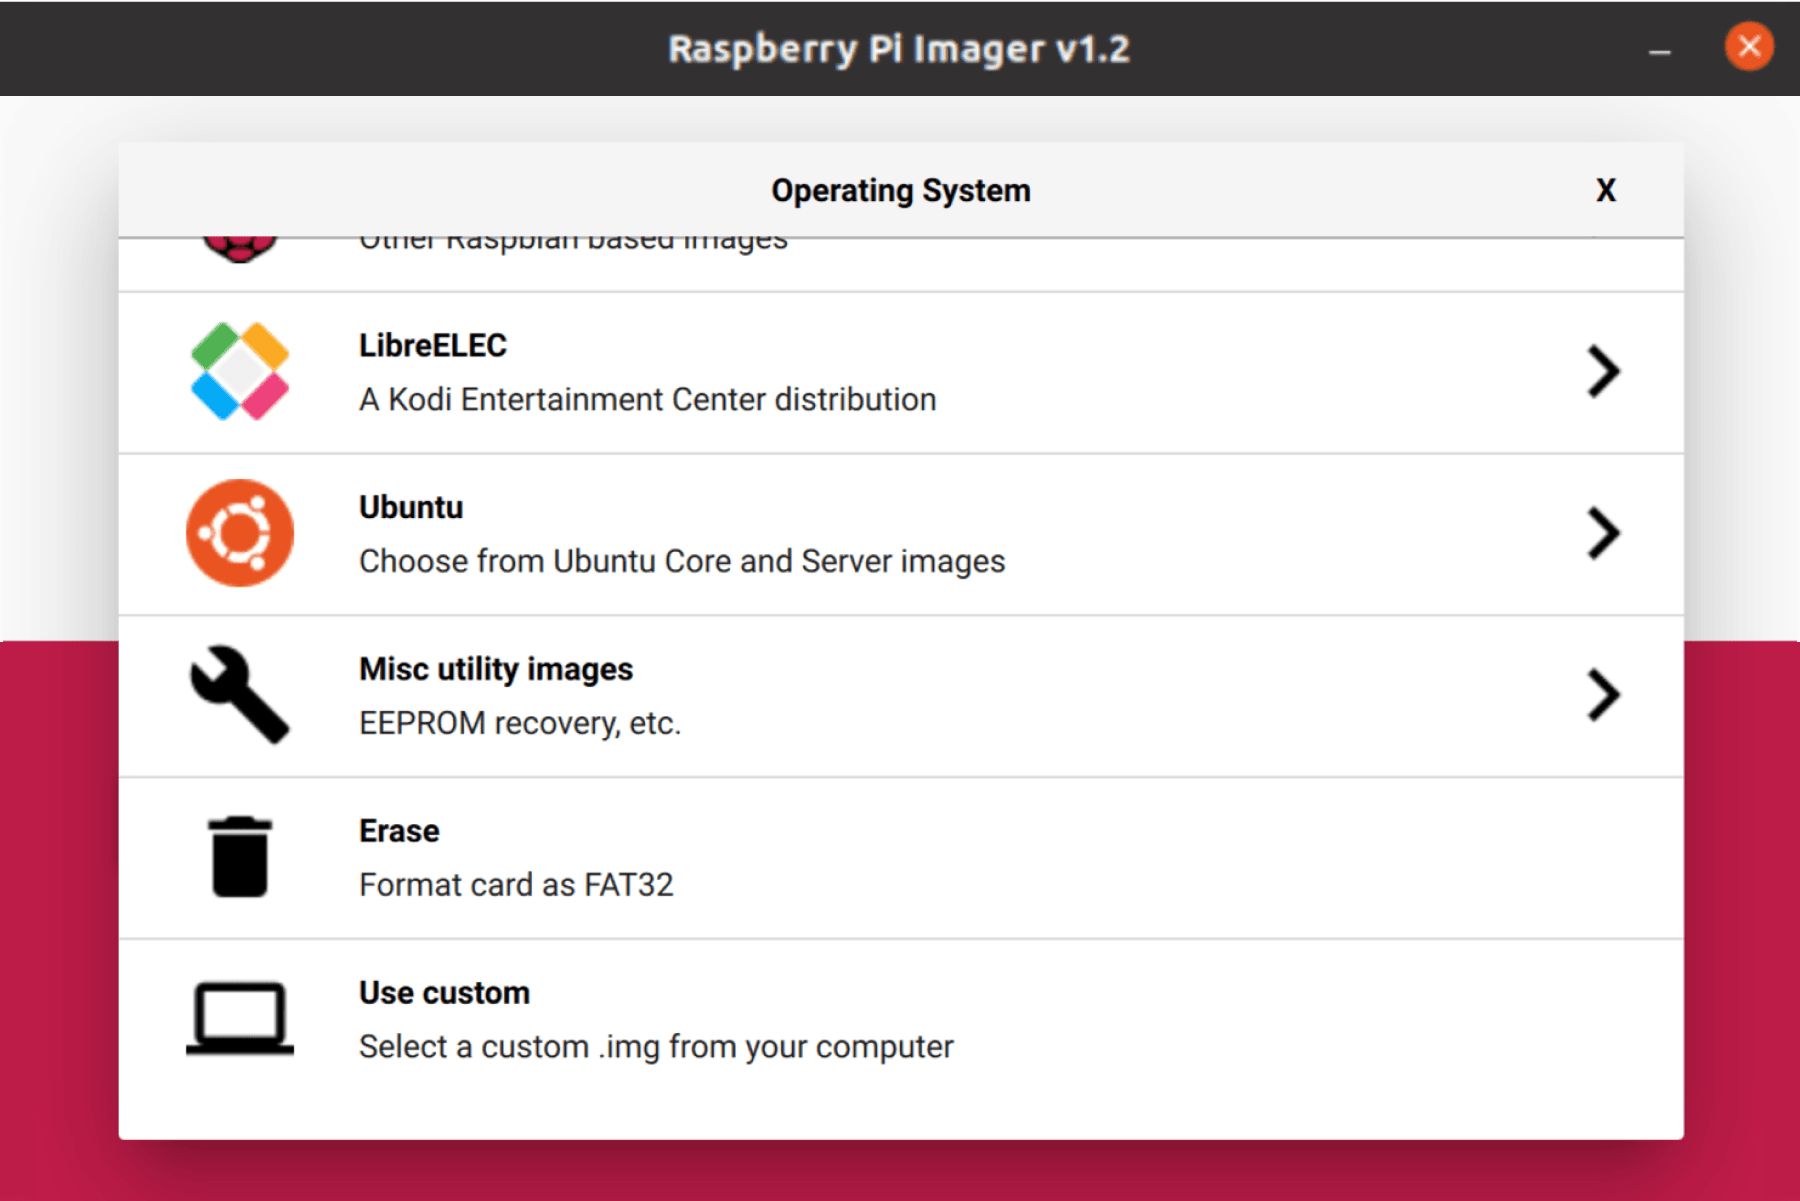
-
Select your microSD card and click
WRITE.
While it is preparing the disk you can go on to the next step and create your SSH keys for secure access to the appliance.
-
Generate Secure Shell (SSH) keys
The 'Secure Shell' protocol provides access to your Ubuntu Appliance and uses cryptographic keys to authenticate you to the device. You need SSH software and keys.
Run the following command:
ssh-keygen -t rsa- This starts the key generation process. When you execute this command, the ssh-keygen utility prompts you to indicate where to store the key
-
Press the
ENTERkey to accept the default location. The ssh-keygen utility prompts you for a passphrase - Type in a passphrase
You now have a public and private key that you can use to authenticate.
-
Create an Ubuntu SSO account
Your Ubuntu Appliance will be added to your Ubuntu cloud account and use your SSH keys to identify you. Add your keys to your account at https://login.ubuntu.com/ssh-keys.
To do so, run the following command in your terminal.
cat ~/.ssh/id_rsa.pubCopy the result into the text field on the website. Click
importand will have the key set up. -
Boot your Raspberry Pi from the microSD card
Wait for the Raspberry Pi images to complete. Remove the microSD card from your computer and insert it into the Raspberry Pi. Attach your monitor and keyboard to the Pi, you will use them for the initial device configuration.
If you want to use a wired network, connect your ethernet cable to the Pi before booting.
Power up the Pi by connecting it to your USB power supply.
Your Pi will boot, and present you with a series of configuration choices. You need to ensure that the Pi has internet access so that it can get updates and verify your SSH keys. If you need more help there is a tutorial that goes through these steps in more detail.
Next, you will need to enter your Ubuntu cloud account email address. Your Pi will connect to your cloud account and retrieve your SSH keys.
-
SSH in
Your Pi will show an ssh command like:
ssh <Ubuntu SSO user name>@<device IP address>Your user name is your Ubuntu SSO user name.
Your terminal will welcome you to Ubuntu Core.
-
That's it
Now that you're in your Pi you will be able to use your AdGuard Ubuntu Appliance image.
What you'll need
- A microSD card (4GB minimum, 8GB recommended)
- A Raspberry Pi 2
- A computer with a microSD card drive
- A micro-USB power cable
- A monitor with an HDMI interface
- An HDMI cable
- A USB keyboard
How to install
These steps will flash your AdGuard Ubuntu Appliance to your Raspberry Pi with a Windows machine, and get you logged in.
-
Install the Raspberry Pi Imaging Tool
-
Prepare the microSD card
Warning- Insert the microSD card into your computer
-
Run the imager and click
CHOOSE OS
-
Next, choose
Use Custom. Select the image you downloaded.
-
Select your microSD card and click
WRITE.
While it is preparing the disk you can go on to the next step and create your SSH keys for secure access to the appliance.
-
Generate Secure Shell (SSH) keys
After you have installed OpenSSH client you will need to generate user SSH keys to secure the connection to your Raspberry Pi.
Launch 'Windows PowerShell' as an Administrator, and type:
ssh-keygen -
Create an Ubuntu SSO account
Your Ubuntu Appliance will be added to your Ubuntu cloud account and use your SSH keys to identify you. Add your keys to your account at https://login.ubuntu.com/ssh-keys.
To do so, run the following command in your terminal.
cat ~/.ssh/id_rsa.pubCopy the result into the text field on the website. Click
importand will have the key set up. -
Boot your Raspberry Pi from the microSD card
Wait for the Raspberry Pi images to complete. Remove the microSD card from your computer and insert it into the Raspberry Pi. Attach your monitor and keyboard to the Pi, you will use them for the initial device configuration.
If you want to use a wired network, connect your ethernet cable to the Pi before booting.
Power up the Pi by connecting it to your USB power supply.
Your Pi will boot, and present you with a series of configuration choices. You need to ensure that the Pi has internet access so that it can get updates and verify your SSH keys. If you need more help there is a tutorial that goes through these steps in more detail.
Next, you will need to enter your Ubuntu cloud account email address. Your Pi will connect to your cloud account and retrieve your SSH keys.
-
SSH in
Your Pi will show an ssh command like:
ssh <Ubuntu SSO user name>@<device IP address>Your user name is your Ubuntu SSO user name.
Your terminal will welcome you to Ubuntu Core.
-
That's it
Now that you're in your Pi you will be able to use your AdGuard Ubuntu Appliance image.
What you'll need
- A microSD card (4GB minimum, 8GB recommended)
- A Raspberry Pi 2
- A computer with a microSD card drive
- A micro-USB power cable
- A monitor with an HDMI interface
- An HDMI cable
- A USB keyboard
How to install
These steps will flash your AdGuard Ubuntu Appliance to your Raspberry Pi with a macOS machine, and get you logged in.
-
Install the Raspberry Pi Imaging Tool
-
Prepare the microSD card
Warning- Insert the microSD card into your computer
-
Run the imager and click
CHOOSE OS
-
Next, choose
Use Custom. Select the image you downloaded.
-
Select your microSD card and click
WRITE.
While it is preparing the disk you can go on to the next step and create your SSH keys for secure access to the appliance.
-
Generate Secure Shell (SSH) keys
The 'Secure Shell' protocol provides access to your Ubuntu Appliance and uses cryptographic keys to authenticate you to the device. You will need SSH software and keys.
Terminal is the terminal emulator which provides a text-based command-line interface (CLI) to the Unix shell of macOS.
To open the macOS Terminal:
-
In Finder, select
Utilitiesfrom the Applications folder. -
Find
Terminalin the utilities list. -
Enter the following command:
ssh-keygen -t rsaThis starts the key generation process. When you execute this command, the ssh-keygen utility prompts you to indicate where to store the key
-
Press the
ENTERkey to accept the default location. The ssh-keygen utility prompts you for a passphrase - Type in a passphrase
You now have a public and private key that you can use to authenticate.
Your private key is saved to the id_rsa file in the .ssh directory and is used to verify the public key you use belongs to the same account.
-
In Finder, select
-
Create an Ubuntu SSO account
Your Ubuntu Appliance will be added to your Ubuntu cloud account and use your SSH keys to identify you. Add your keys to your account at https://login.ubuntu.com/ssh-keys.
To do so, run the following command in your terminal.
cat ~/.ssh/id_rsa.pubCopy the result into the text field on the website. Click
importand will have the key set up. -
Boot your Raspberry Pi from the microSD card
Wait for the Raspberry Pi images to complete. Remove the microSD card from your computer and insert it into the Raspberry Pi. Attach your monitor and keyboard to the Pi, you will use them for the initial device configuration.
If you want to use a wired network, connect your ethernet cable to the Pi before booting.
Power up the Pi by connecting it to your USB power supply.
Your Pi will boot, and present you with a series of configuration choices. You need to ensure that the Pi has internet access so that it can get updates and verify your SSH keys. If you need more help there is a tutorial that goes through these steps in more detail.
Next, you will need to enter your Ubuntu cloud account email address. Your Pi will connect to your cloud account and retrieve your SSH keys.
-
SSH in
Your Pi will show an ssh command like:
ssh <Ubuntu SSO user name>@<device IP address>Your user name is your Ubuntu SSO user name.
Your terminal will welcome you to Ubuntu Core.
-
That's it
Now that you're in your Pi you will be able to use your AdGuard Ubuntu Appliance image.
Start using your AdGuard
Ubuntu Appliance
Now you can go ahead and set everything up. It's usually best to wait 5-10 minutes here. Some snaps will need to refresh themselves and the appliance may need to automatically reboot. When you're ready go to:
http://<IP-of-your-appliance>:3000in another computers browser. Where you will find the initial configuration wizard.
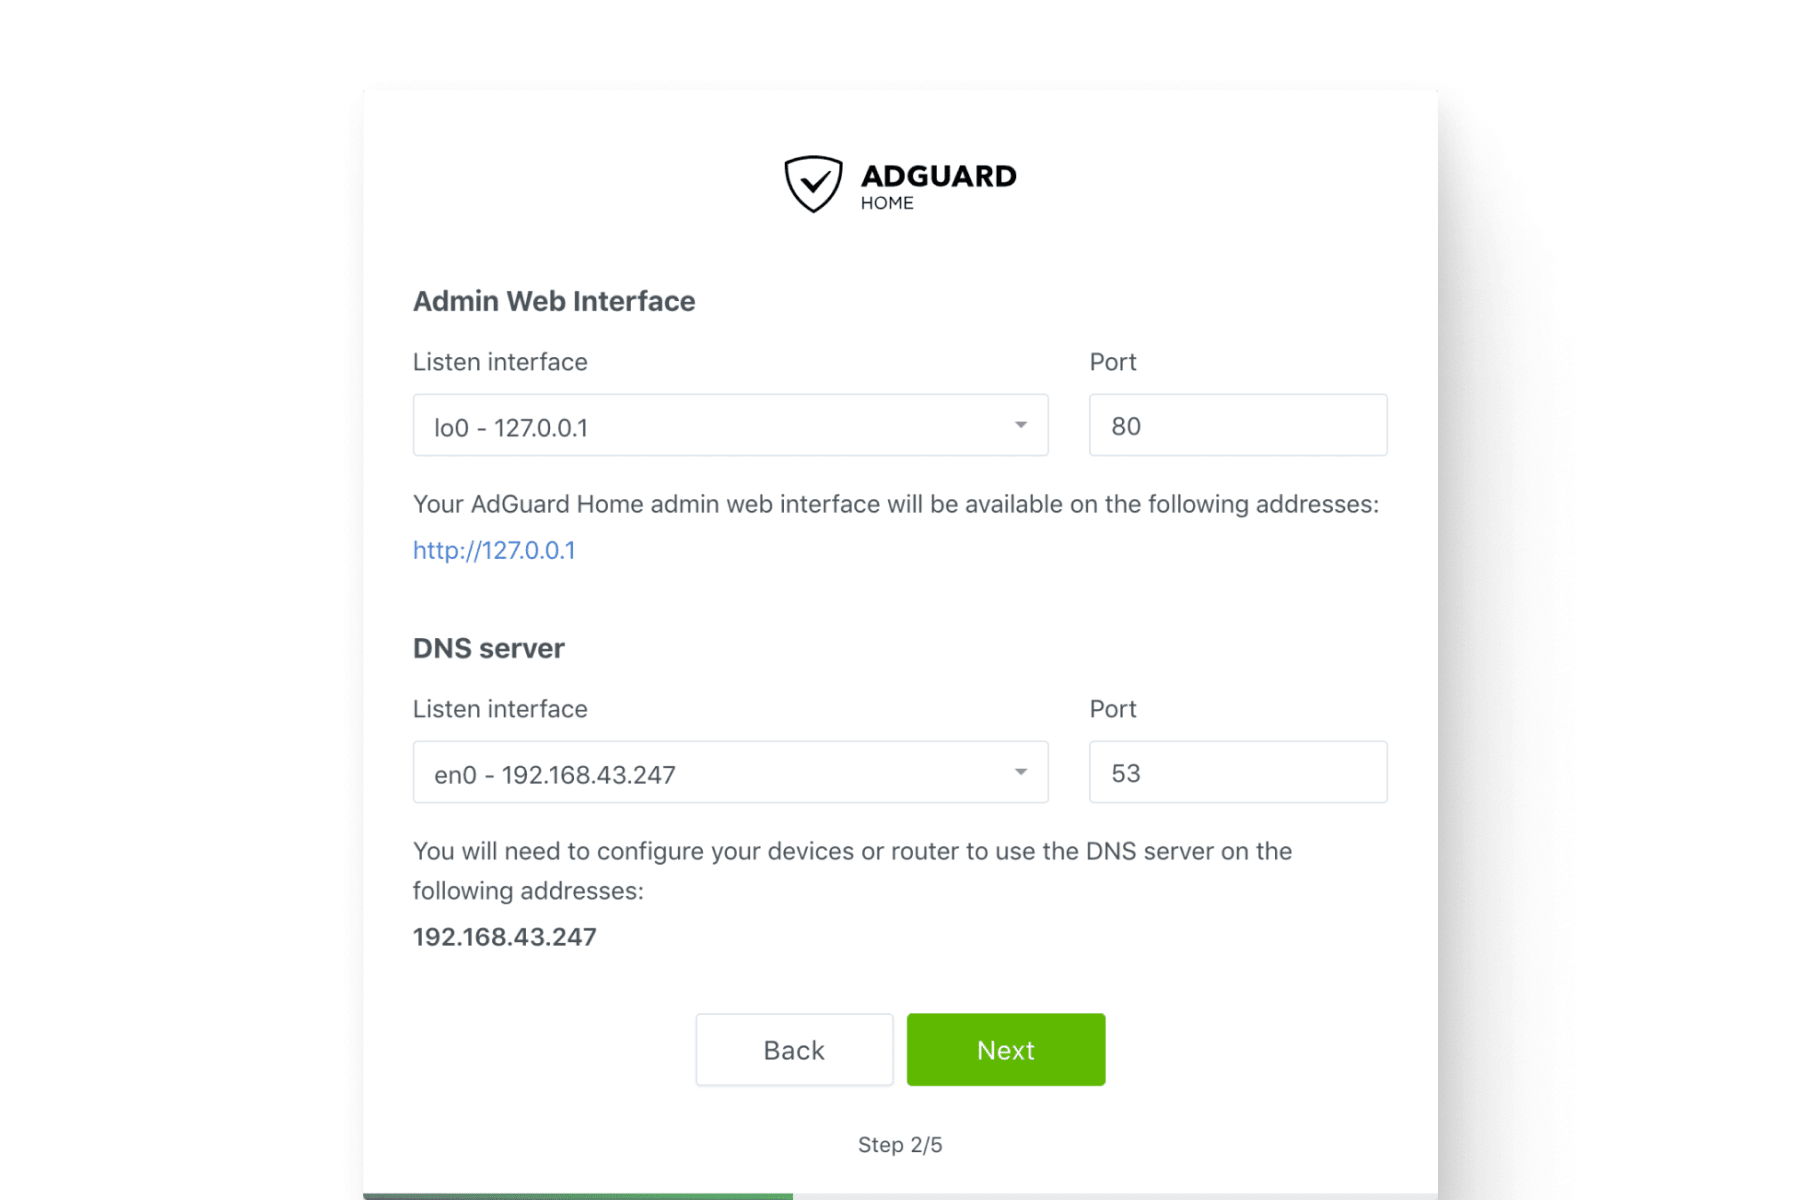
Follow the instructions to start using your new Adguard Home Ubuntu Appliance.
On the AdGuard configuration screen, under DNS Server, it will have an error in red: listen udp 0.0.0.0:53: bind: address already in use. Change the listen interface to Eth0.
Once you've finished the AdGuard configuration, you can connect to the admin panel by just going to http://<ip address> (no longer port 3000), and can configure other devices on your network to use that ip address for the DNS server.
For more information or more documentation on what to do now, the AdGuard website is the best place to go next.