
Systemd support lands in WSL – unleash the full power of Ubuntu today

Oliver Smith
on 21 September 2022
Tags: Microsoft , systemd , Ubuntu WSL
Systemd support has arrived in WSL! This long-awaited upgrade to WSL unlocks a huge number of quality of life features for managing processes and services. This includes snapd support, which enables users to take advantage of all of the tools and apps available on snapcraft.io.
Systemd support is particularly useful for web developers who want to set up and develop service applications inside WSL before deploying them to the cloud. In this post we take you through some best practices on getting started with systemd with this in mind.
For more information on systemd support, including demos of the projects in this post, check out the video above or visit aka.ms/wslsystemd.
How to enable systemd in Ubuntu WSL
Make sure you are running the Microsoft Store version of WSL (version 0.67.6 and higher) to get access to systemd. This is currently available on the latest Windows 11 insiders build ahead of general release later this year.
Inside your Ubuntu instance, add the following modification to /etc/wsl.conf.
[boot]
systemd=true
Then restart your instance by running wsl --shutdown in PowerShell and relaunching Ubuntu.
Note: If you are running Ubuntu Preview, this option is now enabled by default
With everything set up you can now start exploring all of the new functionality enabled by systemd!
Use snap to create a Nextcloud instance in minutes on WSL
Nextcloud is a suite of client-server software for creating and using file hosting services. Think of it as an open source, self-hosted OneDrive or Google Drive and a great way to see the new potential of systemd and snapd in Ubuntu WSL.
With the Nextcloud snap you can have a working instance up and running in under 3 minutes. Don’t believe me? Try it for yourself!
First, install the Nextcloud snap.
$ sudo snap install nextcloudThen create a username and password.
$ sudo nextcloud.manual-install USERNAME PASSWORDThat’s it! To check that it’s running, use:
$ snap servicesThis command will list all the snap processes running on the instance and whether they’re enabled to run on startup.

We can also examine specific services using systemctl.
$ systemctl status snap.nextcloud.apache
We can see everything appears to be running correctly. You can access your Nextcloud instance by going to http://localhost in your native Windows browser and entering your username and password to check out your new Nextcloud!

Next let’s get down to business. Working directly in WSL is fine when you’re only running one web app. But when you’re working on multiple projects simultaneously you need a way to easily switch between them. Using containers in these instances can improve your workflow considerably.
Manage your web projects with LXD
LXD is a next generation system container that supports images for a wide number of Linux distributions, not just Ubuntu. LXD is designed to provide a better user experience on top of LXC containers, which are lightweight and easy to get started with.
In Ubuntu WSL, LXD should be installed by default but you can check this by running:
$ snap listAnd if it’s not there simply snap install lxd.
To make sure it’s up to date run:
$ snap refresh lxdYou can then initialise LXD for the first time by running:
$ lxd init --autoThis sets up LXD with some sensible defaults. Run this without the –auto flag if you want to play with the configuration options.
Let’s start by setting up an example project. Projects are a way of grouping LXC containers to make them easier to manage. You can read more about working with projects in LXD here.
First, create a project called ‘client-website’:
$ lxc project create client-website -c features.images=false -c features.profiles=falseThen switch to work in that project:
$ lxc project switch client-websiteFinally we create two LXC containers, one for a database and another for a webserver:
$ lxc launch ubuntu:22.04 webserver
$ lxc launch ubuntu:22.04 dbserver
We can run:
$ lxc lsTo see our projects and their IP addresses.

Install your webserver
Next we’ll install a basic Apache webserver in our webserver container, we can enter a bash terminal in the container by running:
$ lxc exec webserver bashAnd install apache2:
$ apt install apache2Let’s use systemctl again to confirm everything is running correctly:
$ systemctl status apache2.serviceAnd then exit the container.
$ exitAccessing containers in your native Windows browser is a little complex, however with WSLg we can easily use a web browser inside WSL to view all of our projects directly from the container IP.
$ sudo snap install firefoxThen run:
$ firefox &And navigate to your container IP inside your web browser running on Ubuntu.
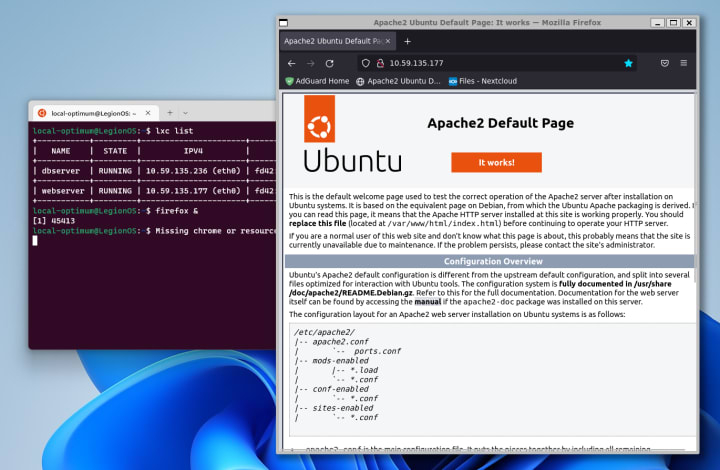
This method allows us to work on multiple web projects simultaneously and access them all via the browser with no fuss.
If you would like additional information on how to access containers directly in your Windows browser then check out our new video covering the use of LXD profiles and devices.
With a basic front-end in place, let’s also set up a back-end database for our website using MySQL.
Install MySQL
To install MySQL we need to exit the webserver and transition to the dbserver container:
$ lxc exec dbserver bashAnd then run the following command:
$ apt install mysql-serverAgain everything should be immediately up and running but we can check with:
$ systemctl status mysqlAnd if not we can start the database with:
$ systemctl start mysqlTo start interacting with our new MySQL database, it’s as simple as running:
$ mysqlAnd then running some simple commands:
mysql> show databases;
More advanced projects
Hopefully these simple examples have given you a taste of the new workflows and features that are now enabled thanks to systemd on WSL.
For those of you who want to go further we’ve also shared a couple of more advanced projects for you to take a look at.
Deploy your Website with MicroK8s and Docker

In the developer video at the top of this page, WSL PM Craig Loewen demonstrated the power of MicroK8s, a lightweight, performant Kubernetes with sensible defaults that makes it quick and easy to get Kubernetes up and running on your machine.
You can try out Craig’s demo for yourself by visiting his github here.
Build a service application with .Net

The .NET development platform was one of Microsoft’s earliest contributions to open-source projects. Its developer community consists of more than 5 million .NET developers, with many adopting Linux and Linux-based OCI containers at runtime. Earlier this year we announced that .NET 6 is now available from the Canonical repositories.
With Ubuntu WSL it’s never been easier to use .Net to create and test cross platform applications. In our new tutorial we show you how to create a simple chatbot with .Net and run it as a systemd service.
Get started with Ubuntu WSL today!
If you’re just getting started with WSL, check out our Ubuntu installation guides:
Install Ubuntu on WSL for Windows 10 ›
Install Ubuntu on WSL for Windows 11 ›
And visit ubuntu.com/wsl for more tutorials.

The full Ubuntu experience, available on Windows
Access the power of a full Ubuntu terminal environment on Windows with Windows Subsystem for Linux (WSL).
Streamline web application development, leverage cutting-edge AI/ML tooling, develop cross-platform applications and manage IT infrastructure without leaving Windows.
Newsletter signup
Related posts
How to deploy Kubeflow on Azure
Kubeflow is a cloud-native, open source machine learning operations (MLOps) platform designed for developing and deploying ML models on Kubernetes. Kubeflow...
Ubuntu available in Microsoft’s new WSL distribution format
New format in Windows Subsystem for Linux makes adoption easier in enterprise environments by enabling image customization and deployments at scale
Upgrade your desktop: Ubuntu 24.04.1 LTS is now available
Whether you’re a first time Linux user, experienced developer, academic researcher or enterprise administrator, Ubuntu 24.04 LTS Noble Numbat is the best way...