
The command line in depth
In Welcome to the terminal, we learned how to navigate the filesystem, work with files and directories, and manage permissions on the command line. Now we’ll go deeper into how to handle data flowing between programs, how to redirect that data to files and other programs, and how shell variables and expansion make our commands even more powerful.
If you are re-using a virtual machine from a different tutorial, skip directly to Standard streams.
Set up the virtual machine
To avoid making changes to your computer we will set up a virtual machine (VM), which provides us with a safe environment to run the commands in. Multipass is great for quickly creating Ubuntu virtual machines, so we will use that. It is available on Windows, Mac and Linux, so you don’t need to be already running Ubuntu on your computer to follow this tutorial.
Prerequisites
The Multipass VM needs 5 GB of disk space, and 1 GB of memory available.
Install Multipass
You can install Multipass directly from the Multipass page in the online snap store (make sure to select the “latest/stable” version from the dropdown menu next to the install button).
If you’re on Windows, Mac, or another Linux operating system, Multipass can be installed using these instructions.
Open a terminal window
Now that Multipass is installed, we need a terminal window to run our commands in. How you open one depends on your operating system.
Press Ctrl + Alt + T together and a terminal window will open. You can also search for “Terminal” in your application launcher.
PowerShell is the most reliable option for working with Multipass on Windows.
Press the Windows key.
Type
PowerShell.Right-click it and select Run as Administrator — this helps avoid permission issues when managing virtual machines.
If you have Windows Terminal installed from the Microsoft Store, that works just as well and offers a nicer experience with tab support.
To confirm everything is working, type multipass version and press Enter. If you see version numbers, you’re ready to continue.
Press ⌘ + Space to open Spotlight.
Type
Terminaland press Enter.
If you use iTerm2, that works perfectly well too.
To confirm everything is working, type multipass version and press Enter. If you see version numbers, you’re ready to continue.
Create the virtual machine
Once you have installed Multipass and opened your terminal, we can launch a new VM using the Ubuntu 26.04 LTS release (codename “resolute”), and let’s give our VM the name tutorial using the following command in our terminal window:
$ It may take a little time, depending on the speed of your internet connection. Multipass downloads the most recent daily image and creates the VM for us.
Note
An Ubuntu image is a collection of files we need to install and run Ubuntu. We don’t need to specify “server” or “desktop” anywhere in our command, because the image is the same for both. The only difference between Ubuntu Server and Ubuntu Desktop is the subset of software packages we use from the Ubuntu Archive.
Once the above command has finished running, we can access the VM by running:
$ We will get a “Welcome to Ubuntu” message. Notice that when we run this command, the terminal username changes to ubuntu and the hostname changes to tutorial:
ubuntu@tutorial:~ $
This shows that we are inside the VM, and this is where we will run all our commands. Now that our setup is complete, let’s carry on with the tutorial!
Standard streams
Now that we can work with files, we’re ready to understand something fundamental about how programs work in the terminal: standard streams.
Every program that runs has three open communication channels by default:
Standard input (stdin) – the channel through which the program receives input. By default, this is your keyboard.
Standard output (stdout) – the channel through which the program sends its results. By default, this is your terminal screen.
Standard error (stderr) – the channel through which the program sends error messages. This also appears on your terminal screen by default, but it is a separate channel from stdout.
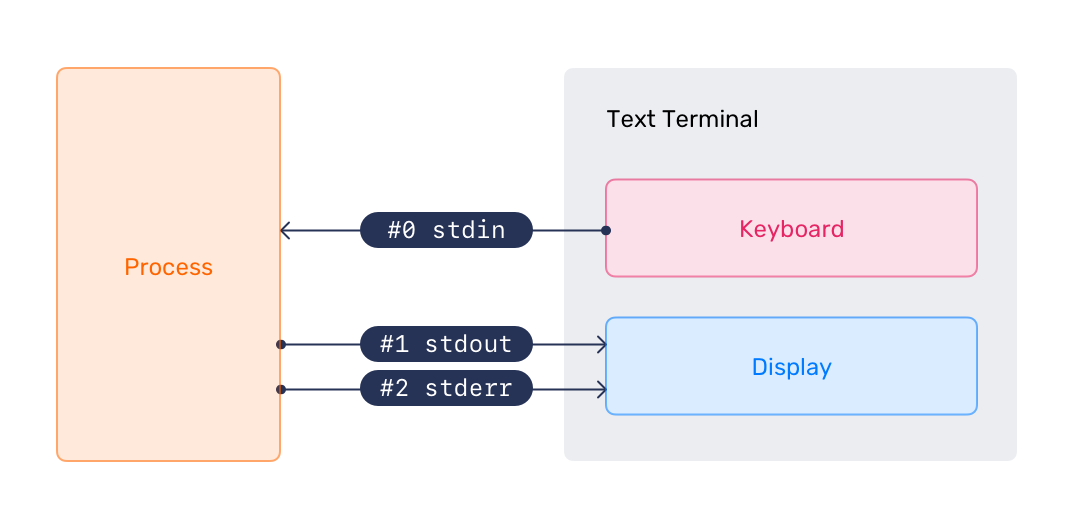
Each stream has a numerical identifier called a file descriptor:
0– stdin1– stdout2– stderr
You may be wondering: “why three separate channels? Why not just one?”.
The answer is that separating normal output from error output gives us much more flexibility. We can save the output of a command to a file while still seeing errors on screen – or silence errors entirely while saving results. We’ll see exactly how in the next sections.
Redirecting output
Normally, a command’s output goes straight to our terminal screen. We can tell the shell to send it somewhere else instead – like a file.
To redirect output to a file, we use the > operator followed by a filename. Let’s redirect the output of ls to a file called file-list.txt:
ubuntu@tutorial:~$ No output appears on screen – it has all gone into a new file called file-list.txt instead.
Viewing file contents
Now that file-list.txt exists and has some content in it, let’s look at the commands we can use to see what the file contains. There are a few to choose from, and which one is most convenient depends on how much of the file we want to see.
To print the full contents of a file to the screen, we can use cat (“concatenate”):
ubuntu@tutorial:~$ total 36
drwxr-x--- 4 ubuntu ubuntu 4096 May 1 09:25 .
drwxr-xr-x 3 root root 4096 Apr 16 14:15 ..
-rw------- 1 ubuntu ubuntu 1623 Apr 23 17:33 .bash_history
-rw-r--r-- 1 ubuntu ubuntu 220 Mar 31 2024 .bash_logout
-rw-r--r-- 1 ubuntu ubuntu 3771 Mar 31 2024 .bashrc
drwx------ 2 ubuntu ubuntu 4096 Apr 16 14:15 .cache
-rw------- 1 ubuntu ubuntu 20 Apr 23 17:33 .lesshst
-rw-r--r-- 1 ubuntu ubuntu 807 Mar 31 2024 .profile
drwx------ 2 ubuntu ubuntu 4096 Apr 16 14:15 .ssh
-rw-r--r-- 1 ubuntu ubuntu 0 Apr 23 11:05 .sudo_as_admin_successful
-rw-rw-r-- 1 ubuntu ubuntu 0 May 1 09:25 file-list.txt
You may see more lines or fewer lines here, depending on whether you ran through the Welcome to the terminal tutorial with this VM or not.
For longer files, less is more comfortable – with less we can scroll through the outputs one page at a time. Let’s look at /etc/passwd, which stores user account information and is long enough to scroll through:
ubuntu@tutorial:~$ Press Space to move down a page, and Q to quit when you are done.
If we only want to see the first lines of a file, we can use head:
ubuntu@tutorial:~$ root:x:0:0:root:/root:/bin/bash
daemon:x:1:1:daemon:/usr/sbin:/usr/sbin/nologin
bin:x:2:2:bin:/bin:/usr/sbin/nologin
sys:x:3:3:sys:/dev:/usr/sbin/nologin
sync:x:4:65534:sync:/bin:/bin/sync
games:x:5:60:games:/usr/games:/usr/sbin/nologin
man:x:6:12:man:/var/cache/man:/usr/sbin/nologin
lp:x:7:7:lp:/var/spool/lpd:/usr/sbin/nologin
mail:x:8:8:mail:/var/spool/mail:/usr/sbin/nologin
news:x:9:9:news:/var/spool/news:/usr/sbin/nologin
By default, head shows the first 10 lines but we can request a different number using the -n flag. For example, head -n 5 /etc/passwd shows only the first 5 lines.
Or we can see the last few lines with tail, which is used the same way as head:
ubuntu@tutorial:~$ fwupd-refresh:x:990:990:Firmware update daemon:/var/lib/fwupd:/usr/sbin/nologin
polkitd:x:989:989:User for polkitd:/:/usr/sbin/nologin
ubuntu:x:1000:1000:Ubuntu:/home/ubuntu:/bin/bash
tail is especially useful for examining log files, where the most recent entries are always at the bottom.
Warning
One thing to be careful about: we know that file-list.txt is empty because didn’t exist before, but if file-list.txt had already contained something, > would have overwritten it completely. To add things to the end of an existing file rather than replacing it, we use >> (append mode):
Let’s make our file a bit longer by using >> to add extra contents:
ubuntu@tutorial:~$ Now file-list.txt contains the original home directory listing followed by the /tmp listing. We can check on this by using cat file-list.txt again.
Sometimes we want a command to run silently, i.e. with its output discarded entirely. We can redirect stdout to /dev/null, a special file that throws away everything written to it:
ubuntu@tutorial:~$ We can also redirect stderr (file descriptor 2) independently from stdout. This is useful for capturing errors to a log file while still seeing normal output on screen:
ubuntu@tutorial:~$ Checking on this file shows us the error that would otherwise have been printed to the screen:
ubuntu@tutorial:~$ ls: cannot access '/nonexistent': No such file or directory
We can also merge stderr into stdout using 2>&1, which means “send file descriptor 2 to wherever file descriptor 1 is currently going”:
ubuntu@tutorial:~$ By doing this, both normal output and error messages will now appear in output.txt.
Redirecting input
We can go the other direction too! Instead of a command reading from the keyboard, we can feed it input from a file using the < operator.
Let’s use wc (“word count”), which counts lines, words, and characters in its input. Without redirection, we would type text and press Ctrl + D to signal the end of input. Instead, we can feed it a file directly:
ubuntu@tutorial:~$ 33
Once again, you might see a different value here, depending on whether this is a new VM or you’re reusing the one from the previous tutorial.
The -l flag tells wc to count lines only. When we use <, the file name does not appear in the output – wc sees the file’s contents as if they had been typed at the keyboard.
Here-documents
There is a related form called a here-document, written as <<. It lets us type multi-line input directly in the terminal, ending when we type a delimiter we choose ourselves (often EOF is used as this marker – short for “end of file”). Let’s test this by sending a greeting into a new file called greeting.txt:
ubuntu@tutorial:~$ The shell reads everything we type until it sees EOF on a line by itself, then passes it all as input to the command on the left. Let’s confirm the file was created correctly:
ubuntu@tutorial:~$ Hello from the terminal!
This text is going into a file.
Pipes
Pipes are one of the most powerful ideas in the Unix philosophy: the output of one command becomes the input of the next. We connect them with the | operator (the “pipe” character).
For example, ls -la /usr/bin produces many lines of output – more than can fit on screen, and you can only see the end of the output. Scrolling back up is often very inconvenient, if you can even do it at all (some terminals can’t!). To make it more convenient, we can pipe the output to less so we can page through it with the space key:
ubuntu@tutorial:~$ Press Q to quit less when you are done.
We can also pipe to grep to filter the output, keeping only lines that match a pattern. Let’s find all currently set environment variables whose names contain the word LANG:
ubuntu@tutorial:~$ LANG=C.UTF-8
Pipes can be chained together to build a pipeline – each command passes its output along to the next. For example, to see the 3 most recently modified files in /usr/bin, we can sort by modification time and then cut the output down with head:
ubuntu@tutorial:~$ total 121540
-rwxr-xr-x 1 root root 174328 Apr 30 13:32 kmod
lrwxrwxrwx 1 root root 4 Apr 30 13:32 lsmod -> kmod
Each command in the pipeline only ever sees the output of the command immediately before it – the shell connects them all behind the scenes.
Chaining commands
Pipes pass data from one command to another and run all of their commands in parallel. This allows commands to begin working on long streams of data while their source is still producing more. However, there are scenarios where you might want a serial process, in which case you would use command chaining instead. Chaining is different: it controls the order in which commands run, and whether the next command runs at all.
The simplest way to chain commands is to separate them with a semicolon (;). The shell runs each command in turn, regardless of whether the previous one succeeded, with the output of each command shown on separate lines:
ubuntu@tutorial:~$ errors.txt file-list.txt greeting.txt output.txt
/home/ubuntu
ubuntu
Note
On Linux, processes declare whether they have “succeeded” or not with an exit code. An exit code (or “exit status”) is a number from 0–255 that a process gives to its parent upon completion. “Success” is defined by exiting with code 0, with all other values indicating different types of failures. These might be specific to a particular program, but the generic failure status will usually be exit code 1. You can use exit n to immediately exit with code n.
Often we want the second command to run only if the first one succeeded. We use && for this:
ubuntu@tutorial:~$ snap-private-tmp systemd-private-[...]
If cd /tmp had failed (which can happen in a script when the directory does not exist), ls would not run at all.
The opposite of && is ||, which runs the second command only if the first one failed:
ubuntu@tutorial:~/tmp$ -bash: cd: /nonexistent: No such file or directory
Could not change directory
We can combine && and || to produce a simple success-or-failure message:
ubuntu@tutorial:~/tmp$ PING localhost (::1) 56 data bytes
[...]
Host is up
A few other operators are useful to know. Try each of these out, both with and without the operators, to see how they change the behaviour for yourself:
- Background execution;
& Runs a command in the background. The shell prompt returns immediately, and the command continues running. Let’s compare the difference in running
sleep 10and thensleep 10 &. Thesleepcommand doesn’t actually do anything, it just makes the system wait for the specified number of seconds. So, in this example our prompt disappears for 10 seconds and you can’t interact with the terminal during that time. If we background it, usingsleep 10 &, our command prompt returns immediately and we can continue to use the terminal.When we use the ampersand (
&) to background the process, it returns something like:[1] 168658
This number is the process ID (PID); a unique number identifying every process running on your machine. When the background process has finished running, you’ll see a message returned that looks like this, so you know it’s done:
[1]+ Done sleep 10
- Command grouping;
{} Groups commands together so they share the same output redirection or run as a unit. E.g. to create a quick log file you could run:
ubuntu@tutorial:/tmp$- Subshell execution;
() Run commands in a subshell, where the commands are forgotten the moment they finish running. This is useful for isolating side effects like a
cd– the directory change does not affect the current shell.ubuntu@tutorial:/tmp$- Line continuation;
\ Continue a long command on the next line, which helps a lot with command readability. You’ll see this often in documentation.
Let’s return home before continuing:
ubuntu@tutorial:/tmp$ Shell environment variables
Before we look at shell expansion, we need to understand shell variables, because expansion builds heavily on them.
Think of a variable as a labelled box: we give it a name, put a value inside, and later retrieve that value using the name of the box. The shell uses variables to store all kinds of information – including a great deal about the environment we’re working in.
Built-in variables
The shell already has a number of variables set up for us. To see every variable currently set in our environment, we can run:
ubuntu@tutorial:~$ We can print the value of any variable using echo with a $ in front of the variable name:
ubuntu@tutorial:~$ /bin/bash
ubuntu@tutorial:~$ ubuntu
ubuntu@tutorial:~$ /home/ubuntu
One particularly important variable is PATH. It tells the shell which directories to search when we type a command name:
ubuntu@tutorial:~$ /usr/local/sbin:/usr/local/bin:/usr/sbin:/usr/bin:/sbin:/bin:/usr/games:/usr/local/games:/snap/bin
Each directory is separated by a colon (:). When we type a command like ls, the shell searches through each of these directories in order until it finds a program with that name. This is why we can run commands without typing their full path. If a command lives outside these directories, we have to give its full path explicitly.
Setting and unsetting variables
We can create our own variables by assigning a name and a value. By convention, user-defined variable names are uppercase:
ubuntu@tutorial:~$ ubuntu@tutorial:~$ Hello, world!
To remove a variable, we use unset:
ubuntu@tutorial:~$ ubuntu@tutorial:~$ This time we get no output, because the variable no longer exists.
Exporting variables to subshells
Variables we create in the shell are only available in the current shell session. If a new shell process is started (for example, when running a script), it will not have access to our variables unless we export them.
Let’s demonstrate. First, we set a variable and try to access it from a subshell:
ubuntu@tutorial:~$ ubuntu@tutorial:~$ Nothing is printed – the subshell has no knowledge of MY_VAR. Now let’s export it first:
ubuntu@tutorial:~$ ubuntu@tutorial:~$ hello
export makes the variable part of the environment that is passed down to any child processes we start.
Special read-only variables
Some variables are set by the shell itself and can only be read, never assigned. Two of the most useful are:
$?– the exit status of the last command.0means success; any non-zero value means something went wrong.$$– the Process ID (PID) of the current shell.
Let’s see $? in action. A successful command returns 0:
ubuntu@tutorial:~$ /etc/passwd
ubuntu@tutorial:~$ 0
And a failing command returns a non-zero value:
ubuntu@tutorial:~$ ls: cannot access '/nonexistent': No such file or directory
ubuntu@tutorial:~$ 2
This is especially useful when we build scripts, where we can check whether the previous command succeeded before deciding what to do next.
Shell expansion
When we press Enter on a command, the shell does not send our text directly to the program. First, it processes the command line and expands certain patterns into their final values. Understanding expansion explains a lot of seemingly “magic” shell behaviour.
Tilde expansion
We have already used tilde expansion without thinking about it. When the shell sees ~ at the start of a word, it replaces it with the value of $HOME:
ubuntu@tutorial:~$ /home/ubuntu
ubuntu@tutorial:~$ /home/ubuntu/my-file.txt
Variable expansion
We have seen this already: $VARIABLE_NAME (or ${VARIABLE_NAME}) is replaced with the variable’s value before the command runs. The braces form is important when the variable name might be confused with the characters that follow it:
ubuntu@tutorial:~$ ubuntu@tutorial:~$ Today is Monday!
Without the braces, the shell would try to expand $DAY! as a single variable name and find nothing.
It’s also important to note that this variable expansion applies everywhere in the line, even with the command name itself!:
ubuntu@tutorial:~$ ubuntu@tutorial:~$ It's dynamic!
This can be useful in, say, a script that runs one of two very similar commands with the same argument, so you don’t have to re-type everything twice in your conditional.
Command substitution
Command substitution lets us use the output of a command as part of another command. We wrap the inner command in $(...):
ubuntu@tutorial:~$ Today is Fri Apr 24 10:00:00 BST 2026
The shell runs date first, captures its output, and substitutes it into the outer command before running it.
Arithmetic expansion
For integer arithmetic, we use $((...)):
ubuntu@tutorial:~$ 8
ubuntu@tutorial:~$ ubuntu@tutorial:~$ 20
The available Arithmetic operators are:
Addition (
+)Subtraction (
-)Multiplication (
*)Integer division (
/)Modulo/remainder (
%)Exponentiation (
**)
Brace expansion
Brace expansion generates a list of strings from a pattern. Unlike the other types of expansion, it does not involve variables or filenames – it is a purely text-based generation mechanism:
ubuntu@tutorial:~$ spin span spar
Ranges work too, using ..:
ubuntu@tutorial:~$ 1 2 3 4 5 6 7 8 9 10
Brace expansion is particularly useful for creating multiple files or directories in one command. For example, to create a directory for each month of the year:
ubuntu@tutorial:~$ ubuntu@tutorial:~$ 01-reports 02-reports 03-reports 04-reports 05-reports 06-reports
07-reports 08-reports 09-reports 10-reports 11-reports 12-reports
We can even clean them up in one command, too:
ubuntu@tutorial:~$ Wildcard expansion
Wildcard expansion (also called globbing) lets us match filenames by pattern. We touched on this in Welcome to the terminal when we used mv *.txt my-folder to move all text files at once.
The three main wildcards are:
*Matches any sequence of characters (including none), so as we saw previously,
*.txtmatches all files ending in.txt.?Matches any single character. For example,
file?.txtmatchesfile1.txtandfileA.txt, but notfile10.txt.[...]Matches any one of the characters inside the brackets.
file[123].txtmatchesfile1.txt,file2.txt, andfile3.txtonly.
Character classes like [[:digit:]] and [[:alpha:]] can be used inside brackets to match whole categories of characters.
Let’s see wildcards in action. To list every file in /usr/bin whose name starts with m:
ubuntu@tutorial:~$ /usr/bin/make /usr/bin/man /usr/bin/md5sum [...]
Wildcards are expanded by the shell before the command runs, so the program receives the resulting list of matching filenames – it never sees the * character itself.
Success!
This is the end of our journey around the terminal, and some of the powerful things we can do with it, but it’s certainly not all there is to know!
If you wish, you can continue to explore the file system on your virtual machine.
Once you are finished and want to exit the VM, just type “exit”.
ubuntu@tutorial:~$ This will take you out of the VM and back to your live machine. Then, you can run the following commands to delete the VM and remove it completely from your machine:
ubuntu@tutorial:~$ ubuntu@tutorial:~$ Next steps
If you wish to continue learning, we recommend following the Managing your software tutorial next. This tutorial will teach you all the different ways to handle installing, removing and customizing software on your Ubuntu machine, as well as how to safely keep it up-to-date.