
Welcome to the terminal
On Ubuntu Server, the terminal is the primary way of interacting with your system. It’s easier to use than you might think, and learning it gives you much more control over your system (including on your Ubuntu Desktop). In this tutorial, you will learn how to use the terminal to navigate your Ubuntu system, find and work with files, and where to find help if you get stuck.
Set up the virtual machine
To avoid making changes to your computer we will set up a virtual machine (VM), which provides us with a safe environment to run the commands in. Multipass is great for quickly creating Ubuntu virtual machines, so we will use that. It is available on Windows, Mac and Linux, so you don’t need to be already running Ubuntu on your computer to follow this tutorial.
Prerequisites
The Multipass VM needs 5 GB of disk space, and 1 GB of memory available.
Install Multipass
You can install Multipass directly from the Multipass page in the online snap store (make sure to select the “latest/stable” version from the dropdown menu next to the install button).
If you’re on Windows, Mac, or another Linux operating system, Multipass can be installed using these instructions.
Open a terminal window
Now that Multipass is installed, we need a terminal window to run our commands in. How you open one depends on your operating system.
Press Ctrl + Alt + T together and a terminal window will open. You can also search for “Terminal” in your application launcher.
PowerShell is the most reliable option for working with Multipass on Windows.
Press the Windows key.
Type
PowerShell.Right-click it and select Run as Administrator — this helps avoid permission issues when managing virtual machines.
If you have Windows Terminal installed from the Microsoft Store, that works just as well and offers a nicer experience with tab support.
To confirm everything is working, type multipass version and press Enter. If you see version numbers, you’re ready to continue.
Press ⌘ + Space to open Spotlight.
Type
Terminaland press Enter.
If you use iTerm2, that works perfectly well too.
To confirm everything is working, type multipass version and press Enter. If you see version numbers, you’re ready to continue.
Create the virtual machine
Once you have installed Multipass and opened your terminal, we can launch a new VM using the Ubuntu 26.04 LTS release (codename “resolute”), and let’s give our VM the name tutorial using the following command in our terminal window:
$ It may take a little time, depending on the speed of your internet connection. Multipass downloads the most recent daily image and creates the VM for us.
Note
An Ubuntu image is a collection of files we need to install and run Ubuntu. We don’t need to specify “server” or “desktop” anywhere in our command, because the image is the same for both. The only difference between Ubuntu Server and Ubuntu Desktop is the subset of software packages we use from the Ubuntu Archive.
Once the above command has finished running, we can access the VM by running:
$ We will get a “Welcome to Ubuntu” message. Notice that when we run this command, the terminal username changes to ubuntu and the hostname changes to tutorial:
ubuntu@tutorial:~ $
This shows that we are inside the VM, and this is where we will run all our commands. Now that our setup is complete, let’s carry on with the tutorial!
Understanding the terminal
In our new terminal window, we see a shell prompt (sometimes called a command prompt), which is constructed as your-username@your-hostname and followed by a dollar sign ($). This is where we input commands to the computer.
your-name@your-machine-name:~$ Output: The results after running the command
The output – the results of running your commands – is shown separately, underneath the shell prompt.
Tip
You can use your mouse to copy text into the terminal by holding the left mouse button and dragging your mouse to highlight the text you want to copy. Then, release the left button.
Move your mouse pointer to the terminal window and press the middle mouse button (or click the right mouse button and select paste).
The Command Line Interface (CLI) is the language we use in our terminal to interact with our system. The CLI gives you far more control over your system than the Graphical User Interface (GUI) that you may be more familiar with.
In software documentation, you will often see instructions to “run” or “execute” a command (or a set of commands). What this means is: type the command into your terminal at the shell prompt and press Enter on your keyboard. We did this already when we ran the multipass launch command to create our VM.
The command is sent to the shell, which interprets the command and sends it to the operating system, which runs the command. It took a little time for the tutorial instance to be created, but eventually the shell showed output like this:
user@computer:~$ Launched: tutorial
So we know that the VM called tutorial was created successfully!
The shell
You may be wondering: “why we need a shell at all? Why can’t we just tell the operating system what to do using our Desktop environment?”
This is a good question. The simple answer is that while you can use the Desktop’s Graphical User Interface (GUI) to interact with your computer, the shell is much more resource-efficient and faster, since it doesn’t need to handle computationally expensive graphics. Servers rarely even have a GUI installed for precisely this reason.
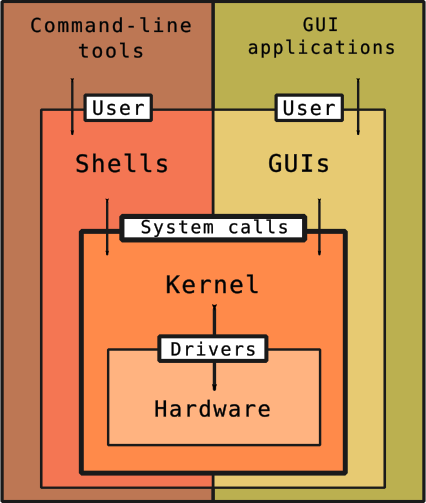
For simple tasks, like renaming a single file, there’s little difference between using your GUI and the CLI to complete it. However, if you need to rename 1,000 files to include the date they were created in the name, this would be a tiresome and time-consuming task to do in the GUI – lots of clicking and typing. Using the CLI, you can pull in the date automatically, set the pattern you want the names to follow, and have all 1,000 files renamed instantly.
The real power and efficiency of the shell can be felt when you need to do something many times. You can even automate routine or large/complex tasks with shell scripts and command chaining – more on that in the next tutorial, though!
The virtual machine provided by Multipass has no Graphical User Interface (GUI). It abstracts away all the details of virtualization, which is quite complicated, so we don’t have to worry about them. This means we can just open a shell inside our Multipass VM instance, which we did when we ran the multipass shell tutorial command:
After we ran the command, our terminal window shows us a welcome message like this:
ubuntu@tutorial:~$ Welcome to Ubuntu 26.04 LTS (GNU/Linux 7.0.0-15-generic x86_64)
* Documentation: https://docs.ubuntu.com
* Management: https://landscape.canonical.com
* Support: https://ubuntu.com/pro
System information as of Fri May 29 17:22:28 BST 2026
System load: 0.17 Processes: 110
Usage of /: 56.8% of 3.70GB Users logged in: 0
Memory usage: 22% IPv4 address for ens3: 10.234.118.66
Swap usage: 0%
Expanded Security Maintenance for Applications is not enabled.
26 updates can be applied immediately.
10 of these updates are standard security updates.
To see these additional updates run: apt list --upgradable
Enable ESM Apps to receive additional future security updates.
See https://ubuntu.com/esm or run: sudo pro status
You’ve probably noticed that your shell prompt has changed, and now says ubuntu@tutorial:~$ – tutorial is the name of our virtual machine (the hostname), and ubuntu is the default username in a Multipass virtual machine. This is how we know we’re now playing in our virtual sandbox, and not in our physical computer.
Other ways to use commands
As we’ve now seen, CLI commands are the instructions that we give the computer by typing them into the terminal. In our documentation, commands are formatted like this.
Sometimes, we might want to run a whole set of commands at once. For convenience, we can save them in a file called a shell script, in the order we want the shell to execute them. Then, we just need to tell the shell to run the script, and it executes the commands in the script by itself.
As you become more familiar with the command line, you can also begin to define your own commands built from other commands. These are called aliases, and they can be very handy shortcuts for small sets of commands you want to run often.
Working with files
We’ve already seen how to create empty files. Let’s look at how to copy, move, and remove files.
Since our directory is empty again, let’s create a new file to play with using the touch command:
ubuntu@tutorial:~$ If we run ls, we’ll see it is there:
ubuntu@tutorial:~$ file1.txt
To copy a file, we use cp (“copy”), followed by the original file’s name, and then the new file’s name. This is another case of using positional arguments:
ubuntu@tutorial:~$ Since we’re not renaming or otherwise touching file1.txt, we should now have two files:
ubuntu@tutorial:~$ file1.txt file2.txt
Before we can see how to move a file, we need to have somewhere to move the file to, so let’s quickly create a directory to test this out using mkdir new-folder.
Now we can move file2.txt to our new-folder using the mv (“move”) command, which takes two arguments:
mv <original-location/file-name> <new-location/file-name>
In our case, that translates to:
ubuntu@tutorial:~$ Both of the arguments here can take a path, but if we’re in the same directory as the file is located in, we don’t need to specify it. This becomes really powerful when you have to handle a lot of files in subdirectories.
ubuntu@tutorial:~$ file1.txt new-folder
If we cd to our new-folder we can see our file has been moved with the same name. But – what if we don’t want to keep the same name? It turns out mv can help us with that too.
ubuntu@tutorial:~/new-folder$ We can also combine both moving the file and renaming it into one command. This time, instead of moving the file down a level by specifying the name of a sub-directory, we can use ../ to indicate we want to move the file up to the previous level:
ubuntu@tutorial:~/new-folder$ We could achieve the same by specifying the name of the next directory up (instead of ..), but this shorthand is much more convenient!
Then if we cd .. back to the home directory, and run ls again, we’ll see that our file has been moved back:
ubuntu@tutorial:~$ file1.txt file2.txt new-folder
So what if we want more copies of the same file, but in our new-folder?
For that, we can use cp again, but give the directory as the destination:
ubuntu@tutorial:~$ Double check with ls and cd that this has worked. You should now have file1.txt in both the home directory, and in new-folder.
Note
Be aware that the terminal will not check for, or warn you about, collisions between names. If you tell it to rename a file where a file of that name already exists, it will gleefully overwrite the original!
The cp command is not just for files. We can make backup copies of a whole directory (and all its contents) using the -a (or --archive) flag. This flag preserves all the file permissions:
ubuntu@tutorial:~$ Take a look around your new-folder-backup directory to make sure it all matches the original, then cd .. back to the home directory.
Let’s say we no longer want file.txt. We can use the rm command to remove it, the way we did before. This time, we don’t need the -r flag because we’re deleting a single file.
ubuntu@tutorial:~$ Warning
Remember, there is no recycle bin in the Linux terminal – once you rm a file, it is gone. On your real system, double-check what you are deleting before running this command.
Understanding file attributes
In Linux, everything is represented as a file – including directories, devices, and network connections. When we use ls -l, the very first character of each line tells us what type of file it is.
Let’s look at a few examples:
ubuntu@tutorial:~$ -rw-rw-r-- 1 ubuntu ubuntu 0 Apr 21 17:46 file2.txt
drwxrwxr-x 2 ubuntu ubuntu 4096 Apr 21 18:00 new-folder
drwxrwxr-x 2 ubuntu ubuntu 4096 Apr 21 18:00 new-folder-backup
The output looks quite complicated at first, so let’s break it down using the first row of the output.
Column |
What it is |
Description |
|---|---|---|
|
Permissions |
The type of file and who can read/write/execute it |
|
Links |
The number of distinct filesystem paths that refer to this file or directory (called “hard links”) |
|
Owner |
The username of the person who owns the file |
|
Group |
The name of the group that has specific permissions |
|
Size |
The size of the file in bytes |
|
Timestamp |
The date and time the file was last modified |
|
Name |
The actual name of the file or directory |
Fields like the file name, size, and timestamp, are quite intuitive once you know that this is what the fields represent. Permissions, owner and group are a bit less intuitive, so let’s examine those in more detail.
Users, groups, and permissions
Linux is a multi-user system – it is designed to be used by multiple people at once, and it carefully controls who can read, modify, or run any given file. Understanding users, groups, and permissions is essential for working safely on a Linux system.
Every file on a Linux system has an owner (a user account) and a group associated with it. Permissions grant different types of access to owners and groups.
The nine characters in the permissions field show the different levels of access granted for each file. They are split into three groups of three:
-  rwx  r-x  r-x
|   |    |    |
│   │    │    └── Other (everyone else): read + execute
│   │    └─────── Group: read + execute
│   └──────────── Owner: read + write + execute
└──────────────── File type: regular file
Each group of three characters can contain:
r– Read: view the file’s contentsw– Write: modify or delete the filex– Execute: run the file as a program (or, for directories, enter them withcd)-– the permission is not granted
In our own example, we can see this means that for file2.txt, the permissions are:
-  rw-  rw-  r--
|   |    |    |
│   │    │    └── Other (everyone else): read only
│   │    └─────── Group: read + write (no execute)
│   └──────────── Owner: read + write (no execute)
└──────────────── File type: regular file
The first character on each line is the file type indicator, which tells us what type of file it is:
Symbol |
Type |
Description |
|---|---|---|
|
Regular file |
An ordinary file: documents, scripts, binaries, images, etc. |
|
Directory |
A file that is a list of other files |
|
Symbolic link (or symlink) |
A pointer (shortcut) to another file |
|
Character device |
A device file for hardware that handles data one character at a time (e.g., a keyboard) |
|
Block device |
A device file for hardware that handles buffered data in blocks (e.g., a hard disk) |
|
Socket |
A file used for inter-process communication |
|
Named pipe |
Allows processes to communicate without network socket semantics |
Changing file permissions
We can change a file’s permissions using chmod (“change file mode”). There are two ways to use it.
Symbolic notation
This method uses letters to specify who to change:
u– user (owner)g– groupo– other
And what to change:
+– add a permission-– remove a permission
Let’s test method out first by creating a script file:
ubuntu@tutorial:~$ ubuntu@tutorial:~$ -rw-rw-r-- 1 ubuntu ubuntu 0 Apr 23 10:52 symbolic-test.sh
And then let’s make it executable by us (the owner):
ubuntu@tutorial:~$ ubuntu@tutorial:~$ -rwxrw-r-- 1 ubuntu ubuntu 0 Feb 12 2024 myscript.sh
Note how the permissions for the owner have change from “read and write only” (rw-) to “read, write and execute” (rwx).
Numeric notation
This method uses a three-digit number where each digit is calculated by adding: read (4) + write (2) + execute (1):
ubuntu@tutorial:~$ ubuntu@tutorial:~$ -rw-rw-r-- 1 ubuntu ubuntu 0 Apr 23 15:58 numeric-test.sh
Then let’s use the numeric notation to change the permissions:
ubuntu@tutorial:~$ ubuntu@tutorial:~$ -rwxr-xr-x 1 ubuntu ubuntu 0 Apr 23 15:58 numeric-test.sh
From this we can see that 755 means: the owner has read, write and execute (7) privileges, the group has read and execute (5), while all others have read and execute (5).
Some common permission combinations:
Number |
Symbolic |
Meaning |
|---|---|---|
|
|
Owner can read/write; others can only read. Suitable for most files. |
|
|
Owner can do everything; others can read and execute. Suitable for scripts and directories. |
|
|
Only the owner has any access. |
|
|
Owner can read/write; no one else has any access. |
|
|
Full access to everyone. This is a dangerous permission to grant, but may be useful for debugging permission-related problems or on temporary files. Please avoid using this one unless you really know what you’re doing, and if you do see it, you should probably change it to one of the less permissive combinations. |
When we create a new file, it gets a default set of permissions. The umask (“user file-creation mode mask”) controls what those defaults are. We can check the current umask with:
ubuntu@tutorial:~$ 0002
The umask works by subtracting permissions from the maximum (777 for directories, 666 for files). A umask of 022 results in files being created with permissions of 644 and directories with 755 by default.
Temporary admin privileges with sudo
Most day-to-day work on Ubuntu is done as a regular user, without administrative privileges. When we do need to run a command as an administrator, we prefix it with sudo (“superuser do”), which temporarily grants elevated privileges for that one command. For example, if we want to update the software on our computer, we would run these two commands in sequence:
ubuntu@tutorial:~$ ubuntu@tutorial:~$ When we run a sudo command, we are asked for our password to confirm it is us.
The sudo group on Ubuntu is special: any user account added to it gains the ability to run commands with admin privileges. Groups are listed in /etc/group, and a user can belong to many groups at once. We can inspect who is in the sudo group with:
ubuntu@tutorial:~$ sudo:x:27:ubuntu
Each line of the /etc/group file follows this format:
group_name:password:GID:user_list
Where:
group_nameis the human-readable name of the group (what you see when you runls -l)passwordis always shown asxin modern Linux systems - the actual (encrypted) group password is stored in the secure/etc/passwdfile.GIDis the group ID, which is a unique numerical integer assigned to the group.user_listis a comma-separated list of usernames that are members of the group.
The Filesystem Hierarchy Standard
Now that we know how to move around the filesystem, it’s worth understanding how it is organised. Most Linux distributions, including Ubuntu, follow the Filesystem Hierarchy Standard (FHS), which defines where different types of files and directories belong. This is maintained by the Linux Foundation, and it means the structure of any conforming system is predictable and consistent.
All files and directories live under the root directory, represented by a single forward slash /. Even files stored on separate physical disks appear as part of this single tree.
Let’s take a look at the top level:
ubuntu@tutorial:~$ bin dev home lib64 media opt root sbin srv tmp usr var
boot etc lib mnt proc run snap sys
Here is what the most important directories contain:
Directory |
Purpose |
|---|---|
|
Essential command binaries (e.g., |
|
System binaries (e.g. |
|
Static files needed to boot the system, including the Linux kernel and bootloader files |
|
Device files (e.g. |
|
System configuration files (e.g. |
|
User home directories (optional, but standard) |
|
Essential shared libraries (needed by the binaries in |
|
Mount points for temporarily mounted removable media (like USBs or CDs) |
|
Mount points for manually mounted filesystems (kept separate to avoid clashes) |
|
The home directory for the root user specifically |
|
Service data, for services provided by the system |
|
Temporary files (cleared on reboot) |
|
Most user programs, libraries, and documentation |
|
Variable data: logs, caches, spool files |
This is not a complete list, by any means! If you’d like more information about the Standard and other directories contained within it, take a look at the official specification.
Exploring deeper
Let’s browse a few of these. The /etc directory contains configuration files for the system and its services. Some important files there include:
/etc/passwd– the user account database/etc/shadow– encrypted passwords (readable only by root)/etc/fstab– filesystems to be mounted automatically at startup/etc/group– group account information
The /var/log directory holds the system’s log files – a useful place to look when diagnosing problems:
ubuntu@tutorial:~$ The tree command can be used to visualise directory structures in a tree-style listing. It’s not installed by default, so let’s install it:
ubuntu@tutorial:~$ The -L flag can be used to set the depth you want to view. To see the top level (or level 1) of the root filesystem (/):
ubuntu@tutorial:~$ To go one level deeper, to level 2:
ubuntu@tutorial:~$ What happens if you just run tree by itself, with no arguments?
ubuntu@tutorial:~$ .
├── file2.txt
├── new-folder
│ └── file1.txt
├── new-folder-backup
│ └── file1.txt
├── numeric-test.sh
└── symbolic.sh
3 directories, 5 files
This is a much more convenient way to see what files each directory contains.
A note about flags
So far we’ve been using short flags, with a single dash (-) followed by a single letter, like with ls -l.
Most flags also have a long version, where you’ll see a double dash (--) with a full word. If a flag has both a long and short version, they can be used interchangeably.
It’s possible to combine flags together. For example, the -l and -a flags (“long list”, “all”) would be combined into ls -la gives us a long listing that also includes hidden files, or those whose names start with a . character:
ubuntu@tutorial:~$ drwxr-x--- 6 ubuntu ubuntu 4096 Apr 23 17:26 .
drwxr-xr-x 3 root root 4096 Apr 16 14:15 ..
-rw------- 1 ubuntu ubuntu 936 Apr 23 13:00 .bash_history
-rw-r--r-- 1 ubuntu ubuntu 220 Mar 31 2024 .bash_logout
-rw-r--r-- 1 ubuntu ubuntu 3771 Mar 31 2024 .bashrc
drwx------ 2 ubuntu ubuntu 4096 Apr 16 14:15 .cache
-rw------- 1 ubuntu ubuntu 20 Apr 23 17:26 .lesshst
-rw-r--r-- 1 ubuntu ubuntu 807 Mar 31 2024 .profile
drwx------ 2 ubuntu ubuntu 4096 Apr 16 14:15 .ssh
-rw-r--r-- 1 ubuntu ubuntu 0 Apr 23 11:05 .sudo_as_admin_successful
-rw-rw-r-- 1 ubuntu ubuntu 0 Apr 23 15:47 file2.txt
drwxrwxr-x 2 ubuntu ubuntu 4096 Apr 23 15:53 new-folder
drwxrwxr-x 2 ubuntu ubuntu 4096 Apr 23 15:53 new-folder-backup
-rwxr-xr-x 1 ubuntu ubuntu 0 Apr 23 15:58 numeric-test.sh
-rwxrw-r-- 1 ubuntu ubuntu 0 Apr 23 15:54 symbolic.sh
This brings us onto one of the most important skills when you are learning the terminal – how to find help.
Getting help
Linux comes with a comprehensive built-in manual, and learning to use it helps us explore on our own. Every command in Linux has a manual page that describes what it does, and lists all the option flags available.
Most documentation uses the short version of a flag when demonstrating a command – mostly for convenience. However, if you are ever unsure what a flag does, you can look up the command’s manual page (often called a “manpage” for short).
For example, you can invoke the manual page for ls using the man ls command.
ubuntu@tutorial:~$ This opens the manual page for ls. We can navigate it with the following keys on our keyboard:
Key |
Action |
|---|---|
Enter |
Move down one line |
Space |
Move down one page |
g |
Move to the top |
G |
Move to the bottom |
h |
Display navigation help |
q |
Quit |
You can also scroll up and down using the mouse wheel, or the up and down keys.
Let’s try reading the man page for man itself:
ubuntu@tutorial:~$ The Linux manual is divided into numbered sections – the number appears in the page title, e.g., LS(1). Section 1 means “executable programs and shell commands”. We can search within a man page by pressing / followed by a search term, then Enter.
Manual pages are also rendered online and can be viewed in your browser.
Quick help with –help
Most commands also accept a --help flag that prints a brief summary of the available options:
ubuntu@tutorial:~$ This is often quicker than opening the full manual page when we just want to check a specific flag.
Searching for a command
If we know what we want to do but don’t know which command to use, man -k searches the man page descriptions for a keyword:
ubuntu@tutorial:~$ This lists every command whose description mentions “copy”, which can help us find the right tool for the job.
Next steps
This is the end of our introduction to the terminal! We have covered a lot of ground: launching a virtual machine, navigating the filesystem, working with files and directories, understanding file types and the filesystem hierarchy, managing permissions, and finding help. All the commands we covered here (as well as some extra ones) can be found in our reference Command-line cheat sheet.
If you wish, you can continue to explore the file system on your virtual machine, or proceed straight to the next tutorial where you can use the same VM.
However, if you’re done for now and want to exit the VM, just type “exit”.
ubuntu@tutorial:~$ This will take you out of the VM and back to your live machine. Then, you can run the following commands to delete the VM and remove it completely from your machine:
ubuntu@tutorial:~$ Next steps
If you wish to continue learning, we recommend following the The command line in depth tutorial next. This tutorial will teach you the more advanced ways to interact with the Command Line Interface; how data flows, how input and output can be used more efficiently, and how to use variables.