Your submission was sent successfully! Close

You have successfully unsubscribed! Close

Thank you for signing up for our newsletter!
In these regular emails you will find the latest updates about Ubuntu and upcoming events where you can meet our team.Close

Setup a ZFS storage pool

1. Overview

ZFS is a combined file system and logical volume manager originally designed and implemented by a team at Sun Microsystems led by Jeff Bonwick and Matthew Ahrens. Features of ZFS include protection against data corruption, high storage capacity (256 ZiB), snapshots and copy-on-write clones and continuous integrity checking to name but a few. If you are dealing with large amounts of data, or providing a backing filesystem for virtualisation, ZFS is a great choice.

This guide will go through the process of installing ZFS on Ubuntu 16.04 LTS and setting up a storage pool.

What you’ll learn

  • How to install ZFS
  • How to create a storage pool

What you’ll need

  • Ubuntu Server 16.04 LTS

Ready? Let’s head over to the next step!

Originally authored by Aden Padilla.


2. Installing ZFS

The main components of ZFS are maintained as a standard Ubuntu package, so to install simply run:

sudo apt install zfsutils-linux

After that, we can check if ZFS was installed correctly by running:

whereis zfs

You should see output similar to the following:

whereisoutput

Now that we’re done installing the required packages, let’s create a storage pool!


3. Creating a ZFS Pool

Choosing Drives to Pool

Check installed drives by running:

sudo fdisk -l

Carefully note down the device names of drives you want to pool.

These are the two drives we’re going to pool: disk1

Creating a Pool

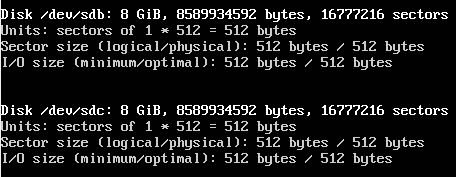
There are two types of simple storage pools we can create. A striped pool , also called RAID-0 , in which the data is stored in “stripes” across all drives, or a mirrored pool , also called RAID-1 , in which a complete copy of all data is stored separately on each drive. Striped pools are not fault tolerant whereas mirrored pools can survive the failure of one drive. Striped pools have twice the storage capacity of mirrored pools and have better performance than mirrored pools.

To create a striped pool, we run:

sudo zpool create new-pool /dev/sdb /dev/sdc

To create a mirrored pool, we run:

sudo zpool create new-pool mirror /dev/sdb /dev/sdc

In both examples, new-pool is the name of the pool.

Sometimes an error like this might pop up:
error Add “-f” to the end of the zpool create command to override it.

A mirrored pool is usually recommended as we’d still be able to access our data if a single drive fails. However, this means that we’ll only get the capacity of a single drive. A striped pool, while giving us the combined storage of all drives, is rarely recommended as we’ll lose all our data if a drive fails. You can also opt for both, or change the designation at a later date if you add more drives to the pool.

The newly created pool is mounted at /new-pool. You can select a different mount point using the -m option:

sudo zpool create -m /usr/share/pool new-pool mirror /dev/sdb /dev/sdc

The newly mounted pool will appear to Ubuntu as any other part of the filesystem.


4. Checking Pool Status

You can check the status of ZFS pools with:

sudo zpool status

This is the status of our newly created pool: newpoolstats


5. Removing the pool

If you are finished with the pool, you can remove it. Beware that this will also remove any files that you have created within the pool!

sudo zpool destroy new-pool

You can confirm that the pool has been removed by checking the filesystem and by running the status check again:

sudo zpool status

6. That’s all!

Congratulations, you have updated your Ubuntu install with a cutting edge new filesystem! You have found out:

  • How to install the ZFS utilities
  • How to identify which drives to use in a ZFS pool
  • The basic types of ZFS pools
  • How to create and mount a pool
  • How to remove the pool once you no longer need it

Be sure to check back on this site for more tutorials on using ZFS!

Further reading