Developing an LLM chat-client with Spring AI
This tutorial aims to provide a quick, hands-on introduction to Spring AI. Starting with devpack-for-spring, and using a locally installed large language model, the tutorial demonstrates how easy it is to create an LLM chat-client using Spring AI.
Introduction to Spring AI
The Spring AI project aims to streamline development of applications that incorporate artificial intelligence functionality. It is an extension to the Spring and Spring Boot frameworks. It includes abstractions for various artificial intelligence interactions and protocols that hide complexity and provide an easy programming interface for Java applications. Spring AI offers a consistent interface across AI providers and models, making your code portable.
Spring AI’s core abstractions include:
The advanced features include support for:
The above feature-set makes LLM interactions effortless and other complex interactions relatively easier.
An LLM chat-client using Spring AI
In this tutorial, Spring AI’s ChatClient API is used to create a simple LLM chat-client. The application offers a REST API to send questions to a configured LLM, and relay the answers as responses. We use Qwen 2.5 VL model installed locally using an inference snap. The devpack-for-spring CLI is used to initialize this application.
Installing Qwen 2.5 VL locally
Install qwen-vl for the 2.5 track:
user@host:~$ sudo snap install qwen-vl --channel 2.5/betaTo check the status, use the status command. We revisit this in a later section.
user@host:~$ qwen-vl statusWhen the status command reports an openai endpoint, Qwen 2.5 VL is installed and the server used to perform inference with it is up and running. To learn more, refer to the documentation on inference snaps.
Initializing the chat-client project
Install devpack-for-spring (skip this step when already installed):
user@host:~$ sudo snap install devpack-for-spring --classic --channel latest/edgeInstall the content snap for Spring AI:
user@host:~$ devpack-for-spring add-library content-for-spring-ai-20Important
The content-for-spring-ai-20 snap installs Spring AI 2.X, which is compatible with Spring Boot 4.0.x.
To initialize a Spring Boot and Spring AI project, use devpack-for-spring’s CLI wizard.
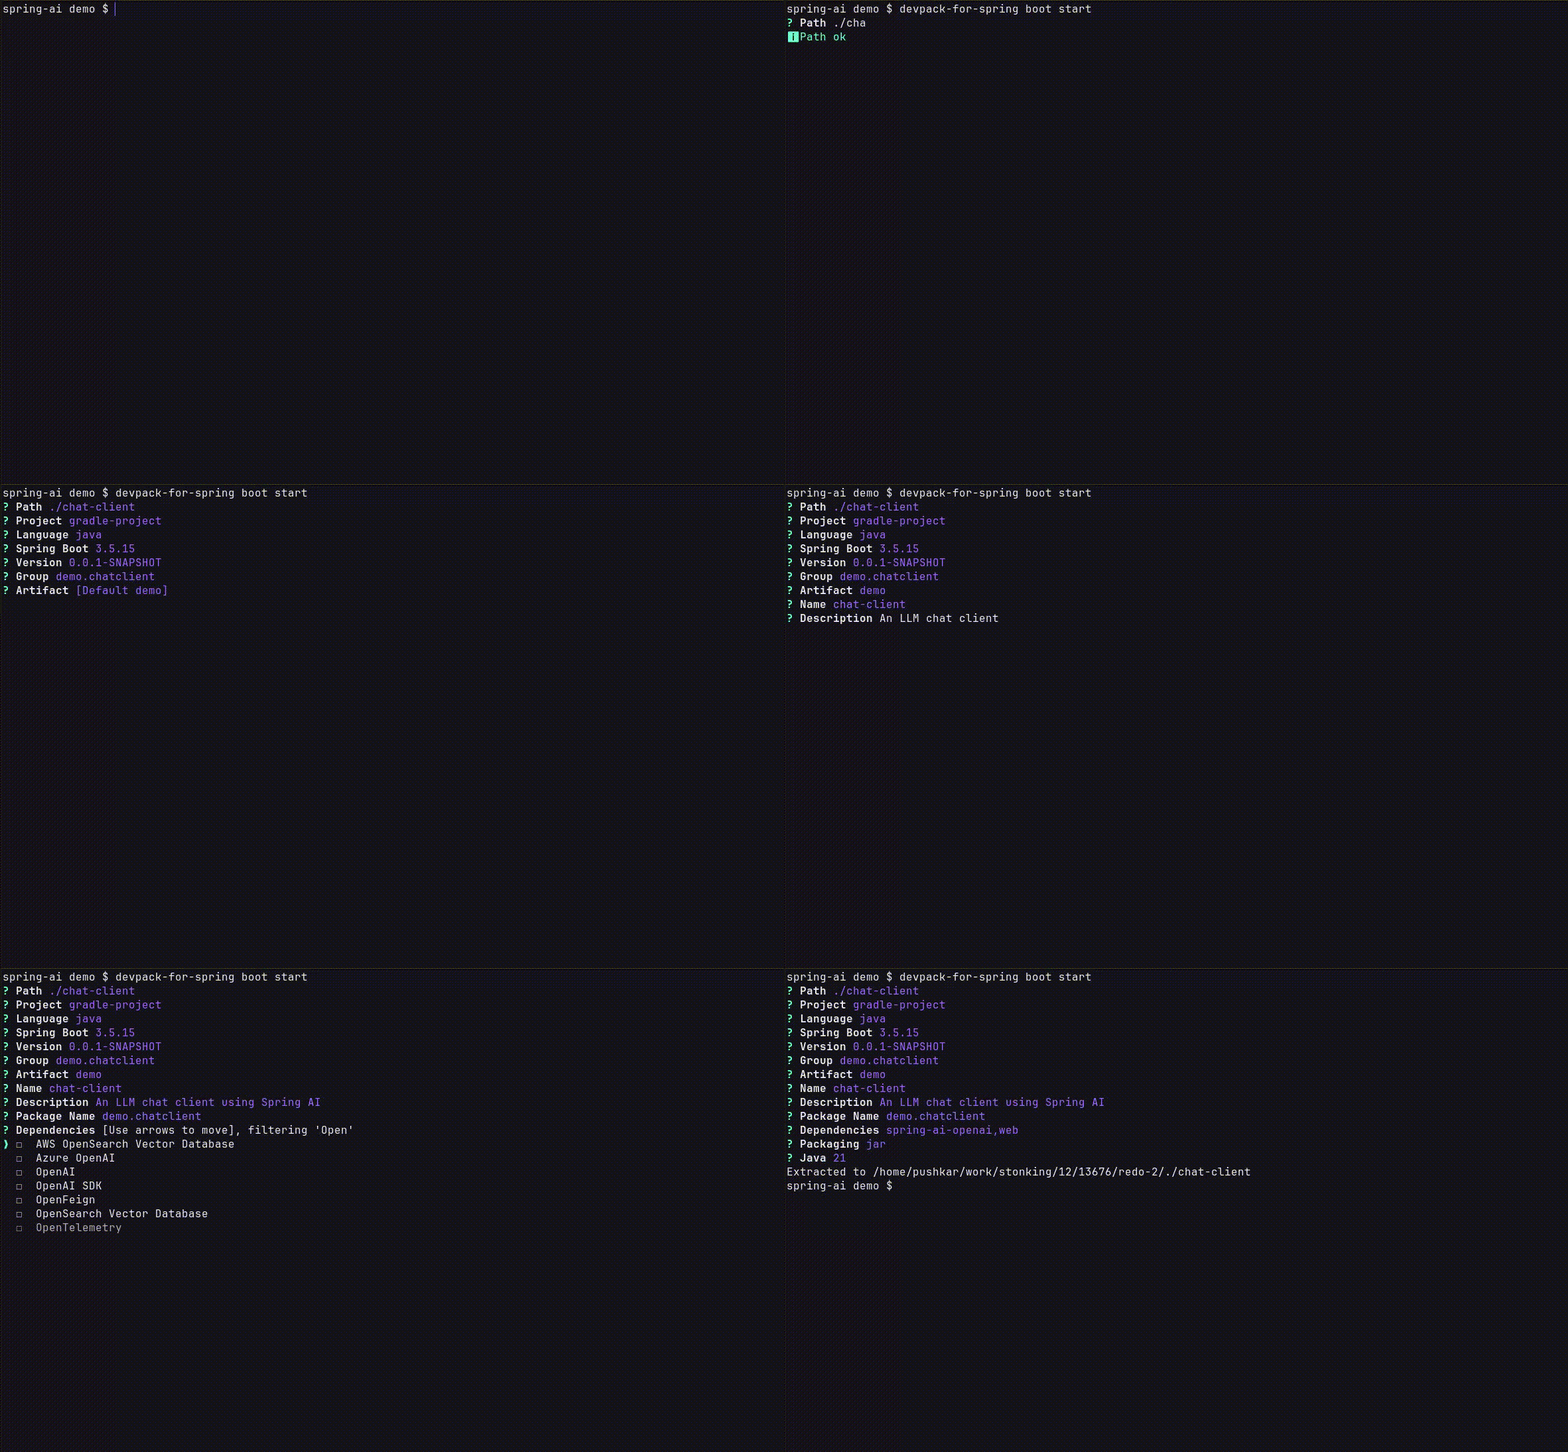
Alternatively, initialize it using this command:
user@host:~$ devpack-for-spring boot start \
> --path $PWD/chat-client \
> --project gradle-project \
> --language java \
> --boot-version 4.0.8 \
> --version 0.0.1-SNAPSHOT \
> --group demo.chatclient \
> --artifact demo \
> --name chat-client \
> --description "An LLM chat-client using Spring AI" \
> --package-name demo.chatclient \
> --dependencies spring-ai-openai,web \
> --packaging jar \
> --java-version 21Important
Note the chosen dependencies. The spring-ai-openai dependency supports interaction with OpenAI-compatible models. The web dependency supports the creation of an HTTP endpoint.
Implementing the chat-client backend
After successful project initialization, you find the file src/main/java/demo/chatclient/ChatClientApplication.java. The code in this file marks the primary entry point of your application. We now add code related to the LLM chat-client application.
Let us first define the basic abstractions.
File src/main/java/demo/chatclient/Question.java defines the Question type.
src/main/java/demo/chatclient/Question.java¶package demo.chatclient;
public record Question(String question) {}
File src/main/java/demo/chatclient/Answer.java defines the Answer type.
src/main/java/demo/chatclient/Answer.java¶package demo.chatclient;
public record Answer(String answer) {}
File src/main/java/demo/chatclient/DemoChatClient.java defines the basic chat-client interface.
src/main/java/demo/chatclient/DemoChatClient.java¶package demo.chatclient;
public interface DemoChatClient {
Answer askQuestion(Question question);
}
We then add a service implementing the above interface and a controller that defines the REST endpoint.
File src/main/java/demo/chatclient/DemoChatService.java implements the DemoChatClient interface.
src/main/java/demo/chatclient/DemoChatService.java¶package demo.chatclient;
import org.springframework.ai.chat.client.ChatClient;
import org.springframework.stereotype.Service;
@Service
public class DemoChatService implements DemoChatClient {
private final ChatClient chatClient;
public DemoChatService(ChatClient.Builder chatClientBuilder) {
this.chatClient = chatClientBuilder.build();
}
@SuppressWarnings("null")
@Override
public Answer askQuestion(Question question) {
var response = chatClient.prompt()
.user(question.question())
.call()
.content();
return new Answer(response);
}
}
File src/main/java/demo/chatclient/DemoChatController.java adds the RestController to create an endpoint named /ask
src/main/java/demo/chatclient/DemoChatController.java¶package demo.chatclient;
import org.springframework.web.bind.annotation.PostMapping;
import org.springframework.web.bind.annotation.RequestBody;
import org.springframework.web.bind.annotation.RestController;
@RestController
public class DemoChatController {
private final DemoChatClient chatClient;
public DemoChatController(DemoChatClient chatClient) {
this.chatClient = chatClient;
}
@PostMapping(path = "/ask", produces = "application/json")
public Answer askQuestion(@RequestBody Question question) {
return chatClient.askQuestion(question);
}
}
Adding a simple HTML frontend
Paste the following code into src/main/resources/static/index.html:
src/main/resources/static/index.html¶<!DOCTYPE html>
<html lang="en">
<head>
<meta charset="UTF-8">
<meta name="viewport" content="width=device-width, initial-scale=1.0">
<title>AI Chat</title>
<style>
body { font-family: sans-serif; max-width: 600px; margin: 40px auto; padding: 0 16px; }
h1 { font-size: 1.4rem; }
input, textarea { width: 100%; box-sizing: border-box; padding: 8px; font-size: 1rem; }
textarea { height: 180px; margin-top: 8px; resize: vertical; }
.buttons { margin-top: 8px; }
button { padding: 8px 16px; font-size: 1rem; margin-right: 8px; cursor: pointer; }
</style>
</head>
<body>
<h1>Ask a Question</h1>
<input id="question" type="text" placeholder="Type your question..." />
<div class="buttons">
<button id="askBtn">Ask</button>
<button id="resetBtn">Reset</button>
</div>
<textarea id="answer" readonly placeholder="The answer will appear here..."></textarea>
<script>
const questionEl = document.getElementById('question');
const answerEl = document.getElementById('answer');
const askBtn = document.getElementById('askBtn');
const resetBtn = document.getElementById('resetBtn');
async function ask() {
const question = questionEl.value.trim();
if (!question) {
answerEl.value = 'Please enter a question.';
return;
}
askBtn.disabled = true;
answerEl.value = 'Thinking...';
try {
const res = await fetch('/ask', {
method: 'POST',
headers: { 'Content-Type': 'application/json' },
body: JSON.stringify({ question })
});
if (!res.ok) {
throw new Error('Request failed: ' + res.status);
}
const data = await res.json();
answerEl.value = data.answer;
} catch (err) {
answerEl.value = 'Error: ' + err.message;
} finally {
askBtn.disabled = false;
}
}
function reset() {
questionEl.value = '';
answerEl.value = '';
questionEl.focus();
}
askBtn.addEventListener('click', ask);
resetBtn.addEventListener('click', reset);
questionEl.addEventListener('keydown', (e) => {
if (e.key === 'Enter') ask();
});
</script>
</body>
</html>
Configuring the LLM to be used
We installed the Qwen 2.5 VL model through the qwen-vl inference snap. To configure Spring AI to use this model, we need to find the model-id and its openai endpoint.
user@host:~$ qwen-vl statusengine: intel-gpu
endpoints:
openai: http://localhost:8326/v3
The openai endpoint is http://localhost:8326/v3.
user@host:~$ curl http://localhost:8326/v3/models 2>/dev/null | jq | grep "id" "id": "Qwen2.5-VL-3B-Instruct-ov-int4",
The model-id is Qwen2.5-VL-3B-Instruct-ov-int4.
Use the above values to define properties in src/main/resources/application.properties:
src/main/resources/application.properties¶spring.application.name=chat-client
spring.ai.openai.base-url=http://localhost:8326/v3
spring.ai.openai.api-key=ignored
spring.ai.openai.chat.options.model=Qwen2.5-VL-3B-Instruct-ov-int4
Attention
Because we are using a local inference model, we do not need to provide an API key. The spring.ai.openai.api-key property is mandatory to access online models.
Launching and using the chat-client
We are now set to launch the chat-client application and run simple prompts.
Before launching the application, ensure you have openjdk-21-jdk installed:
user@host:~$ sudo apt install openjdk-21-jdkLaunch the application using this command:
user@host:~$ ./gradlew bootRunA successful launch produces a log message indicating the application started. No exceptions are logged.
2026-06-18T21:17:05.427+05:30 INFO 977098 --- [chat-client] [ main] demo.chatclient.ChatClientApplication : Started ChatClientApplication in 1.364 seconds (process running for 1.584)
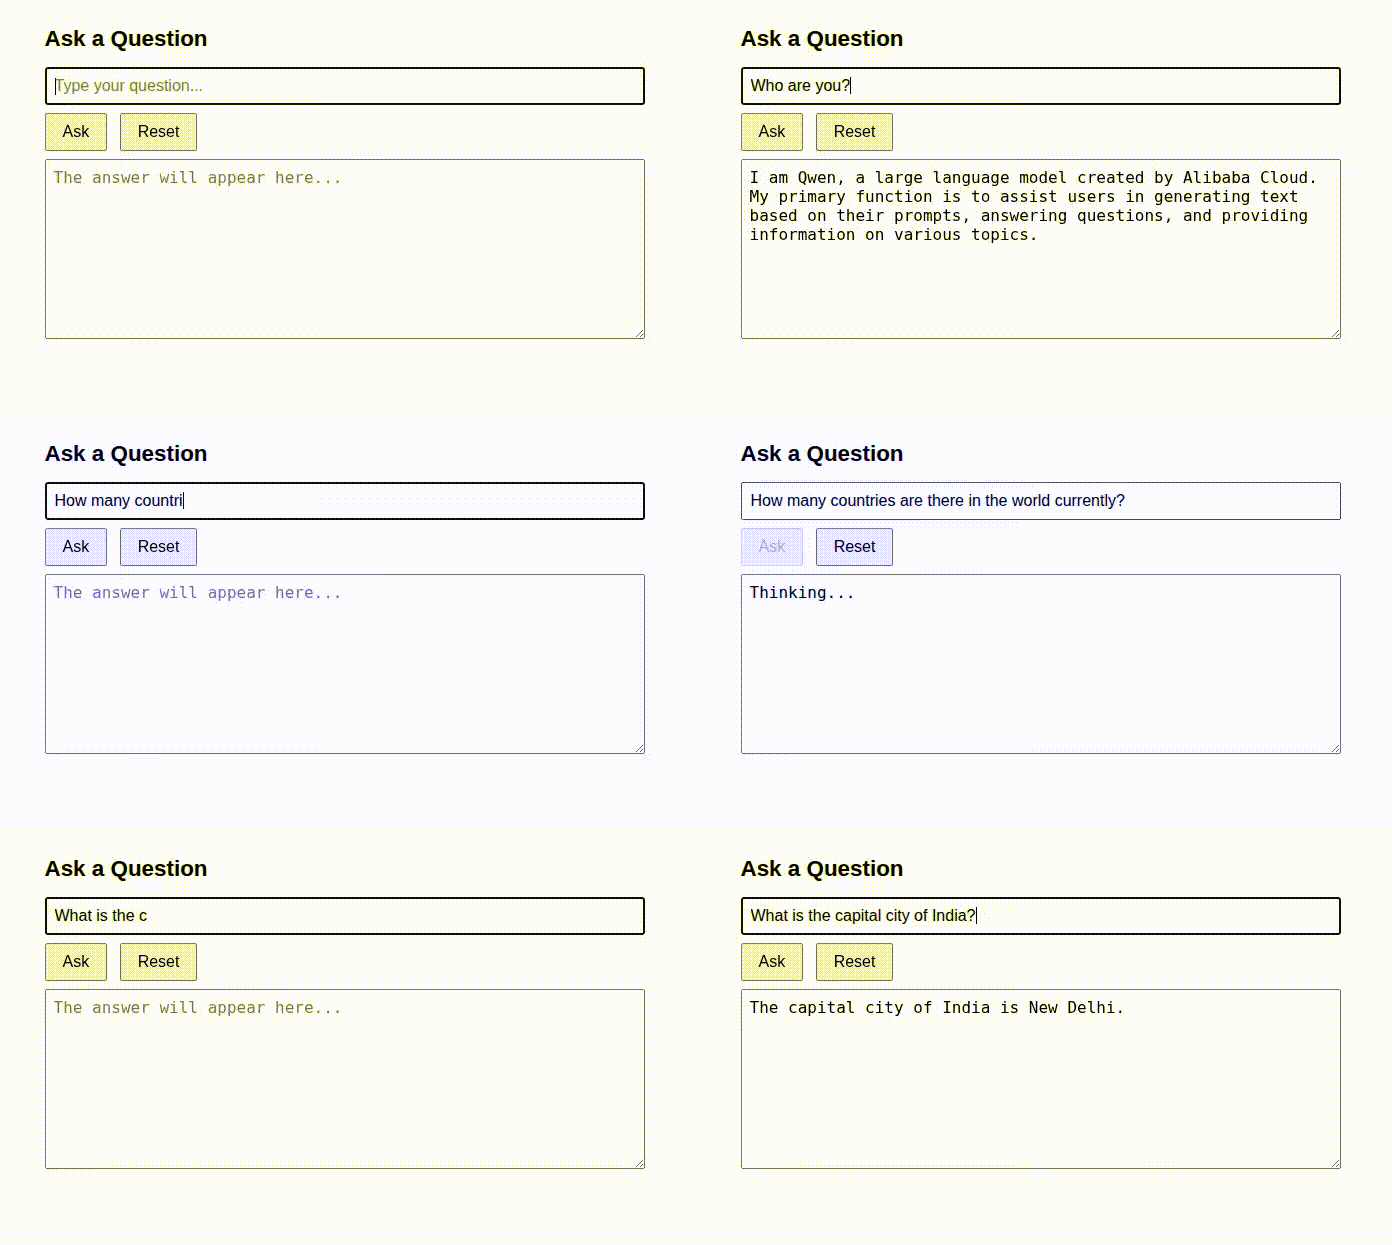
Open http://localhost:8080 in a browser to use the chat-client. A sample interaction is captured below: