
How to create tiered repository mirrors for multi-region and air-gapped deployments
See also: Repository mirroring
You can create tiered (or layered) repository mirrors for additional control over the mirroring, storage and distribution of your packages. This tiered approach uses two or more Landscape Server instances to further segment different regions or components of your deployment.
There are multiple different use cases for this configuration. A couple use cases are noted here:
Multi-region deployments: If your application is deployed in multiple different regions and has several clients in each region, you might not want to serve all of your package updates and installations from a single region because transferring data from one region to another can be costly, inefficient and not ideal. Instead, you could have a central server push repositories to secondary servers in each region, and these secondary servers would then push updates and installations to regionally local clients. Or, you could separate the repository mirroring function into a separate region-based server and leave all central management to a single global server.
Air-gapped or restricted network environments: In air-gapped or restricted network environments, you might have a proxy server that has limited access outside the network. You could use each network’s proxy server to access a central server that acts as an initial filter from public repositories and manages the network proxy servers. This can help you maintain multiple isolated networks.
In this document, we’ve outlined a couple different approaches you can take when creating tiered repository mirrors. Both approaches involve using an additional Landscape server as a third party repository.
Option #1: Role-isolated configuration
You may want to separate your servers by their role or function. See the following diagram for an example of how this could be configured.
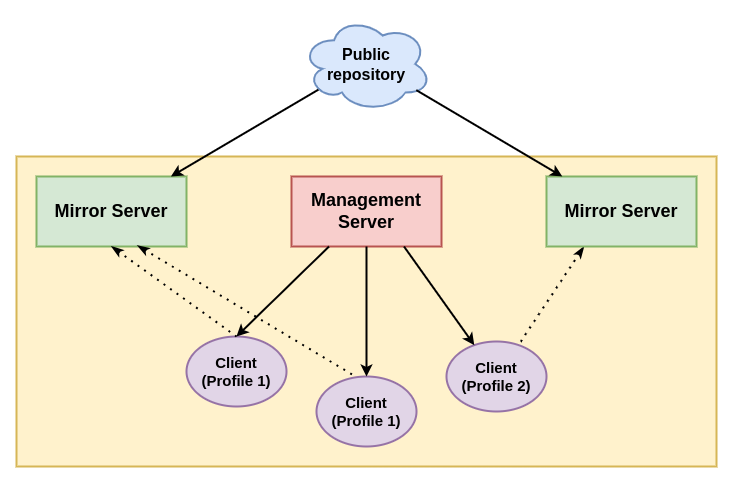
In the diagram, there are three separate Landscape Server instances. The management server functions as a global management server that manages the clients, which can also be grouped into different repository profiles that are assigned by the management server. The repository mirror servers are separated from the management server and contain the packages available to the clients based on the clients’ profiles.
Create role-isolated repository mirrors
Note: You need to use Landscape 24.04 LTS to follow these instructions and access the web portal. If you’re using an older version of Landscape, you won’t be able to access the necessary web portal functions, but you may still be able to create your mirrors using the API.
You can use the Landscape web portal to create role-isolated repository mirrors. The instructions here assume you already have one Landscape Server instance installed and your clients registered to it. Your existing Landscape server is the Management Server.
Step #1: Create your Mirror servers
Create your Mirror server(s) using the same installation method as your existing Management server: Quickstart, Manual, or Juju.
Step #2: Create and import your GPG key
On your Mirror server, follow these instructions to Create and import the GPG key.
Add your secret key to all instances of Landscape Server—Management and Mirror(s).
Step #3: Get the public GPG key from the public repository you want to mirror.
In this example, we discuss mirroring the Landscape PPA. Since the PPA is treated like a third-party repository under this configuration, you need to import the public GPG key from the PPA. For PPAs in Launchpad, you can download this by expanding Technical details about this PPA, under Signing key.
Download the public GPG key for the PPA or public repository
Import the public key in your Mirror instance(s) in the web portal, giving it a different name than your previous keys
Step #4: Create the mirror
In your Mirror Server web portal, create a new distribution.
Then Create a mirror, with the following additional options:
Select Third-party as the Type
Enter the PPA location under Mirror URI. For example, the Landscape Server 24.04 LTS mirror URI is https://ppa.launchpadcontent.net/landscape/self-hosted-24.04/ubuntu
In the Mirror GPG Key dropdown menu, select the public key from the PPA that you just imported
Step #5: Sync the mirror
Note: This step can take a few hours or more for larger repositories.
To download all the packages for your mirror, you need to sync the mirror or pockets. To learn more about pockets, see the about repository mirroring guide.
Step #6: Create an APT Source in your Management server
In your Management server, go to Repositories > APT Sources
Click Add APT Source
Add a name for your APT source, such as “landscape-ppa”
In the APT Line field, enter “deb”, followed by the URI for the repository mirror, distribution and components. An example entry could be
deb http://landscape-repo-mirror/repository/standalone/ubuntu jammy main universe restricted multiverseSelect the private GPG key you imported earlier
Select the appropriate access group you want for the APT source
Click Add APT Source
Step #7: Create a repository profile and associate instances to that profile
In your Management server, follow the guide to create repository profiles, with the following changes:
If you’ve tagged your clients with a specific tag, such as “repo-mirror-client”, associate your profile to the appropriate tag(s)
In the APT Source tab, select the APT source you previously added
In the Activities menu in the sidebar, a new activity named “Apply repository profiles” should be in progress. Once that activity finishes, your configuration is complete. Your Mirror server is configured as the upstream source of packages to the clients, which are managed under the Management Server.
Option #2: Network-isolated configuration
You may want completely isolated networks. See the following diagram for an example of how this could be configured.
.png)
In the diagram, there are two layers of Landscape Server instances: Tier 1 and Tier 2. The Tier 1 server acts as a global server that filters packages from the public repositories, and the Tier 2 servers contain the packages that will be distributed to the clients.
Create network-isolated repository mirrors
Note: You need to use Landscape 24.04 LTS to follow these instructions and access the web portal. If you’re using an older version of Landscape, you won’t be able to access the necessary web portal functions, but you may still be able to create your mirrors using the API.
You can use the Landscape web portal to create network-isolated repository mirrors. The instructions here assume you already have one Landscape Server instance installed and your clients registered to it. Your existing Landscape server is a Tier 2 Network server.
Step #1: Create a Tier 1 Global server
Create your Tier 1 Global server using the same installation method as your existing Tier 2 Network server: Quickstart, Manual, or Juju.
Step #2: Create and import your GPG key on your Tier 1 Global server
On your Tier 1 Global server, follow these instructions to Create and import the GPG key.
Add your secret key to your Tier 1 Global server
Add the matching public key to your Tier 2 Network server
Step #3: Create and import your GPG key on your Tier 2 Network server
On your Tier 2 Network server, follow these instructions to Create and import the GPG key.
Add your secret key to your Tier 2 Network server
Step #4: Get the public GPG key from the public repository you want to mirror
If you’re mirroring the Ubuntu repositories, these keys are already known in Landscape and do not need to be imported. If you’re mirroring another third party source, you’ll need to acquire that repository’s public signing key. For PPAs in Launchpad, you can download this by expanding Technical details about this PPA, under Signing key.
Download the public GPG key for the public repository
Import the public key in your Tier 1 Global server in the web portal, giving it a different name than your previous keys
Step #5: Create the mirror in the Tier 1 Global server
In your Tier 1 Global server web portal, create a new distribution.
Then Create a mirror, with the following additional options:
Select the appropriate mirror type. If you’re not mirroring an Ubuntu repository, the type is Third party. Otherwise, select the appropriate Ubuntu mirror type.
Enter the URL for the repository location under Mirror URI. For example, the Landscape Server 24.04 LTS mirror URI is https://ppa.launchpadcontent.net/landscape/self-hosted-24.04/ubuntu
In the Mirror GPG Key dropdown menu, select the public key from the public repository that you just imported
In the GPG Key dropdown, select your private key that you created and imported on the Tier 1 server earlier.
Step #6: Create the mirror in the Tier 2 Network server
You also need to set up your Tier 2 Network server(s) to access the mirror from the Tier 1 Global server.
In your Tier 2 Network server web portal, create a new distribution.
Then Create a mirror, with the following additional options:
Select Third-party as the Type
Enter the repository location under Mirror URI. This is the Mirror URI for your Tier 1 Global server. It’s typically formatted as
http://<landscape-url>/repository/standalone/ubuntu.In the Mirror GPG Key dropdown menu, select the Tier 1 Global server’s public signing key, which you created earlier
In the GPG Key dropdown, select your private key that you created and imported on the Tier 2 server earlier.
Step #7: Sync the Tier 1 Global server mirror
Note: This step can take a few hours or more for larger repositories.
To download all the packages for your mirror, you need to sync the mirror or pockets. To learn more about pockets, see the about repository mirroring guide.
Step #8: Sync the Tier 2 Network server mirror
Sync the mirror for the Tier 2 Network server, using the same process that you used for the Tier 1 Global server mirror.
If you want your client machines to retrieve packages from their associated Tier 2 Landscape repository mirrors, you can do this with repository profiles. You’ll also have to create APT sources that reference these Tier 2 servers as necessary and configure those in the repository profiles for the client machines, similar to the process in the previous role-isolated configuration.
Otherwise, your network-isolated set-up is complete.