Your submission was sent successfully! Close

You have successfully unsubscribed! Close

Thank you for signing up for our newsletter!
In these regular emails you will find the latest updates about Ubuntu and upcoming events where you can meet our team.Close

Create a bootable USB stick on macOS

1. Overview

With a bootable Ubuntu USB stick, you can:

  • Install or upgrade Ubuntu, even on a Mac
  • Test out the Ubuntu desktop experience without touching your PC configuration
  • Boot into Ubuntu on a borrowed machine or from an internet cafe
  • Use tools installed by default on the USB stick to repair or fix a broken configuration

Creating a bootable USB stick is very simple, especially if you’re going to use the USB stick with a generic Windows or Linux PC. We’re going to cover the process in the next few steps.

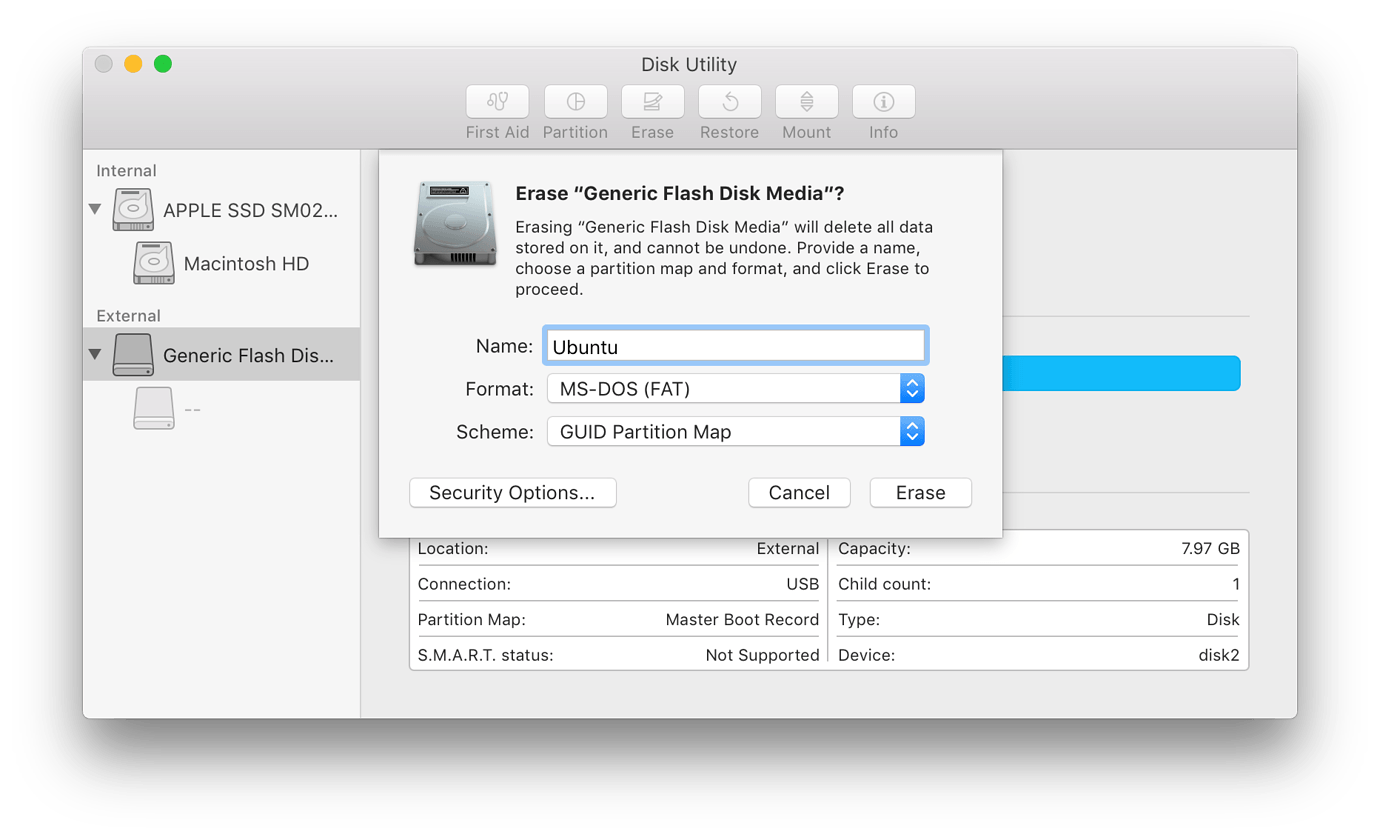
Apple hardware considerations

There are a few additional considerations when booting the USB stick on Apple hardware. This is because Apple’s ‘Startup Manager’, summoned by holding the Option/alt (⌥) key when booting, won’t detect the USB stick without a specific partition table and layout. We’ll cover this in a later step.


2. Requirements

You will need:

  • A 2GB or larger USB stick/flash drive
  • An Apple computer or laptop running macOS
  • An Ubuntu ISO file. See Get Ubuntu for download links

3. Prepare the USB stick

To ensure maximum compatibility with Apple hardware, we’re going to first blank and reformat the USB stick using Apple’s ‘Disk Utility’. But this step can be skipped if you intend to use the USB stick with only generic PC hardware.

  • Launch Disk Utility from Applications>Utilities or Spotlight search
  • Insert your USB stick and observe the new device added to Disk Utility
  • Select the USB stick device (you may need to enable the option View>Show All Devices) and select Erase from the tool bar (or right-click menu)
  • Set the format to MS-DOS (FAT) and the scheme to GUID Partition Map
  • Check you’ve chosen the correct device and click Erase

Warning: Disk Utility needs to be used with caution as selecting the wrong device or partition can result in data loss.


4. Install and run Etcher

To write the ISO file to the USB stick, we’re going to use a free and open source application called Etcher. After downloading this and clicking to mount the package, Etcher can either be run in-place or dragged into your Applications folder.

By default, recent versions of macOS block the running of applications from unidentified developers. To side-step this issue, enable ‘App Store and identified developers’ in the ‘Security & Privacy’ pane of System Preferences. If you are still warned against running the application, click ‘Open Anyway’ in the same pane.


5. Etcher configuration

Etcher will configure and write to your USB device in three stages, each of which needs to be selected in turn:

  • Select image will open a file requester from which should navigate to and select the ISO file downloaded previously. By default, the ISO file will be in your Downloads folder.

  • Select drive, replaced by the name of your USB device if one is already attached, lets you select your target device. You will be warned if the storage space is too small for your selected ISO.

  • Flash! will activate when both the image and the drive have been selected. As with Disk Utility, Etcher needs low-level access to your storage hardware and will ask for your password after selection.


6. Write to device

After entering your password, Etcher will start writing the ISO file to your USB device.

The Flash stage of the process will show progress, writing speed and an estimated duration until completion. This will be followed by a validation stage that will ensure the contents of the USB device are identical to the source image.

When everything has finished, Etcher will declare the process a success.

Congratulations! You now have Ubuntu on a USB stick, bootable and ready to go.

Warning: After the write process has completed, macOS may inform you that ‘The disk you inserted was not readable by this computer’. Don’t select Initialise. Instead, select Eject and remove the USB device.


7. Boot your Mac

If you want to use your USB stick with an Apple Mac, you will need to restart or power-on the Mac with the USB stick inserted while the Option/alt (⌥) key is pressed.

This will launch Apple’s ‘Startup Manager’ which shows bootable devices connected to the machine. Your USB stick should appear as gold/yellow and labelled ‘EFI Boot’. Selecting this will lead you to the standard Ubuntu boot menu.

Finding help

If your Mac still refuses to boot off your USB stick you may find it easier to boot and install off an Ubuntu DVD instead. See our How to burn a DVD on macOS for further details.

Alternatively, if you feel confident using the macOS command line, see the community documentation on How to install Ubuntu on MacBook using USB Stick for a more manual approach.

If you want to install Ubuntu, follow our install Ubuntu desktop tutorial.

Finally, if you get stuck, help is always at hand: