
How to upgrade from Windows 7 to Ubuntu – Desktop tour and applications

Igor Ljubuncic
on 11 February 2020
Tags: snap store , Snaps , Ubuntu , Ubuntu Desktop , Windows 7
This is the third and the last guide in this series. In the first installment, we learned about considerations for an update from Windows 7 to Ubuntu, key differences in hardware and software between the two operating systems, the terminology, and how to safely backup data ahead of migration.
In the second tutorial, we covered the installation process of Ubuntu, including standalone setup, as well as how to configure Ubuntu side by side with Windows 7. We also touched on the concept of virtualization. Now that we have Ubuntu installed, we can examine what it looks and feels like, the differences from the Windows desktop, how to install applications and perform system updates, and a few other useful tasks.
Terminology
There are some small differences in common terms:
| Windows 7 | Ubuntu |
| Desktop | Desktop |
| Start menu | Activities |
| Taskbar | Panel (top) Dock (left) |
| System tray | System area |
| Windows Explorer | Files (also known as Nautilus); commonly referred to as file manager |
| User’s default folder | Home |
| Folder | Folder or directory |
| Task manager | System monitor |
| Command prompt (cmd) | Terminal |
In Ubuntu, your (default) user account will have administrative privileges, and be able to perform privileged tasks, like software installation, for instance. In such scenarios, you will be asked to provide your password. This is similar to the UAC dialog prompts in Windows.
First login
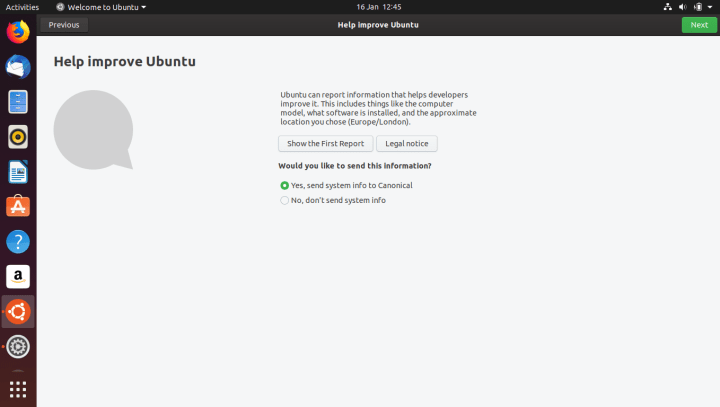
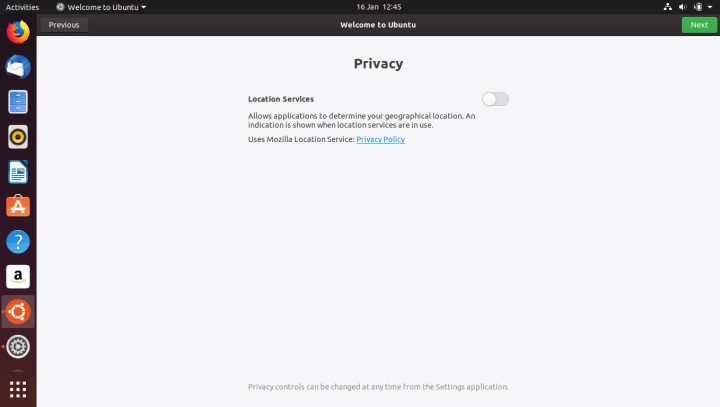
Once Ubuntu starts for the first time, it will ask you to configure a few things. You have the option to configure your online accounts – this is somewhat similar to how you’d do this on a smartphone. This will make the configured accounts available to applications that support this functionality. For example, you can integrate Google Docs and Google Calendar into your Ubuntu desktop using Online Accounts. You can also send a system information report to Canonical, and enable location services, which may be used by applications that require it.

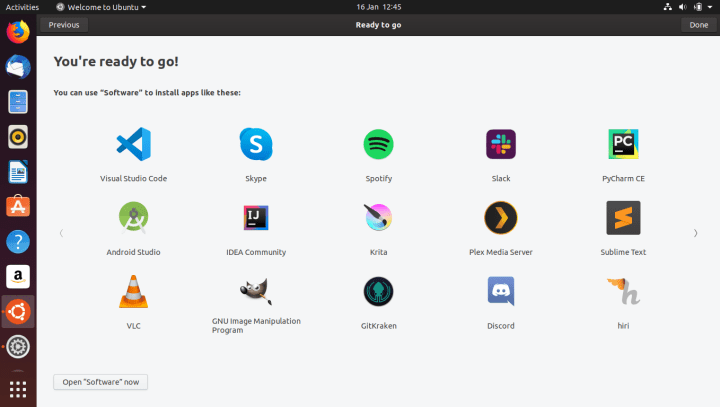
The last step in the first-login wizard will show you a grid of popular applications available in Ubuntu Software – the app store for Linux. At this point, you can install some popular applications you like or need. You can also do this later on, at any time. We will review this functionality shortly.
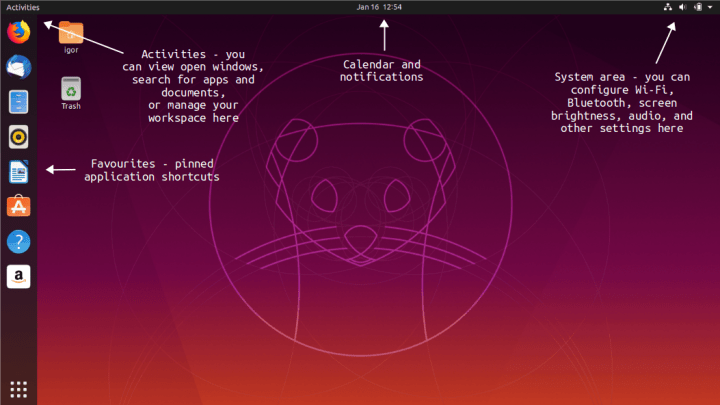
Desktop tour
The Ubuntu desktop has a different layout from Windows 7. There are two panels, one on the top, and one on the left. The top one contains Activities (application menu and search) in the left corner, Calendar and notifications in the middle, and a system area in the right corner. The left one is a launcher dock, and contains pinned application shortcuts (Favourites), and a grid-like icon that opens a full-screen view of your installed applications.
How to install applications in Ubuntu
This is probably the most important element of desktop usage, and there are notable differences from Windows 7.
- In Windows 7, users would typically go to a website, download a program installer (exe or msi), and then run these files to install and configure their software. Some applications have a built-in update mechanism, but most do not, and it is up to the user to manage and update their applications as they see fit.
- In Ubuntu, application management is done using Ubuntu Software, which utilizes a store model, similar to Android or iOS. When you search for applications in Ubuntu Software, you can also use categories, as well as view descriptions, screenshots, and user reviews to help you decide what you may like or need. You can also search for popular applications directly, e.g. Skype, Steam, Spotify, etc. Effectively, it also means you do not need to manually search for applications on the Web. You can install software using a secure store-like utility.

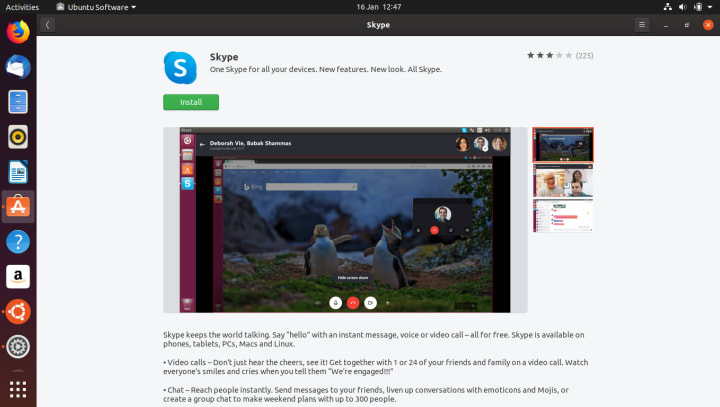
Skype application shown in Ubuntu Software. You get the application description and screenshots, user ratings, and you can install it by clicking the Install button.
Snap Store
Ubuntu offers software in two formats – Deb and snap. When you search for applications through Software, you will be offered applications from the archives and the Snap Store. You can see the source in the description details.
Snaps do have various advantages over Deb packages. Snaps are self-contained applications, with security isolation and automatic updates, designed to be used on the desktop, in the cloud and IoT devices. Snaps can run on Ubuntu as well as any other Linux distribution that has snap support, which makes them easier to develop and distribute – something that has traditionally not been easy in Linux.
The complete technical reasons behind this are intricate and beyond the scope of this article. In general terms. Some applications are available in both formats, while others are exclusive to one or the other. Overall, in most cases, the user experience is pretty straightforward. In fact, you can explore the available catalog on software online, even without having installed Ubuntu.

Snap Store offers applications uploaded and managed directly by their publishers. It hosts thousands of applications, and is used by millions. It is available as a desktop application, but you can also browse the official website (even on a Windows system) to get an impression of the available software. There are also additional tools for developers, user forums, and more. The Snap Store has over 2,000 stable applications available for use.
System updates
Much like applications, when it comes to system updates, Ubuntu does things differently from Windows 7:
- In Windows 7, system updates are done separately from applications via the Windows Update mechanism. Through Windows Update, you can receive system patches, drivers, and updates for other Microsoft products (like dotNET, Microsoft Office, etc).
- In Ubuntu, after you have installed applications you want, you will receive updates for your software. Periodically, Ubuntu will search for drivers, security patches and application updates and install them automatically, whenever they become available.
Popular applications
By default, Ubuntu ships with the following applications:
- Firefox browser
- Thunderbird mail client
- LibreOffice office and productivity suite
- Rhythmbox music player
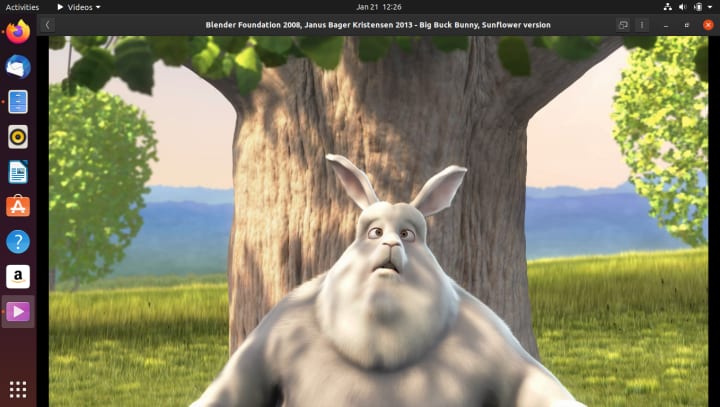
- Videos media (videos and music) player
- Cheese webcam application
If you require additional applications, you can simply search for them using Ubuntu Software. For example, all of the following are available: Android Studio, Atom, Blender, Chromium, Discord, Eclipse, Hiri, OBS Studio, Opera, OnlyOffice Desktop Editors, Skype, Slack, Spotify, Steam, Telegram Desktop, VLC, and thousands of others. The Snap Store also includes some Windows applications and games that are not normally natively available for Ubuntu.
For licensing reasons, Google Chrome is not currently available in either Ubuntu Software or Snap Store. However, you can manually download the Deb file from the official site – much like you would with an .exe installer file in Windows, and install it that way. Google Chrome will then be configured correctly, including updates.
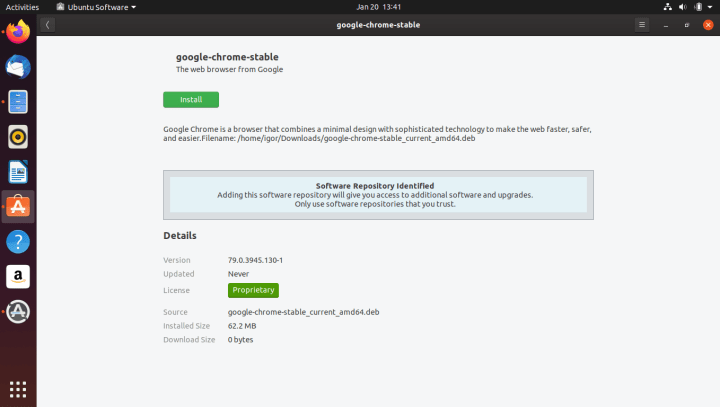
Once you double-click on the downloaded Google Chrome .deb file, you will see the following prompt, with the information on the file you are trying to install.
Media codecs
If you have checked the box that reads “Install third-party software for graphics and Wi-Fi hardware and additional media codecs” during the installation, your system will already have the necessary media codecs.
Drivers
If your hardware requires proprietary drivers, some of them may not be offered out of the box. For example, if you are using an Nvidia graphics card, Ubuntu will run with an open-source Nouveau driver by default. You can launch the Additional Drivers tool to search and install any proprietary drivers your system needs (Activities > Additional Drivers).
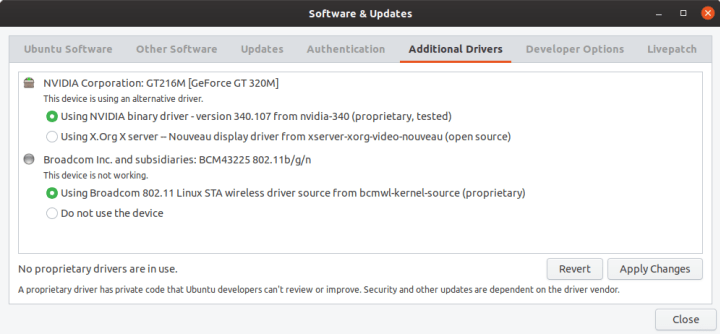
An example of the Additional Drivers utility running on a laptop. By default, no proprietary drivers will be used. In this case, we can select Nvidia drivers for the graphics card, and the Broadcom drivers for the Wireless card. Once the changes are applied, reboot your system for the drivers to be loaded and used.
Peripherals – Bluetooth, printing, etc.
You can manage different hardware components and peripherals attached to your computer using the Settings utility (Activities > Settings). In most cases, you will have a simple guided wizard to help you configure your hardware. Sometimes, it may not be trivial, or Ubuntu may not have the necessary drivers to setup your hardware. This can also happen in Windows, and you may need to download drivers yourself.

Firefox profile restore
In the first tutorial, we learned how to backup the Firefox profile. We can now restore the profile in Ubuntu, so you can pick up where you left. If you copied the profile to an external drive, plug it into your computer. Ubuntu will prompt you, much like Windows does, when it detects new media. You can then copy files through the file explorer just as you would normally do that in Windows.
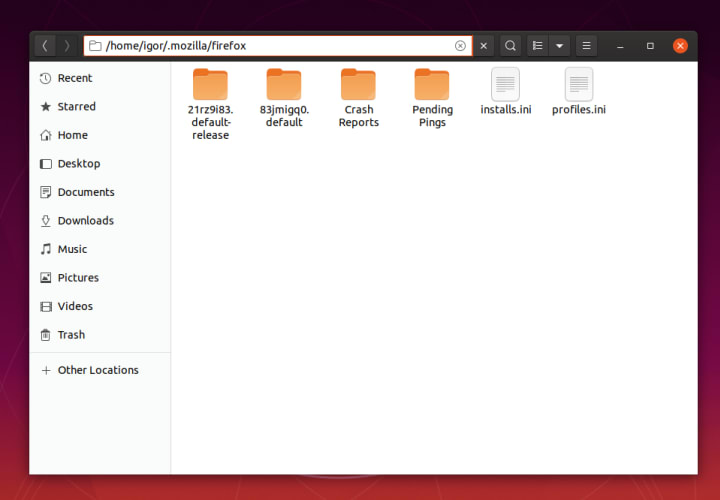
In Ubuntu, Firefox profiles are stored under /home/”user”/.mozilla/firefox/.
You may not see the .mozilla folder through the file explorer because it is prefixed with a dot (.), and in Ubuntu, files or folders of this type are normally hidden. However, you can still navigate to hidden folders, even if they are not visible. To expose the address bar, use the Ctrl + L keyboard shortcut. Then, type the Firefox path in the address bar, and it will show up. Now, you can copy the old Firefox profile there.
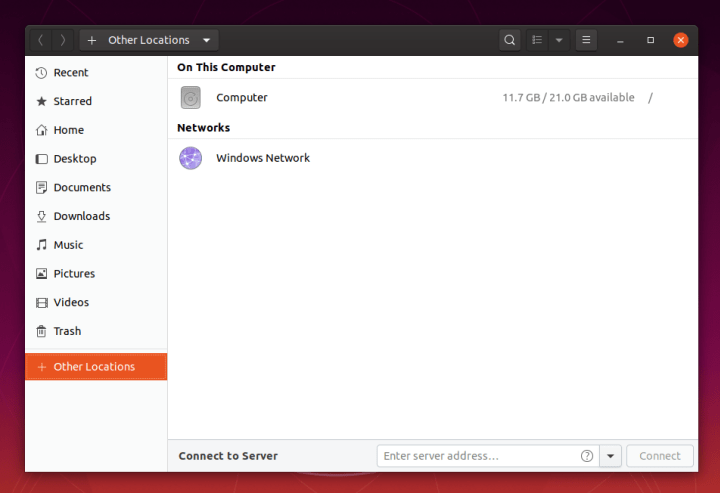
If your profile still resides in an existing Windows 7 installation on your hard disk (if you had opted for a side-by-side configuration), then you can retrieve it from Ubuntu, which has native support for Windows filesystems (like NTFS).
Click on “+ Other Locations”. You will now have the option to access other partitions on the hard disk, or even remote locations (like other computers). The internal hard disk partitions will have the /dev/sdXY notation, which we’ve seen in the installation part of this series. If you do not know which partition holds the Windows 7 data, you can find it through trial & error. Once you open a partition, the listing of files and folders will be identical to Windows, so you need to navigate to , and copy the Firefox profile from there into the Ubuntu installation.
The last part is to tell Firefox to use the old profile.
Advanced usage: command line
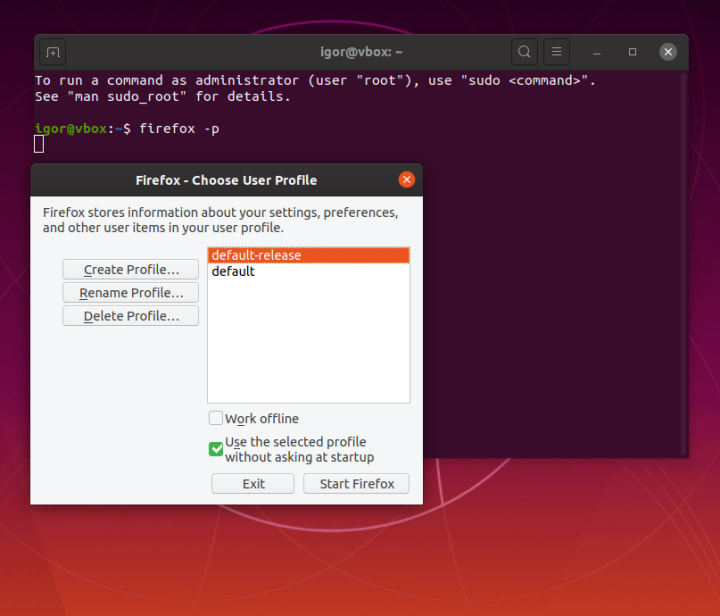
To complete the Firefox profile restore, we will resort to command line. This may sound intimidating, as most Windows users have never used it before. However, if you want to import an existing Firefox profile in Windows, you will need to resort to similar methods – invoke the Run window (Start > Run, or Ctrl + R), and then type a command in there.
In Ubuntu, we need the Terminal application (Activities > Terminal). In the window that opens, there will be a blinking command prompt. Here, we will start Firefox profile manager, which lets us choose existing profiles, or create a new one.
firefox -p
This will launch the profile manager. If your old profile (after being copied) does not show in the list, then click on Create profile, and in the path, simply navigate to it. Firefox will then import it, and you will have your settings, bookmarks, history, extensions, and other components in your profile.
In general, the Ubuntu command line is quite useful, and it allows you to accomplish many typical tasks in a fast, elegant manner. Here’s a table of some common administrative tasks:
| Task | Command |
| Go to your home | cd |
| Display contents of folder | ls (or ls -l to see a detailed list, or ls -la to include hidden files) |
| Copy file | cp “source” “destination” |
| Copy entire folder | cp -r “source” “destination” |
| Move file or folder | mv “source” “destination” |
| Delete file | rm “file” (be extra careful!) |
| Delete folder | rm -r “folder” (be extra careful!) |
| Check user name | whoami |
| Command-line task manager | top (press q to exit) |
| Check for updates | sudo apt-get update |
| Install updates | sudo apt-get dist-upgrade |
| Search for a .deb application | sudo apt-cache search “application name” |
| Install a .deb application | sudo apt-get install “application name” |
| Search for a snap | sudo snap find “application name” |
| Install a snap | sudo snap install “application name” |
| Restart your system | sudo reboot |
Summary
This article completes our article series. We started with a Windows 7 system, and we now have an Ubuntu desktop up and running, including a rich repertoire of popular applications as well as our old data. There were some things that required extra scrutiny, like backups, the differences between the two operating systems, the installation, and familiarization with new terminology and the desktop layout in Ubuntu. We hope you enjoyed the journey, and we’re looking forward to sharing future experiences with you.
Photo by Oneisha Lee on Unsplash.
Ubuntu desktop
Learn how the Ubuntu desktop operating system powers millions of PCs and laptops around the world.
Newsletter signup
Related posts
Managing software in complex network environments: the Snap Store Proxy
As enterprises grapple with the evolving landscape of security threats, the need to safeguard internal networks from the broader internet is increasingly...
What’s new in security for Ubuntu 24.04 LTS?
We’re excited about the upcoming Ubuntu 24.04 LTS release, Noble Numbat. Like all Ubuntu releases, Ubuntu 24.04 LTS comes with 5 years of free security...
DISA publishes STIG for Ubuntu 22.04 LTS
Introduction DISA, the Defense Information Systems Agency, has published their Security Technical Implementation Guide (STIG) for Ubuntu 22.04 LTS. The STIG...