
ROS 2 on Kubernetes: a simple talker and listener setup

sidfaber
on 9 November 2020
Please note that this blog post has old information that may no longer be correct. We invite you to read the content as a starting point but please search for more updated information in the ROS documentation.
Kubernetes and robotics make a great match. However, robots running ROS2 can be tricky to set up with individual components on Kubernetes. In this second part of our blog series about running ROS 2 on Kubernetes, we set up a simple, scalable talker / listener system using MicroK8s on Ubuntu. In order to understand some of the design choices for this configuration, be sure to review part one, “Exploring ROS 2 with Kubernetes“.
This is the second article in a series of four posts describing ROS 2 applications on Kubernetes with MicroK8s
- Part 1: ROS 2 and Kubernetes basics
- Part 2 (this article): ROS 2 on Kubernetes: a simple talker and listener setup
- Part 3: Distribute ROS 2 across machines with Kubernetes
- Part 4: Exploring ROS 2 Kubernetes configurations
MicroK8s brings a full Kubernetes install to your machine with a single command and the baseline ROS 2 Foxy docker image fits neatly into the Kubernetes configuration. Our challenge is to configure these projects to all work nicely together.
This configuration creates ROS nodes in pods, and each pod runs a single docker container. The container is the official baseline ROS Foxy docker image maintained by Open Robotics. We launch two talkers and one listener which can be scaled up and down. Networked ROS devices outside the Kubernetes host can also access the ROS graph.
Before you begin
The only hardware needed to run this demo is an x86 workstation running 64-bit Ubuntu 20.04. This will serve as the Kubernetes host.
Each pod will have its own network address; reserve at least five IP addresses exclusively for Kubernetes. Consider reserving ten or more addresses to explore scaling up the demo.
Multus on MicroK8s
The Multus Container Network Interface (CNI) allows the definition of multiple network interfaces for use within Kubernetes. As discussed in part 1, each pod will need to access the host network, and multus adds an interface for that purpose. Multus acts as a CNI manager, enabling use of different network plugins. The ROS 2 prototype uses the default initial interface, and adds a second MacVLAN network to our pods.
K8s Deployments
Deployments define the desired state for one or more pods (e.g. container configurations). Deployments assist in scaling the number of running pods up and down. The prototype configuration defines a talker deployment and a listener deployment, and each can be scaled to create additional talker or listener pods.
Set up the MicroK8s node
A single MicroK8s installation command brings a full Kubernetes installation onto your host. After installing MicroK8s, add your user account to the microk8s group to run most Kubernetes without requiring sudo access.
sudo snap install microk8s --classic
sudo usermod -a -G microk8s $USER
sudo chown -f -R $USER ~/.kube
MicroK8s only installs the basic software needed to run on your host. However, in order to overcome challenges identified in part one of this series, enable the CoreDNS and Multus addon services with the following command:
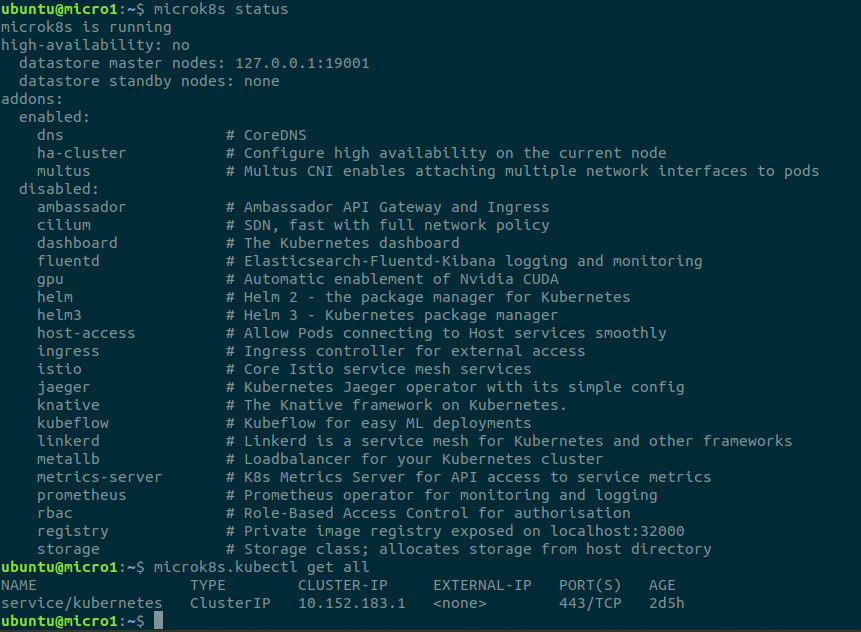
microk8s enable dns multusNext, verify that MicroK8s is started and healthy. An initial installation takes time to start as infrastructure service containers are downloaded and configured. The command microk8s status should show that MicroK8s is running, and the command microk8s.kubectl get all should show a single active kubernetes service.
Start the K8s ROS2 cluster
Download the ros-talker-listener-demo.yaml prototype from github:
wget https://raw.githubusercontent.com/canonical/robotics-blog-k8s/main/ros-talker-listener-demo.yamlModify this prototype to fit your network configuration. Use the ip route command on your K8s host to identify your primary network interface, network subnet and default gateway (eth0, 192.168.0.0/16 and 192.168.1.1 respectively as retrieved from the image below).

Open ros-demo.yaml in a text editor and update the NetworkAttachmentDefinition spec in lines 6 through 23 to match your environment:
- Make sure that the network interface listed in line 10,
"master": "eth0", matches the network interface identified above. - Update
"subnet": "192.168.0.0/16"to the network subnet identified above. - Set the
rangeStartandrangeEndIP addresses on lines 18 and 19 to the range of addresses reserved for your pods. - Change
"gateway": "192.168.1.1"in line 20 to the gateway identified above.
Save your changes.
Now start the single node ROS 2 cluster with the command
microk8s.kubectl apply -f ros-demo.yamlCluster configuration, explained
When you apply this configuration, the following happens:
- Multus defines a network attachment that uses MacVLAN to bridge pods to your host network interface. In addition to the default network interfaces, each container now also receives this MacVLAN interface with access to the host network.
- Kubernetes deploys two ros-talker pods running publisher.py. This script publishes a ROS 2 message on the
microk8s-chattertopic which includes the source container, process ID and message serial number. - Kubernetes deploys a single ros-listener pod running subscriber.py. This script logs each message received on the
microk8s-chattertopic.

Let’s take a more detailed look at the file. Kubernetes configuration files follow standard YAML syntax. This configuration has distinct sections (YAML documents) separated with three dashes.
NetworkAttachmentDefinition my-network
apiVersion: "k8s.cni.cncf.io/v1"
kind: NetworkAttachmentDefinition
metadata:
  name: my-network
The first section invokes Multus to define a network attachment object. This attachment is named my-network.
The specification for the object named my-network follows the definition:
spec:
  config: '{
    "cniVersion": "0.3.0",
    "name": "my-network",
    "type": "macvlan",
    "master": "eth0",
    "mode": "bridge",
    "isDefaultgateway": true,
The type field specifies this as a macvlan network connection. Additional fields follow the CNI plugins format from CNCF. See the MacVLAN documentation for additional options.
By using a MacVLAN adapter, the Pod receives a unique MAC address and IP address. The pod’s network interface is bridged to the host’s master network interface.
The MacVLAN configuration put all the pods directly on the host network; however, consider exploring different networking options of this does not fit your environment. Other CNI plugins such as calico, flannel and ipvlan are available, find them in the /var/snap/microk8s/current/opt/cni/bin directory.
The MacVLAN specification also requires an IP Address Management (IPAM) configuration section:
    "ipam": {
      "type": "host-local",
      "ranges": [
         [ {
           "subnet": "192.168.0.0/16",
           "rangeStart": "192.168.1.160",
           "rangeEnd": "192.168.1.180",
           "gateway": "192.168.1.1"
         } ]
These settings configure the pod network interfaces assigned the my-network network attachment. Each should use the same default gateway and subnet mask as your host’s network interface and other devices on your network. Here we also define the pool of IP addresses which will be assigned to pods.
Deployment ros-talker-deployment
The next section of the configuration file outlines the first Kubernetes deployment. Although we could create individual pods, when we create a deployment we let Kubernetes handle the details of where, when and how to start up the pod.
apiVersion: apps/v1
kind: Deployment
metadata:
  name: ros-talker-deployment
  labels:
    app: ros-talker
The first section contains the preamble used to create a deployment named ros-talker-deployment and assign it a metadata application label of ros-talker.
Kubernetes labels assign arbitrary key/value attributes to objects; in this case, to a deployment. Although labels do not change the object’s behaviour, they can be used as selectors for efficient access and manipulation of objects.
spec:
  replicas: 2
The specification for this deployment begins by calling for exactly two instances (replicas) of this deployment. The number of replicas (and many other deployment properties) can be modified while the pod is running.
  selector:
    matchLabels:
      app: ros-talker
  template:
    metadata:
      labels:
        app: ros-talker
The spec next includes a selector which associates this specification to the ros-talker deployment. Similarly the template is labeled as part of the ros-talker app.
      annotations:
        k8s.v1.cni.cncf.io/networks: my-network
A CNI annotation lets multus configure networking properly. The annotation key k8s.v1.cni.cncf.io/networks binds the network attachment my-network to any pods created with this deployment. The MacVLAN interface will now be added to the ros-talker pod.
    spec:
      containers:
      - name: talker
        image: ros:foxy
The pod spec lies within the deployment spec. This follows standard container definition syntax for kubernetes. This spec creates a container with the base name talker using the standard ros:foxy docker image.
        command: ["/bin/bash", "-c"]
        args: ["source /opt/ros/foxy/setup.bash && apt update && apt install -y curl && curl https://raw.githubusercontent.com/canonical/robotics-blog-k8s/main/publisher.py > publisher.py && /bin/python3 publisher.py talker"]
The final two lines of this section define the behavior for the ROS Foxy container after starting. The container runs a bash shell to spin up a ROS talker:
- First source the ROS setup file to set the proper environment
- Update
aptand installcurl - Use
curlto download thepublisher.pydemo python script from github. - Finally run the downloaded
publisher.pyscript
Typically much of this work would be included as a custom container image; however, for simplicity of this demo the install is done after launch. The container continues to run the publisher script until stopped. This script publishes a message on the microk8s-chatter ROS 2 topic with data to help identify the pod generating the messages. For more information about the publisher.py script, please see the source code.
Deployment ros-listener-deployment
The third section closely follows the talker deployment.
apiVersion: apps/v1
kind: Deployment
metadata:
  name: ros-listener-deployment
  labels:
    app: ros-listener
  annotations:
    k8s.v1.cni.cncf.io/networks: my-network
The only difference between the listener and the talker above is to change the names and labels.
spec:
  replicas: 1
This configuration starts only a single replica; additional listener pods can be created by scaling the number of replicas at any time.
  selector:
    matchLabels:
      app: ros-listener
  template:
    metadata:
      labels:
        app: ros-listener
      annotations:
        k8s.v1.cni.cncf.io/networks: my-network
The listener pod receives the same network configuration as the talker pod which allows both to communicate freely.
    spec:
      containers:
      - name: listener
        image: ros:foxy
        command: ["/bin/bash", "-c"]
        args: ["source /opt/ros/foxy/setup.bash && apt update && apt install -y curl && curl https://raw.githubusercontent.com/canonical/robotics-blog-k8s/main/subscriber.py > subscriber.py && /bin/python3 subscriber.py listener"]
The listener pod downloads and runs the subscriber.py python script. Similar to publisher.py, this script logs the receiving host’s name in addition to the message received.
Explore the Kubernetes cluster
Are you sure your nodes are running? The commands below help monitor the state of the MicroK8s cluster and diagnose any potential problems.
Check the status
It may take a few minutes to download and launch the ROS 2 container on your first startup as MicroK8s downloads the ROS Foxy image. Use the command microk8s.kubectl get all to check the status. This should return results similar to the following:
NAME                                          READY   STATUS              RESTARTS   AGE
pod/ros-talker-deployment-6c447f496c-7r5mq    0/1     ContainerCreating   0          41s
pod/ros-service-deployment-745cd86b67-lprgg   0/1     ContainerCreating   0          40s
pod/ros-talker-deployment-6c447f496c-8cx27    0/1     ContainerCreating   0          40s
pod/ros-listener-deployment-575bfddd-qsm77    0/1     ContainerCreating   0          40s

NAME                 TYPE        CLUSTER-IP     EXTERNAL-IP   PORT(S)   AGE
service/kubernetes   ClusterIP   10.152.183.1   <none>        443/TCP   9m24s

NAME                                      READY   UP-TO-DATE   AVAILABLE   AGE
deployment.apps/ros-talker-deployment     0/2     2            0           41s
deployment.apps/ros-listener-deployment   0/1     1            0           41s
deployment.apps/ros-service-deployment    0/1     1            0           41s

NAME                                                DESIRED   CURRENT   READY   AGE
replicaset.apps/ros-talker-deployment-6c447f496c    2         2         0       41s
replicaset.apps/ros-listener-deployment-575bfddd    1         1         0       41s
replicaset.apps/ros-service-deployment-745cd86b67   1         1         0       40s
Status changes to Running as the download completes and each container launches.
Monitor pod activity
Confirm that the ROS 2 listener is receiving messages with the following command:
microk8s.kubectl logs --follow -l app=ros-listenerThis uses the ros-listener label to find the listener container, and follows the logs generated by the listener. Output should be similar to the following:
...
[INFO] [1603896877.714659178] [minimal_subscriber]: listener:ros-listener-deployment-575bfddd-qsm77:1: "talker:ros-talker-deployment-6c447f496c-7r5mq:1: 347"
[INFO] [1603896877.874107325] [minimal_subscriber]: listener:ros-listener-deployment-575bfddd-qsm77:1: "talker:ros-talker-deployment-6c447f496c-8cx27:1: 342"
...
This shows the listener node receiving messages from two talkers. Host names from the logs matches container names from the get all command above.
Explore logs from each of the pods using the microk8s.kubectl logs command.
Run a command on a container
Sometimes it may be useful to run a command directly on a container within a pod. Use the following command to launch a bash shell on the talker container:
microk8s.kubectl exec pod/ros-talker-deployment-6c447f496c-7r5mq --stdin --tty -- /bin/bashFrom here you can interact with a familiar ROS 2 environment:
root@ros-talker-deployment-6c447f496c-7r5mq:/# source /opt/ros/foxy/setup.bash
root@ros-talker-deployment-6c447f496c-7r5mq:/# ros2 topic list
/microk8s-chatter
/parameter_events
/rosout
root@ros-talker-deployment-6c447f496c-7r5mq:/# ros2 topic info /microk8s
Type: std_msgs/msg/String
Publisher count: 2
Subscription count: 1
Start and stop pods
In order to bring up more talker or listener nodes, dynamically scale the deployment by adding replicas. Follow the listener logs, and open a second terminal session to increase the number of talkers to eight total pods:
microk8s.kubectl scale deployment ros-talker-deployment --replicas=8Each new pod receives its own IP address and joins the ROS graph by talking on the /microk8s topic. Watch as they begin sending messages to the listener pod. To reduce the number of talkers, simply issue the same command with the desired number of replicas. Microk8s will shut down containers and pods which are no longer needed.
Similarly, an individual pod can be deleted by name with the following command:
microk8s.kubectl delete pod/ros-service-deployment-745cd86b67-lprggIn conclusion
This configuration should get you started working on your single node Kubernetes cluster. Become familiar with your setup by running different commands, scaling deployments and running commands directly on pods.
In our next post we’ll take the next step to add two additional K8s nodes and distribute our ROS system across three different computers.
Ubuntu cloud
Ubuntu offers all the training, software infrastructure, tools, services and support you need for your public and private clouds.
Newsletter signup
Are you building a robot on top of Ubuntu and looking for a partner? Talk to us!

Related posts
How should a great K8s distro feel? Try the new Canonical Kubernetes, now in beta
Try the new Canonical Kubernetes beta, our new distribution that combines ZeroOps for small clusters and intelligent automation for larger production...
AMD Kria™ KR260 Robotics Starter Kit and Ubuntu: An exploration into future robotics development
The robotics field is constantly evolving, and with AMD and Canonical’s collaboration, the trajectory towards a more adaptable and efficient robotics...
ROS architectures with snaps
Choosing the right architecture can be hard, but we want to help. In this blog, we’ll look at different architectures and their pros and cons. We’ll also show...