
Raspberry Pi HAT tutorials part 2 – Blinkenlights and micro-Pong!

Oliver Smith
on 14 July 2022
Tags: Raspberry Pi
Welcome to part 2 of our Raspberry Pi HAT tutorial series written by our resident Pi developers, Dave ‘waveform’ Jones and William ‘jawn-smith’ Wilson. You can read part 1 here.
In this post, they teach us how to build a handheld micro-Pong device with the Unicorn HAT Mini and follow it up with a system monitor on the Unicorn HAT HD.
Check out part 1, where William got us started with the Unicorn pHAT and Dave shared his piwheels project dashboard!
This is a guest post from William’s own blog, which he’s kindly allowed us to share here. Check out his site for more great Pi tutorials as well as some equally colorful 3D printing projects.
That’s enough from me, over to William and Dave.
As of Ubuntu 22.04, the Raspberry Pi Pimoroni Unicorn HATs are supported on Ubuntu out of the box. This includes the standard Unicorn Hat, Unicorn pHAT, Unicorn HAT Mini, and Unicorn HAT HD.
To install the libraries for each HAT, run the following commands:
sudo apt install python3-unicornhat
sudo apt install python3-unicornhathd
sudo apt install python3-unicornhatmini
Below are some examples of how to use them!
Tutorial: Micro-Pong on the Unicorn HAT Mini
Section written by William Wilson
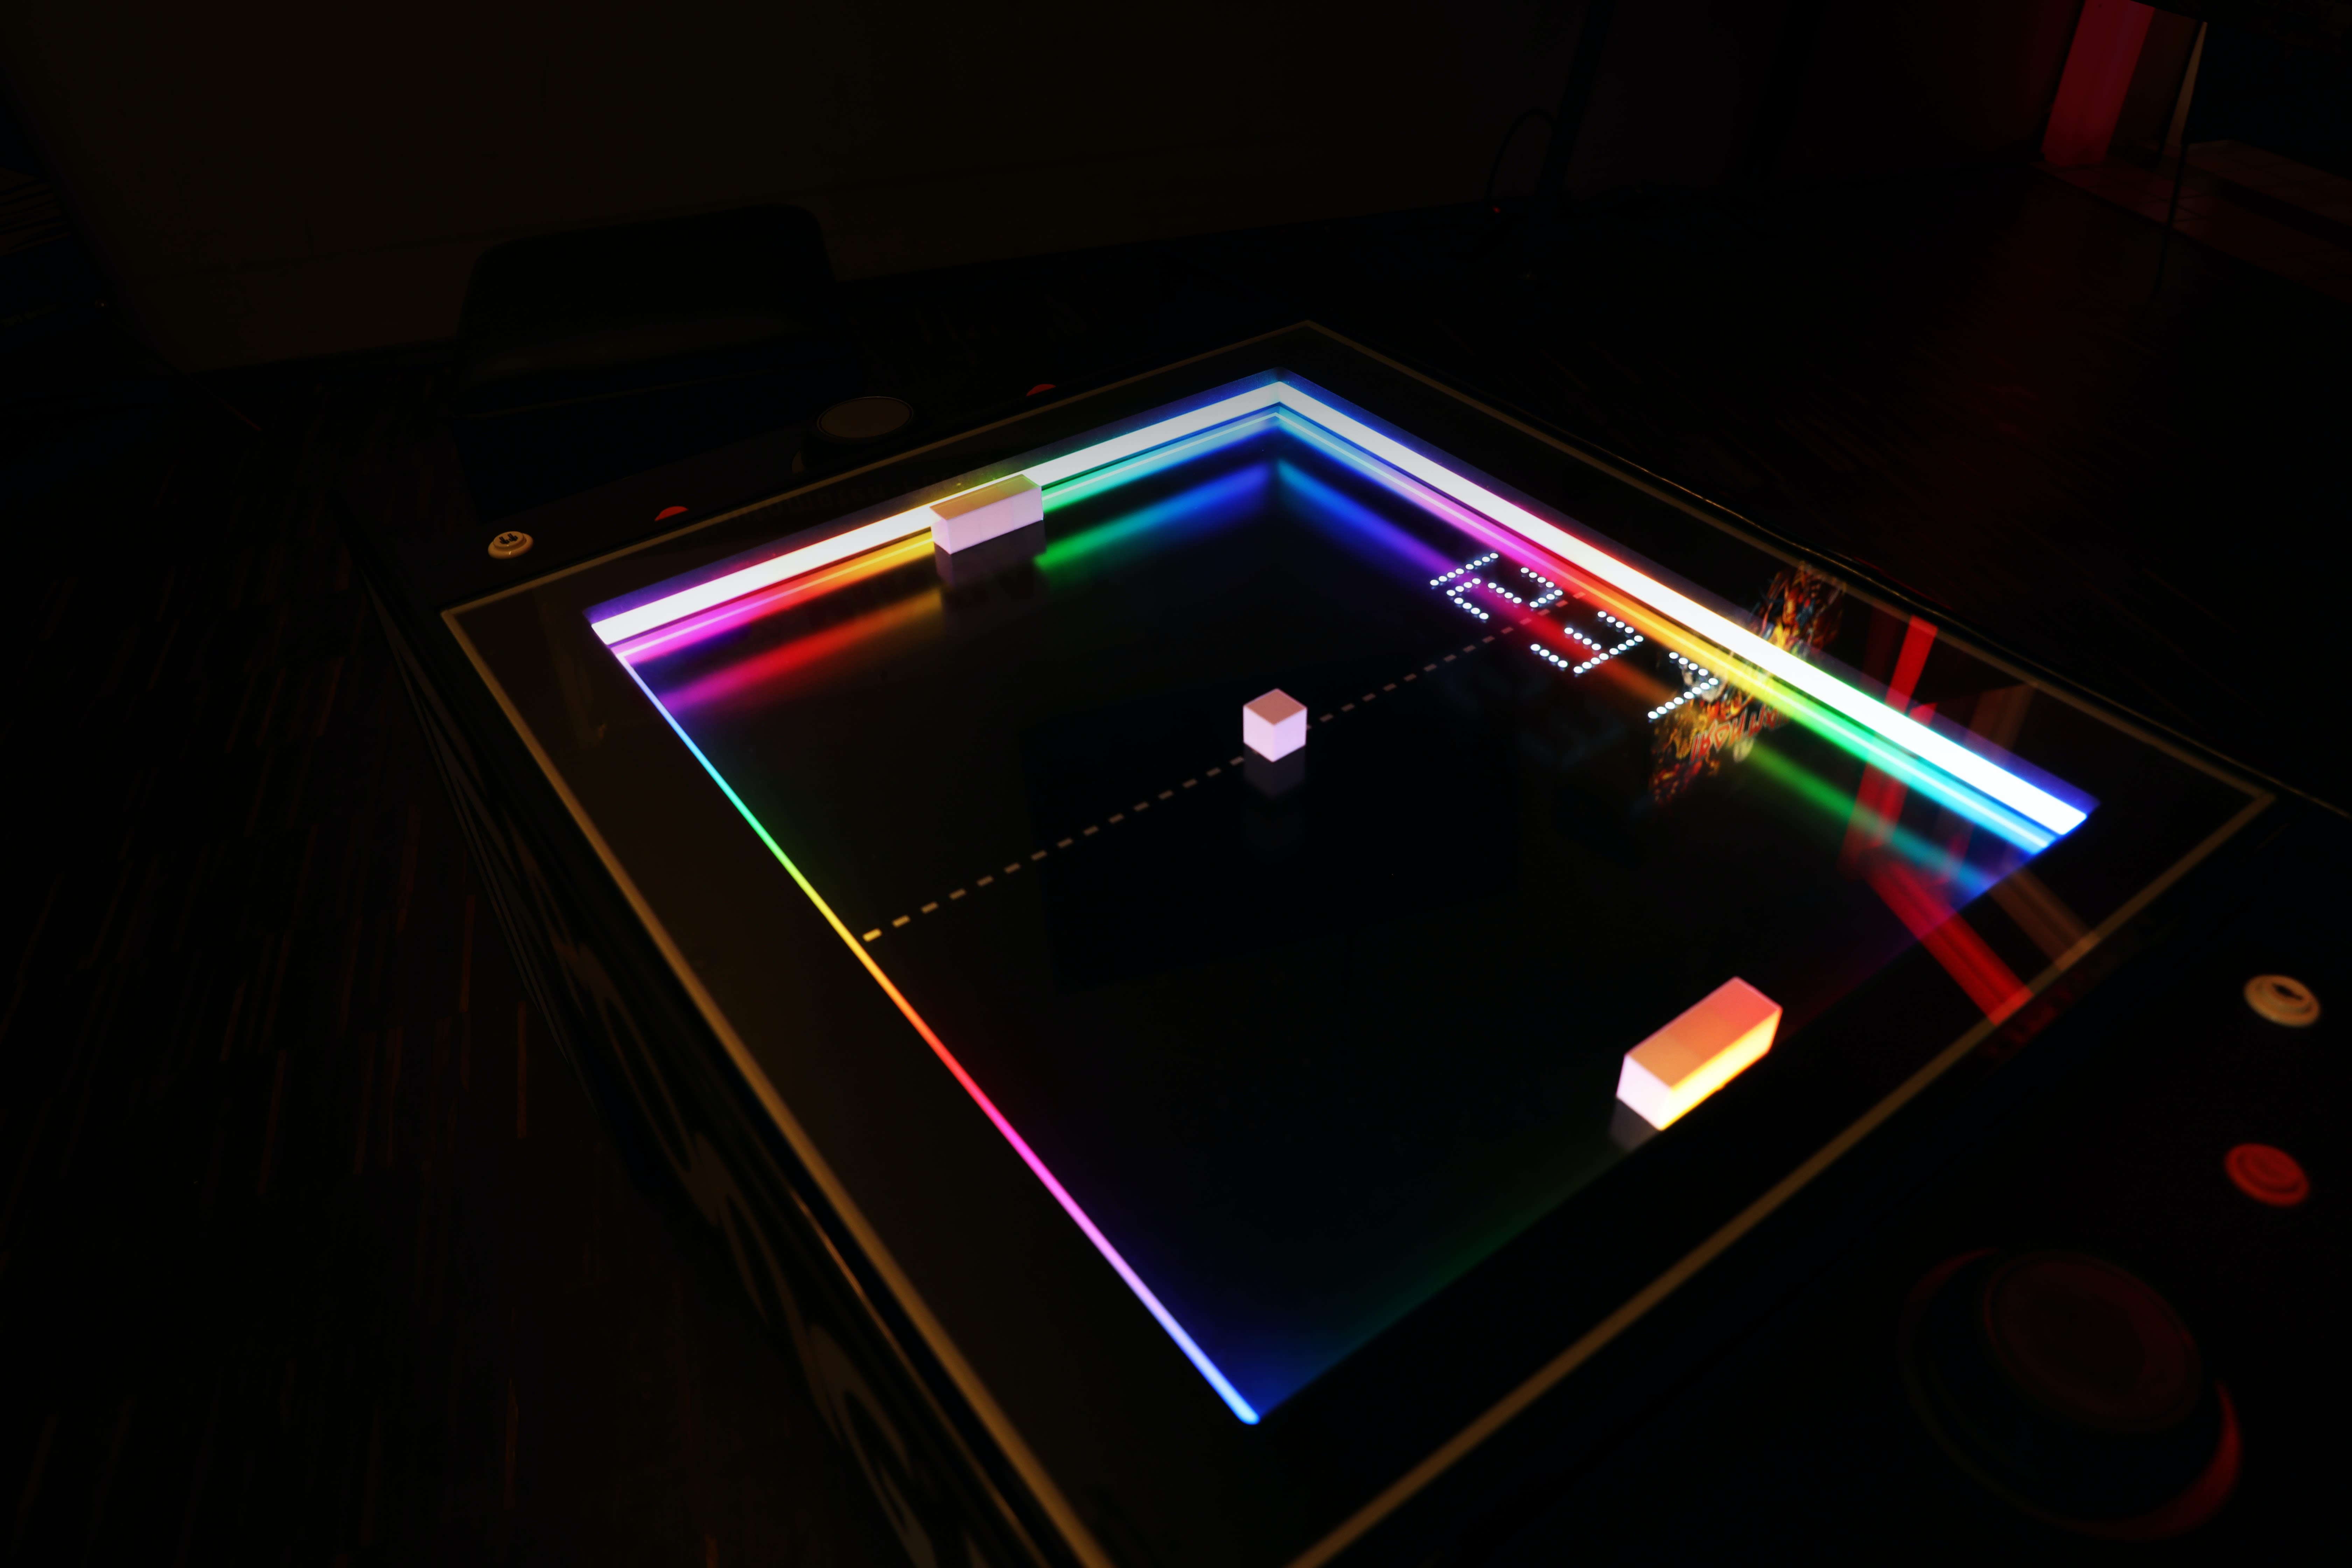
While small, the Unicorn HAT Mini has more pixels than the pHAT so it can display much more. It also has four buttons, making things like simple games possible. This example is a very simple game of Pong that I’ve created. Every time the ball hits a paddle, the color of the ball changes and the game speeds up a little.
import time
import math
import random
import colorsys

from gpiozero import Button
from unicornhatmini import UnicornHATMini

unicornhatmini = UnicornHATMini()
unicornhatmini.set_brightness(0.5)
width, height = unicornhatmini.get_shape()

class Pong():
    def __init__(self):
        # start the paddles roughly halfway vertically
        self.l_paddle_y = 3
        self.r_paddle_y = 3
        self.delay = 0.3
        self.ball_x = 1
        self.ball_y = 1
        self.ball_horiz = 1
        self.ball_vert = 1
        self.game_on = True
        self.paddle_height = 3
        self.colors = (
            (255, 0, 0),
            (0, 255, 0),
            (0, 0, 255),
            (255, 255, 0),
            (255, 0, 255),
            (0, 255, 255),
            (255, 255, 255)
        )
        self.color = random.choice(self.colors)

    def l_paddle_down(self):
        if self.l_paddle_y < height - self.paddle_height:
            self.l_paddle_y += 1

    def l_paddle_up(self):
        if self.l_paddle_y > 0:
            self.l_paddle_y -= 1

    def r_paddle_down(self):
        if self.r_paddle_y < height - self.paddle_height:
            self.r_paddle_y += 1

    def r_paddle_up(self):
        if self.r_paddle_y > 0:
            self.r_paddle_y -= 1

    def update(self):
        # check if the game is over
        if self.ball_x in (0, width - 1):
            self.game_on = False
            return

        # clear the board state
        unicornhatmini.clear()

        # set the position of the paddles
        for i in range(3):
            unicornhatmini.set_pixel(0,
                    self.l_paddle_y + i,
                    255, 255, 255)
            unicornhatmini.set_pixel(width - 1,
                    self.r_paddle_y + i,
                    255, 255, 255)

        # calculate the next position of the ball
        ball_x_next = self.ball_x + self.ball_horiz
        ball_y_next = self.ball_y + self.ball_vert

        # check if the ball needs to bounce off of a paddle
        if (
                (ball_x_next == 0 and ball_y_next in
                    (self.l_paddle_y + i for i in range(3))) or
                (ball_x_next == width - 1 and ball_y_next in
                    (self.r_paddle_y + i for i in range(3)))
            ):
            # the paddle has hit the ball, so change direction
            self.ball_horiz = -self.ball_horiz
            # recalculate ball_x_next
            ball_x_next = self.ball_x + self.ball_horiz

            # since the ball hit a paddle
            # reduce the delay to speed up the game
            self.delay -= 0.01

            # change the color of the ball every time
            # the ball hits a paddle
            self.color = random.choice(self.colors)

        # check if the ball needs to bounce off of an edge
        if (
                (self.ball_y == 6 and self.ball_vert == 1) or
                (self.ball_y == 0 and self.ball_vert == -1)
            ):
            self.ball_vert = -self.ball_vert
            ball_y_next = self.ball_y + self.ball_vert

        self.ball_x = ball_x_next
        self.ball_y = ball_y_next
        unicornhatmini.set_pixel(self.ball_x,
                self.ball_y,
                *self.color)

        # show the game state
        unicornhatmini.show()

pong_game = Pong()

button_a = Button(5)   # left paddle up
button_b = Button(6)   # left paddle down
button_x = Button(16)  # right paddle up
button_y = Button(24)  # right paddle down

button_a.when_pressed = pong_game.l_paddle_up
button_b.when_pressed = pong_game.l_paddle_down
button_x.when_pressed = pong_game.r_paddle_up
button_y.when_pressed = pong_game.r_paddle_down

while pong_game.game_on:
    pong_game.update()
    time.sleep(pong_game.delay)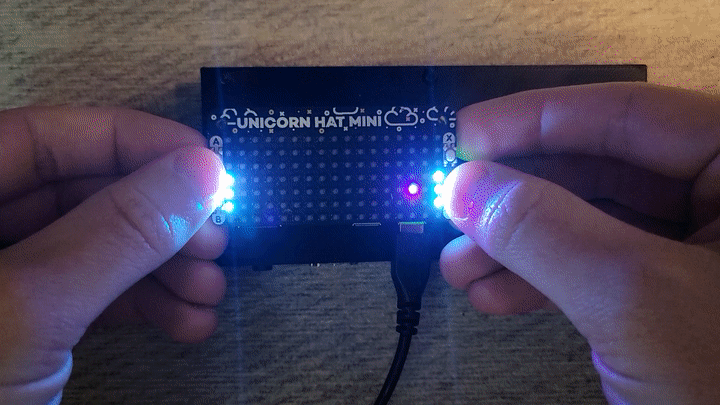
Pimoroni has many more examples on their GitHub repo!
Tutorial: Unicorn HAT HD system monitor
Section written by Dave Jones
Moar Pixels!
The Unicorn HAT HD has an outrageous number of neopixels, just waiting to spew rainbows at unsuspecting eyeballs. So much so, it seems a shame to waste them all on something as mundane as a two-tone monitoring service. Let’s try for something more … colorful!
Old computers had huge arrays of lights, now often referred to (slightly tongue in cheek) as blinkenlights. These often visualized actual machine registers, bus addresses and the like. These days, memory is too large and too fast to make this useful. However, it’s fairly typical (on an Ubuntu for Raspberry Pi desktop image running a few things like a browser, terminal, etc.) to have a number of userland processes that would fit quite nicely within the 256 neopixels on the Unicorn HAT HD.
Let’s build a modern blinkenlights variation that visualises the process table. We’ll use red to represent CPU usage, green to represent memory usage, and blue to represent the inverted age of a process (so brand new processes will show up bright blue, then fade as they age).
We can use ps to query the process table. We’ll exclude PID 2, which on Linux represents the kernel, and any process under PID 2 (the kernel’s various “threads” which are largely static and thus not very visually interesting). We’ll ask ps for cp (per-mill CPU usage), rss (resident set size, a measure of the amount of actual RAM a process is using), and etimes (age of the process in seconds). Finally, we’ll turn off the headers because we don’t need them:
$ ps --pid 2 --ppid 2 --deselect -o cp,rss,etimes --no-headers
  1 10760   91980
  0 35128   91975
  0 23432   91975
  0  2916   91975
  0  3332   91971
  3  3364   91971
  0  7368   91970
  0  3868   91970
  0  3428   91969
  ....
This looks reasonable, so let’s get coding. First, some imports:
#!/usr/bin/python3

import shlex
import subprocess as sp
from time import sleep
from threading import Thread, Event
from itertools import zip_longest

import unicornhathd
Next, our main monitor function:
def monitor():
    unicornhathd.rotation(0)
    unicornhathd.brightness(1.0)
    width, height = unicornhathd.get_shape()

    processes = {
        # coord  CPU   mem   age
        (x, y): (None, None, None)
        for y in range(height)
        for x in range(width)
    }
    limits = {'max-cpu': 0, 'max-mem': 0}
    updates = UpdateThread(processes, limits)
    updates.start()
    try:
        while True:
            if limits['max-cpu']:
                for (x, y), (cpu, mem, age) in processes.items():
                    if cpu is not None:
                        r = min(255, int(255 * cpu / limits['max-cpu']))
                        g = min(255, int(255 * mem / limits['max-mem']))
                        b = max(0, min(255, int(255 * (10 - age) / 10)))
                        unicornhathd.set_pixel(y, x, r, g, b)
                    else:
                        unicornhathd.set_pixel(y, x, 0, 0, 0)
            unicornhathd.show()
            sleep(1/30)
    finally:
        unicornhathd.off()
        updates.stop()
        updates.join()
This is fairly simple but let’s go through it piece by piece. We start off by initializing:
- The Unicorn HAT HD itself, with the unicornhathd module. We also grab its shape (which should always be 16×16).
- processes – a dictionary mapping coordinates on the display to a three-tuple representing CPU usage, RAM usage, and process age. These will be None by default (for any pixel not currently representing a process).
- limits – a simple dictionary acting as a way to pass a couple of other values (the current maximum CPU and memory usage) between the update thread and the main thread.
- updates – an instance of UpdateThread (which we’ll define a bit later on), which we start before entering the main loop.
The main loop simply checks that we have a valid max-cpu value then updates the display from the values in the processes dictionary with some simple maths. All the values are scaled to the maximum CPU and memory usage so we get a nice distribution of color.
Now the UpdateThread itself:
class UpdateThread(Thread):
    def __init__(self, processes, limits):
        super().__init__(target=self.update, args=(processes, limits),
                         daemon=True)
        self._done = Event()

    def stop(self):
        self._done.set()

    def update(self, processes, limits):
        cmdline = shlex.split(
            'ps --pid 2 --ppid 2 --deselect -o cp,rss,etimes --no-headers')
        while not self._done.wait(1/30):
            proc = sp.run(cmdline, capture_output=True, text=True)
            output = proc.stdout.splitlines()
            max_cpu = max_mem = 0
            for coord, line in zip_longest(processes, output):
                if not coord:
                    break
                elif line:
                    cpu, mem, age = (int(i) for i in line.split())
                    max_cpu = max(cpu, max_cpu)
                    max_mem = max(mem, max_mem)
                    processes[coord] = (cpu, mem, age)
                else:
                    processes[coord] = (None, None, None)
            limits['max-cpu'] = max_cpu
            limits['max-mem'] = max_mem
This is also fairly simple; the update method just calls ps and loops over the lines of output, sticking values into the processes dictionary and updating the limits dictionary with the biggest CPU and memory values found at the end.
Hang on a minute … how is this safe? Surely both the “main” thread, and our background update thread are going to be bashing away at these structures simultaneously?! In most languages this would indeed be a no-no. In Python it’s safe, provided that the dictionary doesn’t grow or shrink while we’re iterating over it.
Note: The limitation on not inserting into / deleting from dictionaries while iterating over them is the primary reason for the structure of both these demo scripts. The fixed size of the dictionaries in both cases avoids the need for any explicit locking, keeping the scripts both simple and reasonably efficient.
For those curious about what goes on under the covers, there is still some locking going on: the Python GIL is ensuring that both threads leave the structures in a consistent state between Python statements (actually between bytecodes, but let’s not split hairs!).
It’s also worth noting that, as there’s no locking, we can’t guarantee that the limits are actually accurate when the main display thread is iterating over the processes dictionary. This is why we’re using min and max to clamp the calculation results in the main thread.
Finally, we just need to kick things off:
if __name__ == '__main__':
    monitor()
And we’re done! Run the full script (you don’t need sudo for this one as the Unicorn HAT HD has a very different control mechanism) and bask in the glow of das blinkenlights!
Try stopping and starting your web browser while it’s running and see just how many processes a modern browser encapsulates.
You may be surprised to see processes appearing and disappearing constantly at the “end” of the table. This is actually quite normal for a modern system. You may also,see that the end of the table has one persistently red (CPU load) and one persistently blue (“new”) process, when your system is idle. Have a think about which processes these might be! In particular, why is one process always “new” …
Press Ctrl+C to exit the script.
If you wish to run the script automatically on boot, place this service definition in /etc/systemd/system/das-blinkenlights.service (this assumes you’ve saved the script as /usr/local/bin/blinkenlights.py):
[Unit]
Description=Unicorn HAT HD based process table monitor
After=local-fs.target

[Service]
Type=simple
User=ubuntu
Restart=on-failure
ExecStart=/usr/bin/python3 /usr/local/bin/blinkenlights.py

[Install]
WantedBy=multi-user.target
Then run the following and you should find that the monitor will start automatically on the next reboot:
$ sudo systemctl daemon-reload
$ sudo systemctl enable das-blinkenlights
Now, you can keep track of your system performance without digging around on your device.
And that’s all for this series! A big thanks to William and Dave for allowing us to reproduce their tutorials.
If these ideas have sparked the imagination, don’t forget you can share your HAT projects in the Raspberry Pi category on the Ubuntu Discourse!
For tips on getting started with the Raspberry Pi as well as further project ideas, check out some of the links below.
Tutorials
- Install Ubuntu Desktop on the Raspberry Pi 4 (2GB and above)
- How to install Ubuntu Server on your Raspberry Pi
- How to install Ubuntu Core on your Raspberry Pi
Projects
Ubuntu Desktop for Raspberry Pi
Watch the live event of the 20.10 launch the and find out all the news about the new Ubuntu Desktop image for Raspberry Pi.
Newsletter signup
Related posts
End of year review: Ubuntu Desktop in 2023
As 2023 draws to a close, it’s time to look back on the evolution of Ubuntu Desktop over the last twelve months.
Canonical releases Ubuntu 23.10 Mantic Minotaur
Fortified security, enhanced desktop app discovery and new hardware support lead the latest release of Ubuntu 23.10 Mantic Minotaur.
Linux for schools: why use Ubuntu for education
How Ubuntu Desktop combines hardware support, administrative and productivity tools to empower students and keep control in the hands of educators.