
Turning your Raspberry Pi 4 into an edge gateway – Part 2

Galem KAYO
on 16 March 2020
In the first part of this tutorial, we installed and configured EdgeX foundry on a Raspberry Pi 4, turning it into an edge gateway. In this tutorial, the gateway will be connected to dummy IoT devices. These dummy devices will be virtually simulated by software. They will send messages transmitting random measurements to an MQTT broker hosted in the cloud. These messages will be forwarded to MQTT clients that subscribes to receive them.
Connecting the Southbound
The IoT data flow from devices to the edge gateway is referred to as the Southbound. In EdgeX, communication between IoT devices and gateways is assured by device services. A device service is a microservice that implements an interface to an IoT communication protocol (Modbus, OPC-UA, REST, BLT, Zigbee, MQTT, BACNet, SNMP etc…).
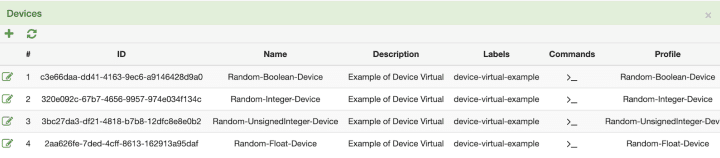
The Virtual Device Service is convenient for configuring and testing your Raspberry Pi 4 gateway. It allows you to carry out tests without any real IoT device. This way, microservices running on the gateway can be configured and troubleshooted without any IoT device connected. The Virtual Device Service also simulates dummy IoT devices that generate and transmit random numbers of different types: integer, unsigned integer, boolean and float.

The Virtual Device Service can be enabled very easily with the following command:
sudo snap set edgexfoundry device-virtual=on
Upon enablement, the service and the virtual devices it simulates become visible in the edgeX web UI.
Creating an MQTT server in the cloud
Edge gateways are the juncture between devices and servers. We will now configure the receiving end in the cloud: a server hosting a custom MQTT broker. The MQTT broker will receive the messages sent from the virtual devices. The messages will then be dispatched to subscribing client devices.

The MQTT broker is installed on a Ubuntu 18.04 (bionic) server instance running AWS cloud. MQTT is quite easily installed on the Ubuntu cloud instance in a snap, as follows:
sudo snap install mosquitto
The status of the broker can then be inquired:
sudo systemctl status snap.mosquitto.mosquitto.service
Connecting the Northbound
With the MQTT server hosted in the cloud, a Northbound connection needs to be established between the Raspberry Pi 4 gateway and the server. An EdgeX Export Service is a microservice that moves data collected by device services to a server in the cloud. An Export Service can be created as follows:
sudo snap set edgexfoundry export-client=on
sudo snap set edgexfoundry export-distro=on
Upon activation, data transfer to the MQTT server can be configured. Parameters like the server IP address, port, communication protocol, data format, topic and encryption are to be specified as described in the screenshot below.

Once saved, the Export Service will connect to the MQTT broker and create a topic. The Export Service will publish data collected from virtual devices through this topic.
Consuming the virtual IoT data flow
At this point, you have a Raspberry Pi 4 gateway listening to virtual IoT devices, and forwarding the data collected from devices to an MQTT server hosted on a public cloud.
Now, any MQTT client running on any device can consume the IoT data flow originating from virtual devices. Clients only need to subscribe to the associated topic via our MQTT broker.
To read this data flow, we will install an MQTT client on a Ubuntu desktop, and subscribe to the topic created above via the Export Service. It should be noted that this data flow can be accessed via any MQTT client software installed on any desktop device.
sudo snap install mosquitto
mosquitto_sub -h <your_ip_adress_here> -t <topic_name_here>
The virtual IoT data flow can be read in the terminal. The stream corresponds to the data created by the Virtual Devices, in the format specified by our Export Service.

Resources
- EdgeX Foundry documentation
- Mosquitto documentation
- Mosquitto snap store
- Install instructions for Ubuntu on the Raspberry Pi 4
Next steps
In the third part of this tutorial, the gateway will be connected to a physical IoT device. We will also test the device management capabilities of EdgeX Foundry.
Internet of Things
From home control to drones, robots and industrial systems, Ubuntu Core and Snaps provide robust security, app stores and reliable updates for all your IoT devices.
Newsletter signup
Related posts
Canonical at Dell Technologies World 2024
Canonical, the company behind Ubuntu and the trusted source for open source software, is thrilled to announce its sponsorship of Dell Technologies World again...
Ubuntu Pro for EKS is now generally available
May 14, 2024 – Canonical, the publisher of Ubuntu, is delighted to announce the general availability of Ubuntu Pro for Amazon Elastic Kubernetes Service...
Deploy an on-premise data hub with Canonical MAAS, Spark, Kubernetes and Ceph
Download the Spark reference architecture guide In this post we’ll explore deploying a fully operational, on-premise data hub using Canonical’s data centre...